
Introduction
Thank you for choosing the Wengart LR316 Digital Programmable Timer Switch. This device is designed for precise automatic control of electrical equipment and control circuits, helping you manage power consumption efficiently. This manual provides detailed instructions for safe installation, operation, and programming of your timer switch.
Please read this manual thoroughly before installation and operation to ensure correct usage and to prevent potential hazards or damage.
Safety Information
- Electrical Hazard: Installation and wiring must be performed by a qualified electrician in accordance with local electrical codes.
- Power Disconnection: Always disconnect power to the circuit before installing or servicing the timer switch.
- Voltage Compatibility: Ensure the supply voltage (220-240V AC) matches the device's requirements.
- Load Capacity: Do not exceed the maximum relay switching capacity of 25A 250VAC.
- Dry Contact: The output terminals (Switch) are dry contacts and do not supply voltage automatically. Incorrect wiring can damage connected equipment.
- Indoor Use Only: This device is intended for indoor use in dry environments.
Product Overview
The Wengart LR316 is a digital programmable timer switch featuring a dry contact output, suitable for controlling various electrical systems without introducing parasitic voltage. It offers precise, second-level programming for up to 28 ON/OFF cycles daily or weekly.

Figure 1: Front view of the Wengart LR316 Digital Time Switch, showing the LCD display and control buttons.
Key Features:
- Dry Contact Output: Isolated output relay (Switch) from the power supply circuit, preventing 230V from damaging sensitive equipment like boiler thermostats.
- Second-Level Programming: Configure up to 28 ON/OFF programs per day or week with second-level precision for short cycles.
- Reinforced 25A Relay: Supports loads up to 25A at 250VAC, preventing contact sticking due to inrush currents.
- Lithium Battery Backup: An internal CR2450 lithium battery retains programming for up to 3 years during power outages.
- Compact DIN Rail Mounting: Designed for direct clip-on installation onto a 35mm DIN rail (dimensions: 98x55x43mm).

Figure 2: Visual representation of key product features including time accuracy, chip control, internal battery, non-volatile memory, programmability, and stable operation.
Specifications
| Parameter | Value |
|---|---|
| Model | LR316 |
| Supply Voltage | 220-240V AC 50-60Hz |
| Output Type | Dry Contact (Potential-free relay) |
| Relay Switching Capacity | 25A 250VAC |
| Programming Range | 1 second to 168 hours (28 ON/OFF programs per day/week) |
| Power Reserve | 3 years (Integrated CR2450 lithium battery) |
| Self-Consumption | <2W |
| Mounting | 35mm DIN Rail |
| Dimensions (L x W x H) | 98 x 55 x 43 mm (3.86 x 2.17 x 1.69 inches) |
| Material | Plastic |
| Weight | 149 Grams |
| Certification | CE Compliant |

Figure 3: Detailed dimensions of the Wengart LR316 Digital Time Switch for installation planning.
Setup and Installation
1. Mounting
The Wengart LR316 is designed for 35mm DIN rail mounting. Simply clip the device onto the DIN rail in your electrical panel or automation cabinet.

Figure 4: Side view showing the DIN rail mounting mechanism of the Wengart LR316.
2. Wiring Diagram (Dry Contact)
Important: The "IN Power" terminals are for supplying 220-240V AC power to the timer itself. The "Switch" (output) terminals function as a simple mechanical open/closed switch and do NOT automatically supply any voltage. Incorrect wiring can damage your equipment.
- Power Input: Connect the 220-240V AC supply to the "IN Power" terminals.
- Output (Dry Contact):
- For 230V Appliances: If controlling a 230V appliance, you must bridge the Phase (L) from your power supply to one of the "Switch" terminals. The other "Switch" terminal then connects to your appliance's Phase input. The Neutral (N) connects directly to the appliance.
- For Gas Boilers/Thermostats: If controlling a gas boiler or thermostat that requires a simple contact closure, connect the two thermostat wires directly to the "Switch" terminals.

Figure 5: Wiring diagram illustrating connections for power input and dry contact output to control a light bulb. Note the bridging of the live wire for 230V loads.
Operating Instructions
The LR316 features an intuitive interface for setting time and programming schedules.
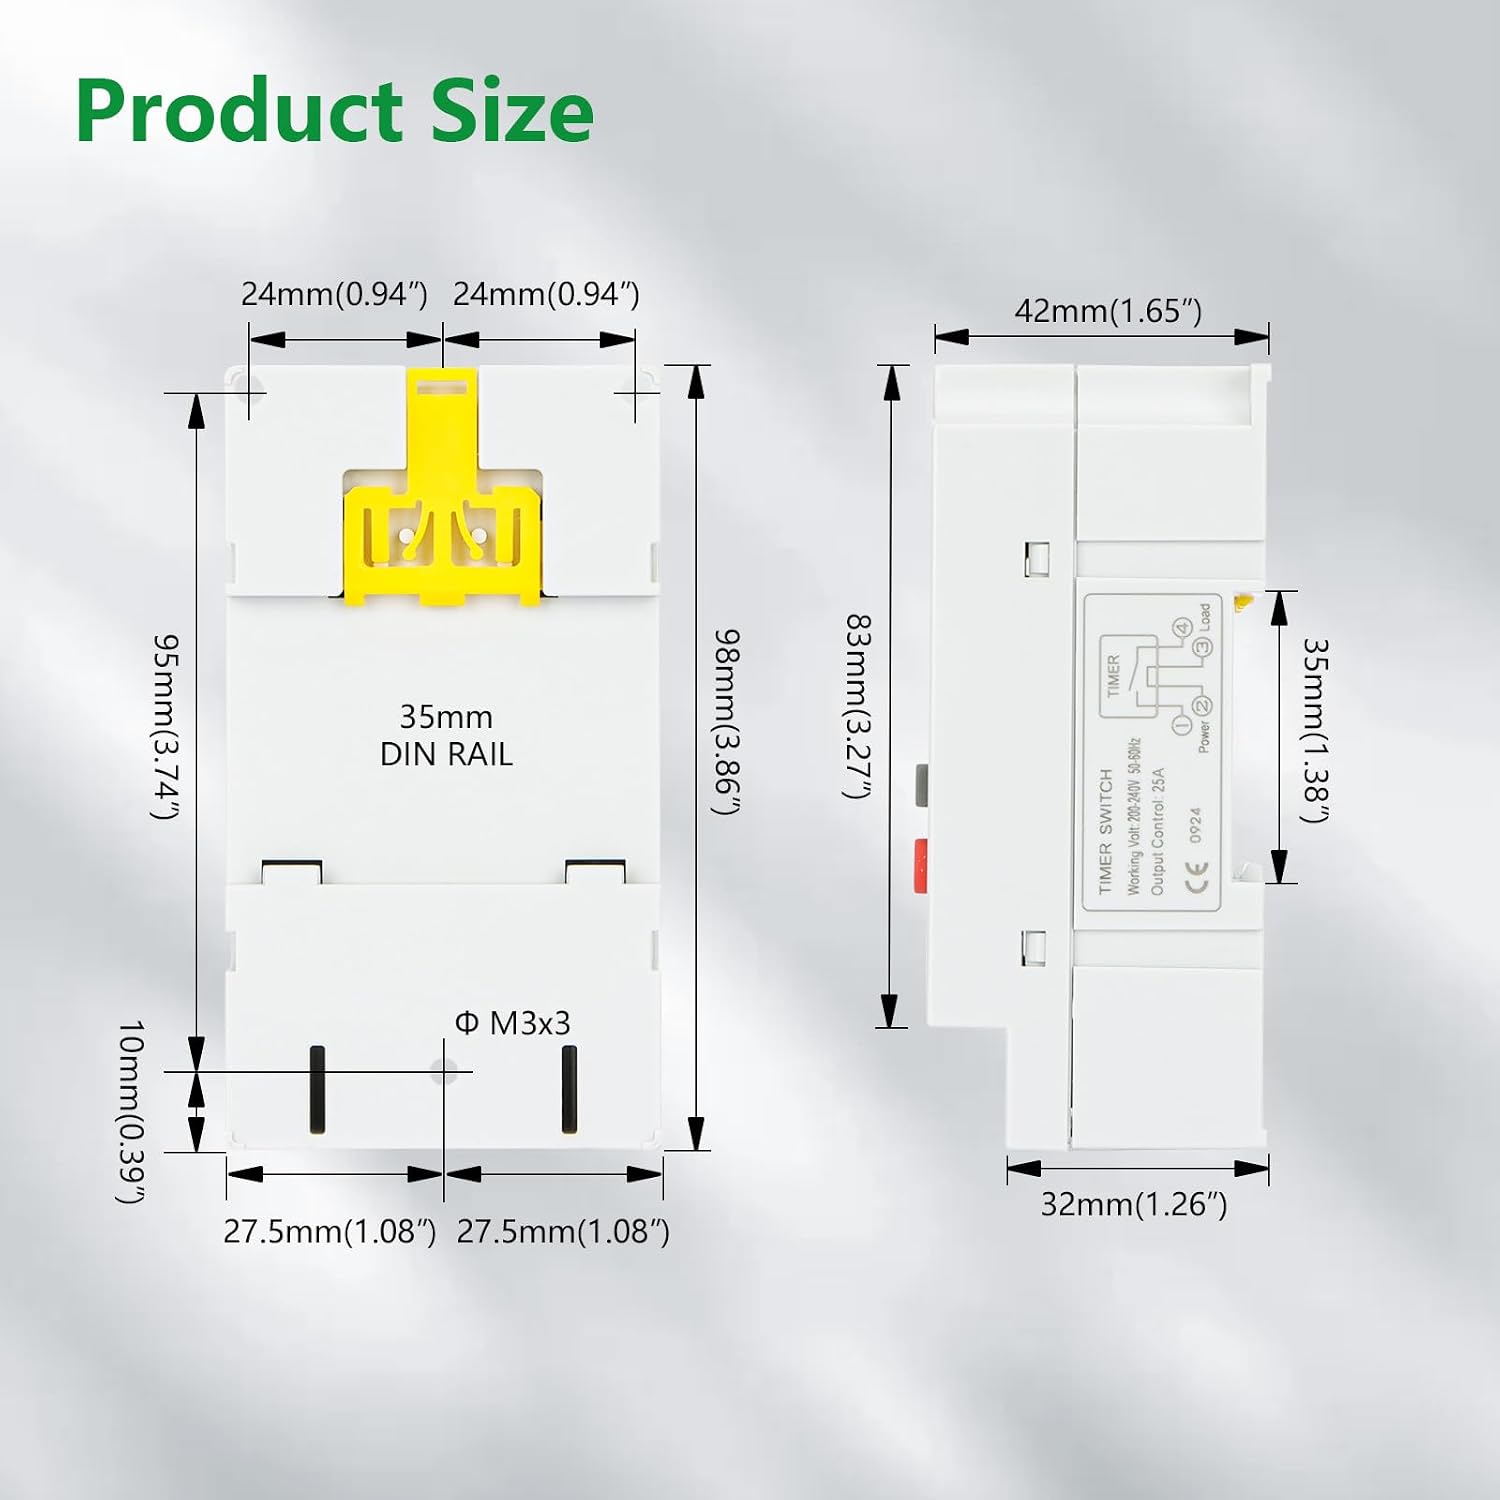
Figure 6: Overview of the LR316 interface, highlighting the LCD display, control buttons (Week, Hour, Minute, Second, Clock, Timer, C/R, Manual), and pilot lamp.
1. Setting the Current Time
- Press and hold the "Clock" button.
- While holding "Clock", press "Week" to set the current day of the week.
- While holding "Clock", press "H" to set the current hour.
- While holding "Clock", press "M" to set the current minute.
- While holding "Clock", press "S" to set the current second.
- Release the "Clock" button to save the time.
2. Programming ON/OFF Cycles
The timer supports up to 28 ON/OFF programs. Each program consists of an ON time and an OFF time.
- Press the "Timer" button once. The display will show "01 ON" (for the first ON program).
- Press "Week", "H", "M", "S" to set the desired turn ON time for this program.
- Press the "Timer" button again. The display will show "01 OFF" (for the first OFF program).
- Press "Week", "H", "M", "S" to set the desired turn OFF time for this program.
- Repeat steps 1-4 for additional programs (up to 28).
- After setting all desired programs, press the "Clock" button to exit programming mode and save settings.

Figure 7: Visual guide for setting the current time and programming ON/OFF cycles on the LR316.
3. Manual Control
The "Manual" button allows you to override the programmed schedule temporarily. Pressing it cycles through different modes:
- ON: Output is continuously ON, ignoring programs.
- OFF: Output is continuously OFF, ignoring programs.
- AUTO: The timer operates according to the programmed schedule.
4. Lock/Unlock Keypad
To prevent accidental changes, the keypad automatically locks. If a lock symbol appears on the screen, press the "Clock" button 4 consecutive times to unlock the keypad. The lock symbol will disappear, allowing you to make adjustments.
Maintenance
1. Battery Replacement
The internal CR2450 lithium battery provides power reserve for programming. If the display becomes dim or programming is lost frequently during power outages, the battery may need replacement. This should be performed by a qualified technician.
2. Cleaning
Wipe the device with a soft, dry cloth. Do not use abrasive cleaners or solvents, as they may damage the casing or display.
Troubleshooting
- Q: The timer is not turning ON/OFF as programmed.
- A: Check if the current time is set correctly.
- A: Ensure the timer is in "AUTO" mode (not "ON" or "OFF" manual override).
- A: Verify that the ON/OFF programs are set correctly and enabled for the desired days.
- A: Check the wiring connections, especially the dry contact output.
- Q: The display is blank or dim.
- A: Check if the main power supply to the "IN Power" terminals is connected and active.
- A: The internal battery might be low. While the timer can operate without a functional internal battery when main power is present, a very low battery might affect display clarity.
- Q: The keypad is unresponsive or a lock symbol is displayed.
- A: The keypad is locked. Press the "Clock" button 4 times consecutively to unlock it.
- Q: Programming is lost after a power outage.
- A: The internal CR2450 lithium battery might be depleted. Replace the battery to maintain program memory during power interruptions.
Warranty and Support
Wengart products are manufactured to high-quality standards. For warranty information, please refer to the terms and conditions provided at the point of purchase or contact your retailer.
For technical support or inquiries, please visit the Wengart brand store on Amazon or contact customer service through the platform where you purchased the product. Please have your model number (LR316) and purchase details ready.
WENGART Brand Store: Visit WENGART Store