
Introduction
This manual provides detailed instructions for the assembly, operation, and maintenance of your Feonase Full Size White Metal Bed Frame. Please read all instructions carefully before beginning assembly and retain this manual for future reference.
Safety Information
Observe the following safety precautions to prevent injury or damage to the product:
- Be cautious of sharp edges during unpacking and assembly.
- Exercise care when using tools to avoid personal injury.
- Do not exceed the maximum weight limit of 1000 pounds for this bed frame.
- Be aware of the bed frame's legs, especially in low light, to prevent stubbing toes. The fluorescent strips are designed to assist with visibility.
- Ensure all bolts and screws are securely tightened before use. Periodically check and re-tighten as necessary.
- Keep small parts away from children during assembly to prevent choking hazards.
Package Contents
Verify that all components are present before beginning assembly:
- Hardened Steel Bed Frame x 1
- Metal Art Headboard x 1
- Installation Manual x 1
- Installation Tools & Accessories (wrenches, screws, bolts, etc.)
Specifications
| Size | Full |
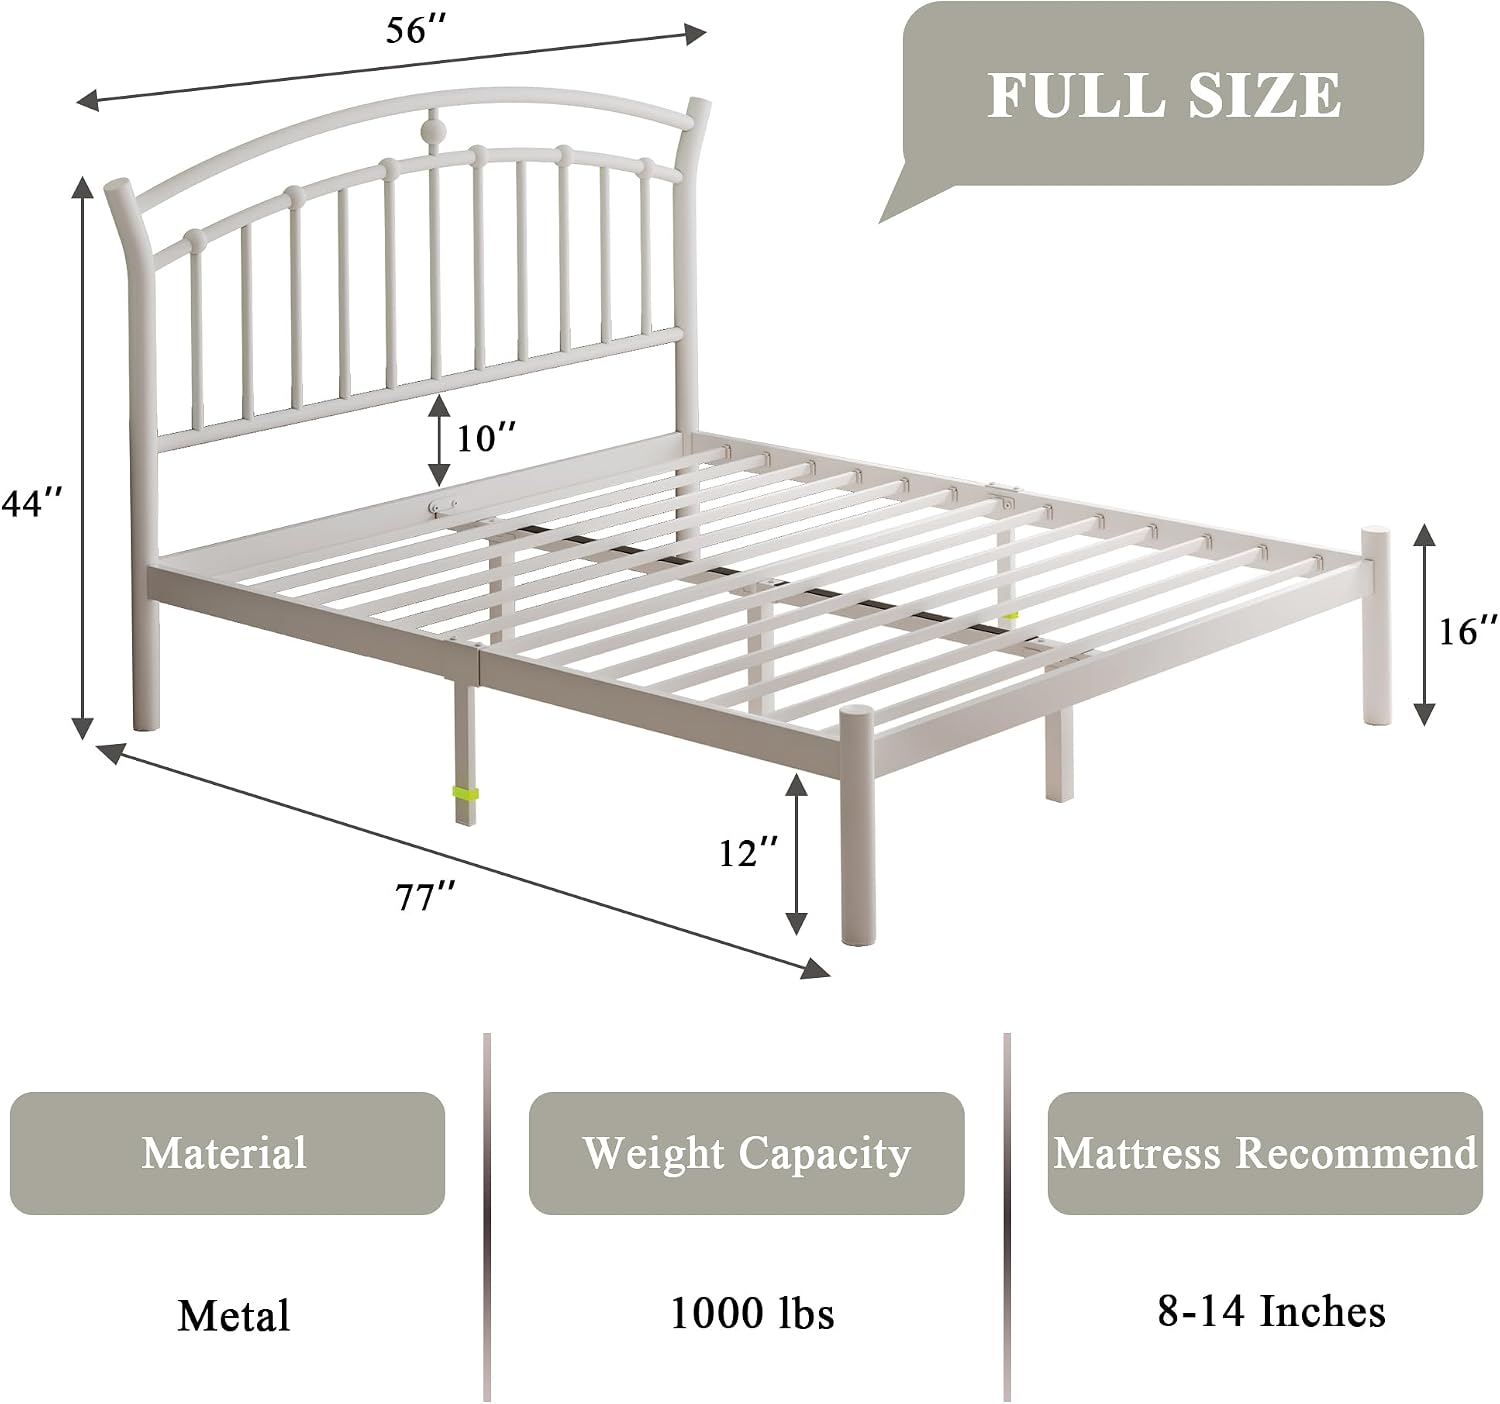
| Product Dimensions | 77"L x 56"W x 44"H |
| Material | Alloy Steel |
| Color | White |
| Weight Capacity | 1000 lbs |
| Compatible Mattress Size | Full (8-14 inches recommended) |
| Under-Bed Clearance | 12 inches |
| Assembly Required | Yes |
| Special Features | Embedded Design, Heavy Duty Steel Frame, Retro Iron-Art Appearance, Safe Fluorescent Strips, Noise-Free Buckles |

Setup (Assembly Instructions)
Assembly is required for this bed frame. It is designed for straightforward installation, typically completable within 20 minutes. It is recommended to have two people for easier assembly.
- Unpack and Identify Parts: Carefully unpack all components and lay them out on a clean, soft surface to prevent scratches. Refer to the included parts list in your separate installation manual to identify each piece.
- Assemble the Headboard: Attach the headboard components as per the detailed diagrams in your manual. Ensure all connections are finger-tightened initially.
- Connect Side Rails: Attach the side rails to the headboard and footboard (if applicable). Use the provided bolts and tools.
- Install Support Legs: Securely attach all central and corner support legs. These are crucial for stability and weight distribution.
- Place Slats: Position the hardened steel slats across the frame. The frame features noiseless buckles to keep slats in place and prevent movement.
- Final Tightening: Once all parts are in place, systematically tighten all bolts and screws using the provided tools. Ensure all connections are firm and secure.
- Apply Fluorescent Strips: If desired, apply the included fluorescent strips to the bed frame legs to enhance visibility in the dark.

Operating (Usage)
Once assembled, your Feonase bed frame is ready for use.
- Mattress Placement: Place your full-size mattress directly onto the steel slats. The embedded frame design helps to keep the mattress securely in place, preventing sliding. A mattress thickness between 8 and 14 inches is recommended for optimal fit and comfort.
- Weight Capacity: Ensure the total weight on the bed frame, including mattress and occupants, does not exceed 1000 lbs.
- Under-Bed Storage: Utilize the 12 inches of clearance beneath the frame for convenient storage of items such as shoes, off-season clothing, or luggage.

Maintenance
Proper care will extend the life of your bed frame.
- Cleaning: Wipe the metal frame with a dry cloth to remove dust and debris. Avoid using harsh chemicals or abrasive cleaners, which can damage the finish.
- Regular Inspection: Periodically check all bolts and connections to ensure they remain tight. Re-tighten any loose fasteners to maintain stability and prevent noise.
- Avoid Excessive Force: Do not jump on the bed or apply excessive, uneven force, as this can compromise the frame's integrity.
Troubleshooting
If you encounter issues with your bed frame, refer to the following common solutions:
- Squeaking or Noise: This bed frame is designed to be noise-free. If you hear squeaking, check all bolts and connections. Loose fasteners are the most common cause of noise. Ensure the slats are properly seated in their buckles.
- Mattress Sliding: The embedded design is intended to prevent mattress movement. If your mattress slides, ensure it is correctly centered on the frame and that the frame's edges are properly enclosing the mattress.
- Instability/Wobbling: Verify that all support legs are firmly on the ground and that all assembly bolts are fully tightened. Ensure the bed frame is on a level surface.
Warranty and Support
For warranty information or customer support, please contact Feonase directly through their official website or the retailer where the product was purchased. Keep your proof of purchase for any warranty claims.