
1. Introduction
The Walfront XY507 is an intelligent PID temperature controller designed for precise temperature management in various industrial and scientific applications. It supports both heating and cooling control, offering a wide input range of 0-1300℃. This manual provides essential information for the safe and effective installation, operation, and maintenance of your device.
2. Safety Information
- Ensure the power supply voltage (100-240VAC, 50/60Hz) matches the device specifications before connection.
- All wiring should be performed by qualified personnel to prevent electric shock or damage to the device.
- Do not operate the controller in environments with excessive moisture, dust, or corrosive gases.
- Disconnect power before performing any maintenance or wiring changes.
- This device is intended for industrial control applications. Use it only as specified in this manual.
3. Product Overview
The XY507 features a clear dual-line, four-digit display for process value (PV) and set value (SV), along with intuitive control buttons.
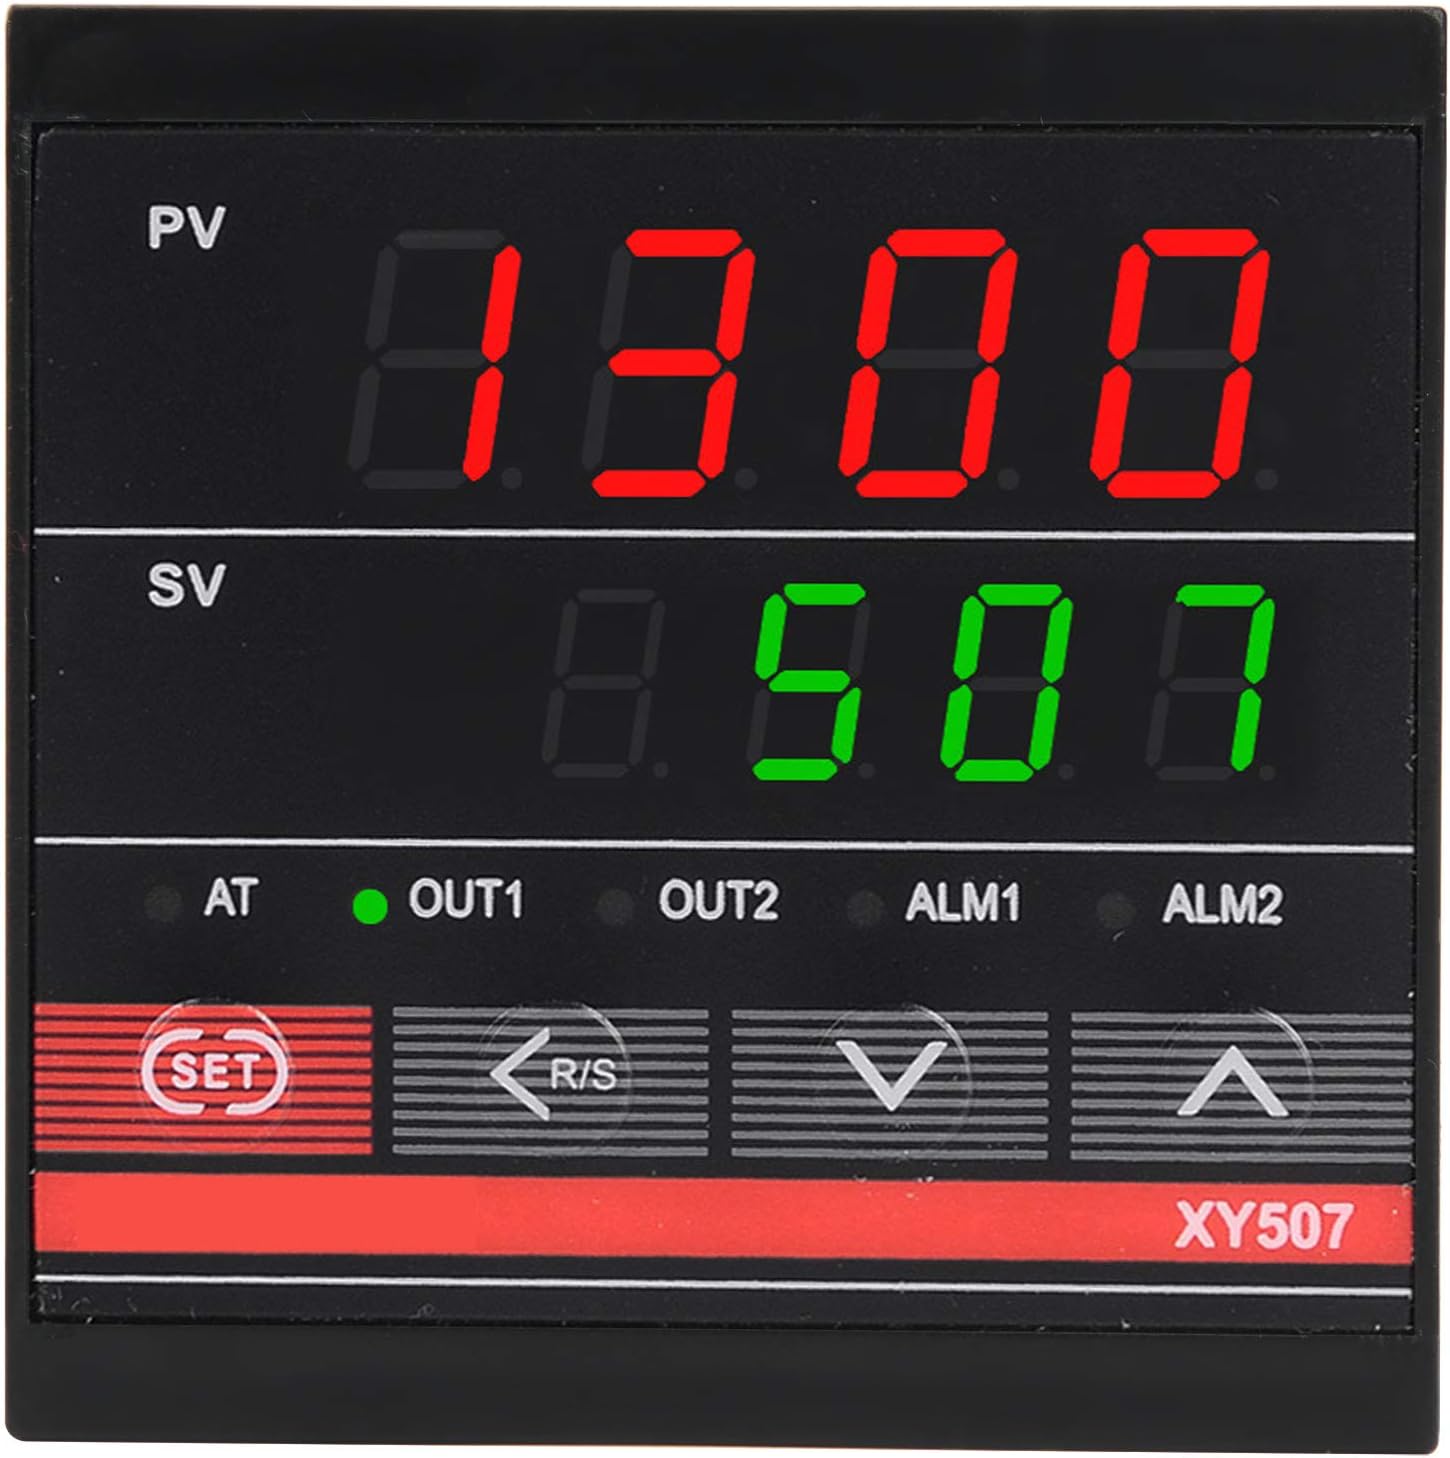
Figure 3.1: Front panel of the XY507 controller. The top red display shows the Process Value (PV), and the bottom green display shows the Set Value (SV). Below the displays are indicator lights for AT, OUT1, OUT2, ALM1, and ALM2, and control buttons including SET, R/S, Down, and Up arrows.

Figure 3.2: Angled view of the controller, highlighting the front display and the side panel which typically contains the wiring diagram and model information.

Figure 3.3: Dimensional drawing of the XY507 controller, indicating its approximate size of 72mm x 72mm x 78mm (2.8 x 2.8 x 3.1 inches).
4. Specifications
| Parameter | Specification |
|---|---|
| Model | XY507 |
| Power Supply | 100-240VAC, 50/60Hz |
| Maximum Input Range | 0-1300℃ (Adjustable) |
| Display | Dual-line, four-digit Celsius temperature |
| Control Method | PID, On/Off |
| Alarm | ALM1 |
| Output Type | General |
| Dimensions (Approx.) | 72 x 72 x 78mm / 2.8 x 2.8 x 3.1in |
5. Setup and Installation
The XY507 controller is designed for panel mounting. Follow these general steps for installation:
- Panel Cutout: Create an appropriate cutout in your control panel according to the controller's dimensions (72x72mm).
- Insert Controller: Carefully insert the controller into the panel cutout from the front.
- Secure with Mounting Frames: Use the provided mounting frames to secure the controller from the rear of the panel. Slide the frames onto the sides of the controller and tighten the screws (if applicable) to hold it firmly in place.

Figure 5.1: The two mounting frames included for securing the controller into a panel cutout.
5.1 Wiring Connections
Refer to the wiring diagram located on the side of the controller for specific connection points. Ensure all connections are secure and correctly polarized.
- Power Supply: Connect 100-240VAC power to the designated terminals.
- Sensor Input: Connect your thermocouple or RTD sensor to the input terminals. The controller supports 10 different types of thermocouple and RTD inputs.
- Output: Connect your heating or cooling device to the output terminals (OUT1, OUT2).
- Alarm Output: If an alarm function is utilized, connect the alarm device to the ALM1 terminals.
6. Operating Instructions
The XY507 controller provides both PID and On/Off control methods. The display shows the current process temperature (PV) and the desired set temperature (SV).
6.1 Basic Operation
- Power On: Once wired correctly, apply power to the controller. The PV and SV displays will illuminate.
- Process Value (PV): The upper red display shows the current measured temperature.
- Set Value (SV): The lower green display shows the target temperature.
6.2 Setting the Target Temperature (SV)
- Press the SET button once. The SV display will begin to flash.
- Use the ▲ (Up) and ▼ (Down) arrow buttons to adjust the SV to your desired temperature.
- Press the SET button again to confirm the new SV. The display will stop flashing.
6.3 Auto-Tuning Function
The auto-tuning function automatically calculates and sets the optimal PID parameters for your specific system, ensuring stable and accurate temperature control.
- To initiate auto-tuning, refer to the detailed instructions in the full user manual (if provided separately) or consult the device's specific menu navigation. Typically, this involves pressing and holding a combination of buttons or navigating through a menu.
- During auto-tuning, the controller will cycle the output to analyze the system's response. The AT indicator light may illuminate.
- Once auto-tuning is complete, the controller will automatically save the new PID parameters.
6.4 Control Mode (PID / On/Off)
The controller supports both PID and On/Off control. The selection of the control method is typically done through the device's parameter settings menu. PID control offers more precise and stable temperature regulation, while On/Off control is simpler and suitable for less critical applications.
7. Maintenance
- Cleaning: Clean the controller's front panel with a soft, dry cloth. Do not use abrasive cleaners or solvents.
- Inspection: Periodically inspect wiring connections for looseness or damage.
- Environment: Ensure the operating environment remains within specified temperature and humidity ranges to prolong the device's lifespan.
8. Troubleshooting
- No Power: Check power supply connections and ensure the voltage is within the specified range.
- Incorrect Temperature Reading: Verify sensor connections and ensure the correct sensor type is selected in the controller's settings. Check for sensor damage.
- Output Not Activating: Confirm that the set temperature (SV) is correctly configured and that the control mode (PID/On/Off) is appropriate for the application. Check output wiring.
- Unstable Temperature: If using PID control, consider running the auto-tuning function to optimize PID parameters. For On/Off control, adjust hysteresis if available.
9. Package Contents
The following items are included in the package:
- 1 x Walfront XY507 Intelligent PID Temperature Controller
- 2 x Mounting Frame
- 1 x User Manual (this document or similar)