
LITFAD LT1265393B
LITFAD Modern Brown Wood Shoe Cabinet Instruction Manual
Model: LT1265393B
Brand: LITFAD
1. Introduction
Thank you for purchasing the LITFAD Modern Brown Wood Shoe Cabinet. This manual provides essential information for the safe assembly, operation, and maintenance of your new shoe storage unit. Please read these instructions carefully before beginning assembly and retain them for future reference.
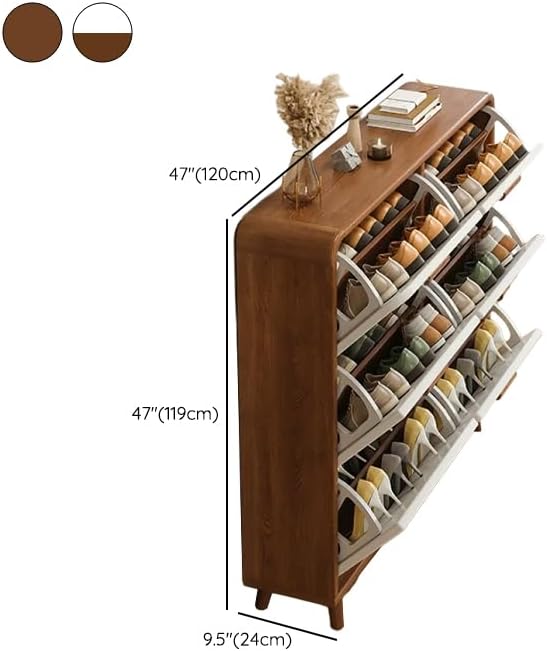
This freestanding shoe cabinet features a modern design with front-drop flip drawers, offering an efficient solution for organizing footwear in various living spaces such as entryways, hallways, or bedrooms.
2. Safety Information
- Always assemble the product on a soft, clean surface to prevent scratches.
- Ensure all parts are securely fastened before use. Loose connections can lead to instability.
- Keep small parts and packaging materials away from children and pets to prevent choking hazards.
- Anti-Tipping Device: For safety, it is highly recommended to secure the shoe cabinet to a wall using the provided anti-tipping strap. This prevents accidental tipping, especially in households with children or pets.
- Do not overload the cabinet. Distribute weight evenly across the shelves.
- Avoid standing or climbing on the cabinet.

3. Package Contents
Before assembly, please verify that all components listed below are present and undamaged. If any parts are missing or damaged, please contact customer support.
- 1 x LITFAD Modern Brown Wood Shoe Cabinet
- 1 x Assembly Tool Kit (includes necessary hardware)
- 1 x Instruction Manual (this document)
4. Specifications
| Brand | LITFAD |
| Model Number | LT1265393B |
| Dimensions (L x W x H) | 47 inches x 9 inches x 47 inches (120cm x 24cm x 119cm) |
| Material | Manufactured Wood (Engineered Wood) |
| Color | Brown |
| Mounting Type | Freestanding |
| Number of Compartments | 6 (via flip drawers) |
| Special Feature | Push door opening, Adjustable Shelves |
5. Setup and Assembly Instructions
Assembly is required for this product. Please follow these steps carefully. It is recommended to have a second person assist with assembly for stability and ease.
5.1 Before You Begin
- Clear a spacious, clean, and soft area for assembly to prevent damage to the cabinet parts.
- Unpack all components and hardware. Refer to the parts list (usually included in the physical manual) to identify each piece. While parts may not be explicitly labeled with letters, carefully compare each piece to the diagrams.
- Gather any additional tools that might be helpful, such as a Phillips head screwdriver (though basic tools are included).
5.2 Assembly Steps
- Assemble the Drawers: Begin by assembling the individual flip drawers. Pay close attention to the orientation of each panel as shown in the diagrams. Ensure all small screws are used where indicated for drawer stability.
- Attach Side Panels and Top: Once the drawers are assembled, attach the side panels to the base and then secure the top piece. This step can be challenging; ensure the curved edges align correctly with the top panel.
- Install Back Panel: Secure the back panel to the main frame. This adds rigidity to the cabinet structure.
- Insert Drawers: Carefully slide the assembled flip drawers into their respective compartments. Test their opening and closing mechanism.
- Attach Legs: Secure the cabinet legs to the bottom of the unit.
- Install Anti-Tipping Strap: Position the cabinet in its desired location. Using the provided hardware, attach one end of the anti-tipping strap to the top rear of the cabinet and the other end to a wall stud or appropriate wall anchor. This step is crucial for safety.

6. Operating Instructions
6.1 Storing Shoes
- To open a compartment, gently pull the front panel of the flip drawer outwards. The drawer will tilt down, revealing the shoe storage area.
- Place shoes into the designated slots. The cabinet is designed to accommodate various shoe sizes, with adjustable shelves to optimize space.
- To close, push the front panel upwards until it clicks securely into place.
6.2 Adjusting Shelves
The internal shelves within each flip drawer are adjustable. To change the height, carefully remove the shelf and reposition it into the desired slots. Ensure both sides of the shelf are level and securely seated before placing shoes on it.

7. Maintenance
To ensure the longevity and appearance of your LITFAD shoe cabinet, follow these maintenance guidelines:
- Cleaning: Wipe the cabinet surfaces with a soft, damp cloth. Avoid abrasive cleaners or harsh chemicals, as these can damage the finish. The manufactured wood material is designed to be waterproof and easy to clean.
- Dusting: Regularly dust the cabinet with a dry, soft cloth to prevent dust buildup.
- Inspection: Periodically check all screws and connections to ensure they remain tight. Retighten if necessary.
- Avoid Direct Sunlight: Prolonged exposure to direct sunlight can cause fading or discoloration of the wood finish.
8. Troubleshooting
- Issue: Cabinet feels unstable after assembly.
Solution: Ensure all screws and fasteners are fully tightened. Verify that the cabinet is placed on a level surface. Most importantly, ensure the anti-tipping strap is securely installed to a wall stud or appropriate anchor. - Issue: Drawers do not open or close smoothly.
Solution: Check for any obstructions within the drawer mechanism or along the tracks. Ensure shoes are not overfilling the compartment, preventing proper closure. Verify that the drawer components were assembled correctly and are not misaligned. - Issue: Visible chips or damage on parts.
Solution: If parts arrived damaged, please contact customer support immediately for assistance.
9. Contact and Support
If you encounter any issues during assembly, operation, or maintenance, or if you have any questions about your LITFAD Modern Brown Wood Shoe Cabinet, please do not hesitate to contact our customer support team. We are committed to assisting you.
Please refer to your purchase documentation or the retailer's website for specific contact information.
Ask a question about this manual
Ask about setup, troubleshooting, compatibility, parts, safety, or missing instructions. Manuals+ will review the question and use this page’s manual context to help answer it.