
KINGGERI KG2-4087
KINGGERI Roof Rack Cross Bars Instruction Manual
Model: KG2-4087
1. Product Overview
The KINGGERI Roof Rack Cross Bars are designed to provide additional cargo carrying capacity for your vehicle. These cross bars attach to existing raised side rails, offering a secure platform for various rooftop accessories such as cargo carriers, bike stands, ski frames, and kayak racks. Constructed from high-grade aluminum, they are engineered for durability and strength.

Image 1.1: KINGGERI Roof Rack Cross Bars installed on a blue Honda Pilot, showcasing the product's appearance and integration with the vehicle's roof.
2. Compatibility
These roof rack cross bars are specifically designed for the following Honda Pilot models with raised side rails:
- Honda Pilot 2023 Sport
- Honda Pilot 2024 Sport
- Honda Pilot 2025 Sport
- Honda Pilot 2023 TrailSport
- Honda Pilot 2024 TrailSport
- Honda Pilot 2025 TrailSport
- Honda Pilot 2023 Touring
- Honda Pilot 2024 Touring
- Honda Pilot 2025 Touring
- Honda Pilot 2023 Elite
- Honda Pilot 2024 Elite
- Honda Pilot 2025 Elite
Note: These cross bars are NOT compatible with Honda Pilot LX & EX-L models.

Image 2.1: Visual guide illustrating the specific Honda Pilot trims (Sport, TrailSport, Touring, Elite) that are compatible with these cross bars, and those that are not (LX, EX-L).
3. Product Specifications
| Specification | Detail |
|---|---|
| Brand | KINGGERI |
| Model Number | KG2-4087 |
| Material | High-grade Aluminum |
| Maximum Load Capacity | 260 lbs (118 kg) |
| Item Weight | 11 pounds |
| Product Dimensions (L x W x H) | 3 x 6 x 40 inches |
| Mounting Type | U-Bolt (Clamping to existing side rails) |

Image 3.1: A red Honda Pilot with a kayak mounted on the roof rack, illustrating the product's maximum load capacity of 260 lbs for various cargo types.

Image 3.2: A close-up view of the roof rack bracket, highlighting its thickened design for enhanced strength and durability.
4. Components (What's in the Box)
Verify that all components listed below are present in your package before beginning installation:
- 1 x Front Crossbar (longer)
- 1 x Rear Crossbar (shorter)
- 4 x Aluminum Brackets
- 1 x Instruction Manual
- 1 x Allen Wrench
- 8 x Bolts (M6*20MM)
- 4 x Sponge Pads
- Spare Screws (quantity may vary, typically 3)

Image 4.1: An exploded view diagram showing all parts included in the package: front bar, rear bar, four bases, bolts, sponge pads, Allen wrench, and instruction manual.

Image 4.2: A closer look at the different screw sizes (M6*20MM and M6*14MM) and the inclusion of spare screws for installation.
5. Setup and Installation
Installation of the KINGGERI roof rack cross bars is designed to be straightforward. It is recommended to have a second person assist with the installation to prevent damage to your vehicle's paint or the components.
5.1 Pre-Installation Steps
- Identify Components: The cross bars are labeled "Front" and "Rear" to indicate their correct placement. The front bar is typically longer than the rear bar. The brackets may also have arrows or labels indicating orientation.
- Protect Vehicle Surface: Place a blanket or soft towel across your vehicle's roof to prevent scratching during assembly and installation.
- Prepare Side Rails: For Honda Pilot models, you may need to remove rubber plugs from the factory side rails to expose the mounting points.
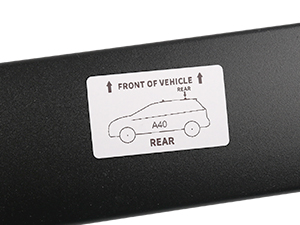
Image 5.1: A label on the crossbar clearly indicating "FRONT OF VEHICLE" and "REAR" for correct orientation during installation.
5.2 Assembly and Mounting
- Attach Brackets to Bars: Loosely attach the aluminum brackets to the ends of the front and rear cross bars using the provided bolts. Ensure the brackets are oriented correctly according to any markings.
- Adjust Bar Width: The width of the crossbars can be adjusted. On the underside of each bar, there are adjustable bolts that allow you to extend or retract the bar length to fit your vehicle's side rails. Adjust these bolts to achieve the approximate width needed for your vehicle.
- Position Cross Bars: Carefully lift each assembled cross bar onto the vehicle's side rails. The front bar should be positioned towards the front of the vehicle, and the rear bar towards the rear.
- Secure to Side Rails: Align the brackets with the mounting points on your vehicle's raised side rails. Use the provided Allen wrench and bolts to securely fasten the cross bars to the side rails. Ensure all bolts are tightened evenly to prevent wobbling.
- Final Tightening: Once both cross bars are in place and aligned, fully tighten all bolts on the brackets and the adjustable bolts on the underside of the bars. Verify that the cross bars are firmly secured and do not move.
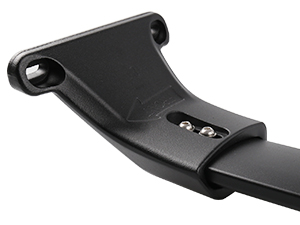
Image 5.2: A detailed view of the adjustable bolts located on the underside of the crossbar, which allow for precise width adjustment to fit various vehicle dimensions.

Image 5.3: A close-up image demonstrating how the heavy-duty clamping design of the bracket securely fastens the crossbar to the vehicle's existing side rails.
6. Operating and Usage
Once installed, your KINGGERI roof rack cross bars are ready for use. They provide a stable base for transporting various items on your vehicle's roof.
6.1 Load Capacity
The maximum load capacity for these cross bars is 260 lbs (118 kg). It is crucial to adhere to this limit to ensure safety and prevent damage to your vehicle or the roof rack. Distribute weight evenly across the bars.
6.2 Cargo Types
The cross bars are suitable for carrying a variety of cargo with appropriate attachments (not included):
- Cargo Boxes
- Bicycles (with bike carriers)
- Kayaks/Canoes (with kayak racks)
- Skis/Snowboards (with ski/snowboard carriers)
- Luggage and other gear

Image 6.1: Examples of various gear that can be carried on the roof rack, including a kayak, bicycle, cargo box, and ski frame, demonstrating the product's versatility.

Image 6.2: A collage of images showcasing various outdoor activities (biking, kayaking, snowboarding, skiing) that are enabled by the use of a roof rack for transporting equipment.
6.3 Aerodynamic Design
The cross bars feature an aerodynamic design intended to minimize wind resistance and reduce noise during travel, contributing to a quieter driving experience.
7. Maintenance
Regular maintenance ensures the longevity and safe operation of your roof rack cross bars.
- Check Fasteners: Periodically inspect all bolts and fasteners to ensure they remain tight. Vibrations from driving can cause them to loosen over time.
- Clean Components: Clean the cross bars and brackets regularly with mild soap and water to remove dirt, road grime, and salt, which can cause corrosion.
- Inspect for Damage: Before each use, check for any signs of wear, cracks, or damage to the bars, brackets, or mounting points. Do not use the roof rack if any damage is observed.
- Lubricate (Optional): If any moving parts or bolt threads become stiff, a small amount of silicone-based lubricant can be applied.
- Winter Care: In areas with road salt, rinse the cross bars thoroughly after exposure to prevent corrosion.
8. Troubleshooting
This section addresses common issues you might encounter.
8.1 Excessive Wind Noise
- Cause: Improper installation, loose components, or specific vehicle aerodynamics.
- Solution:
- Ensure all bolts are securely tightened.
- Verify that the cross bars are correctly positioned and aligned.
- Check for any gaps between the cross bars and the vehicle's side rails.
8.2 Loose Fit or Wobbling
- Cause: Insufficient tightening of bolts, incorrect bar width adjustment, or incompatible vehicle model.
- Solution:
- Re-tighten all mounting bolts and adjustable bolts on the underside of the bars.
- Confirm that the cross bars are adjusted to the correct width for your vehicle's side rails.
- Verify that your vehicle model is listed as compatible in Section 2.
8.3 Paint Chipping on Brackets
- Cause: Abrasion during installation or use, environmental factors.
- Solution:
- Apply touch-up paint or a protective coating to affected areas to prevent rust.
- Ensure careful handling during installation to avoid scratching.
9. Warranty and Support
KINGGERI roof rack cross bars come with a 12-month warranty from the date of purchase.
If you have any concerns, questions, or require assistance with installation or troubleshooting, please do not hesitate to contact KINGGERI customer support. Refer to your purchase documentation for specific contact information.
Related documentsKG2-4087


Ask a question about this manual
Ask about setup, troubleshooting, compatibility, parts, safety, or missing instructions. Manuals+ will review the question and use this page’s manual context to help answer it.