
1. Important Safety Information
Read all instructions carefully before installing, operating, or maintaining this product. Failure to follow these instructions could result in serious injury or death. Keep this manual for future reference.
- Always disconnect power to the pump before performing any service or maintenance.
- Ensure the electrical supply meets the pump's requirements (115V, 60Hz).
- Do not operate the pump if the power cord is damaged. Contact qualified personnel for repair.
- Keep children and unauthorized persons away from the pool equipment.
- Ensure proper grounding to reduce the risk of electric shock.
- Never operate the filter without water.
- Do not exceed the maximum operating pressure of the filter.
2. Product Overview
Key Features
- High-Efficiency Filtration: Designed to circulate and filter pool water through the sand cylinder, providing a clean pool environment.
- 7 Function Controls: The multi-port valve offers Filter, Rinse, Backwash, Recirculate, Waste, Winter, and Closed settings for comprehensive pool management.
- Equipment Parameters: Suitable for cleaning pools up to 11000 gallons. Equipped with a 3/4HP pump, offering a filtration flow rate of up to 3435 gallons per hour. The connecting hose outlet size is 1.25 inches.
- 24-Hour Timer: The pool pump features a timer that can be preset to run automatically from 1 to 20 hours or for continuous operation, simplifying pool maintenance.
- Safety Certified: UL certification for energized wires ensures adherence to recognized safety standards.
- Versatile Applications: Ideal for above-ground pools, hot tubs, and spas.
Components
Familiarize yourself with the main components of your VINGLI Sand Pool Filter system:
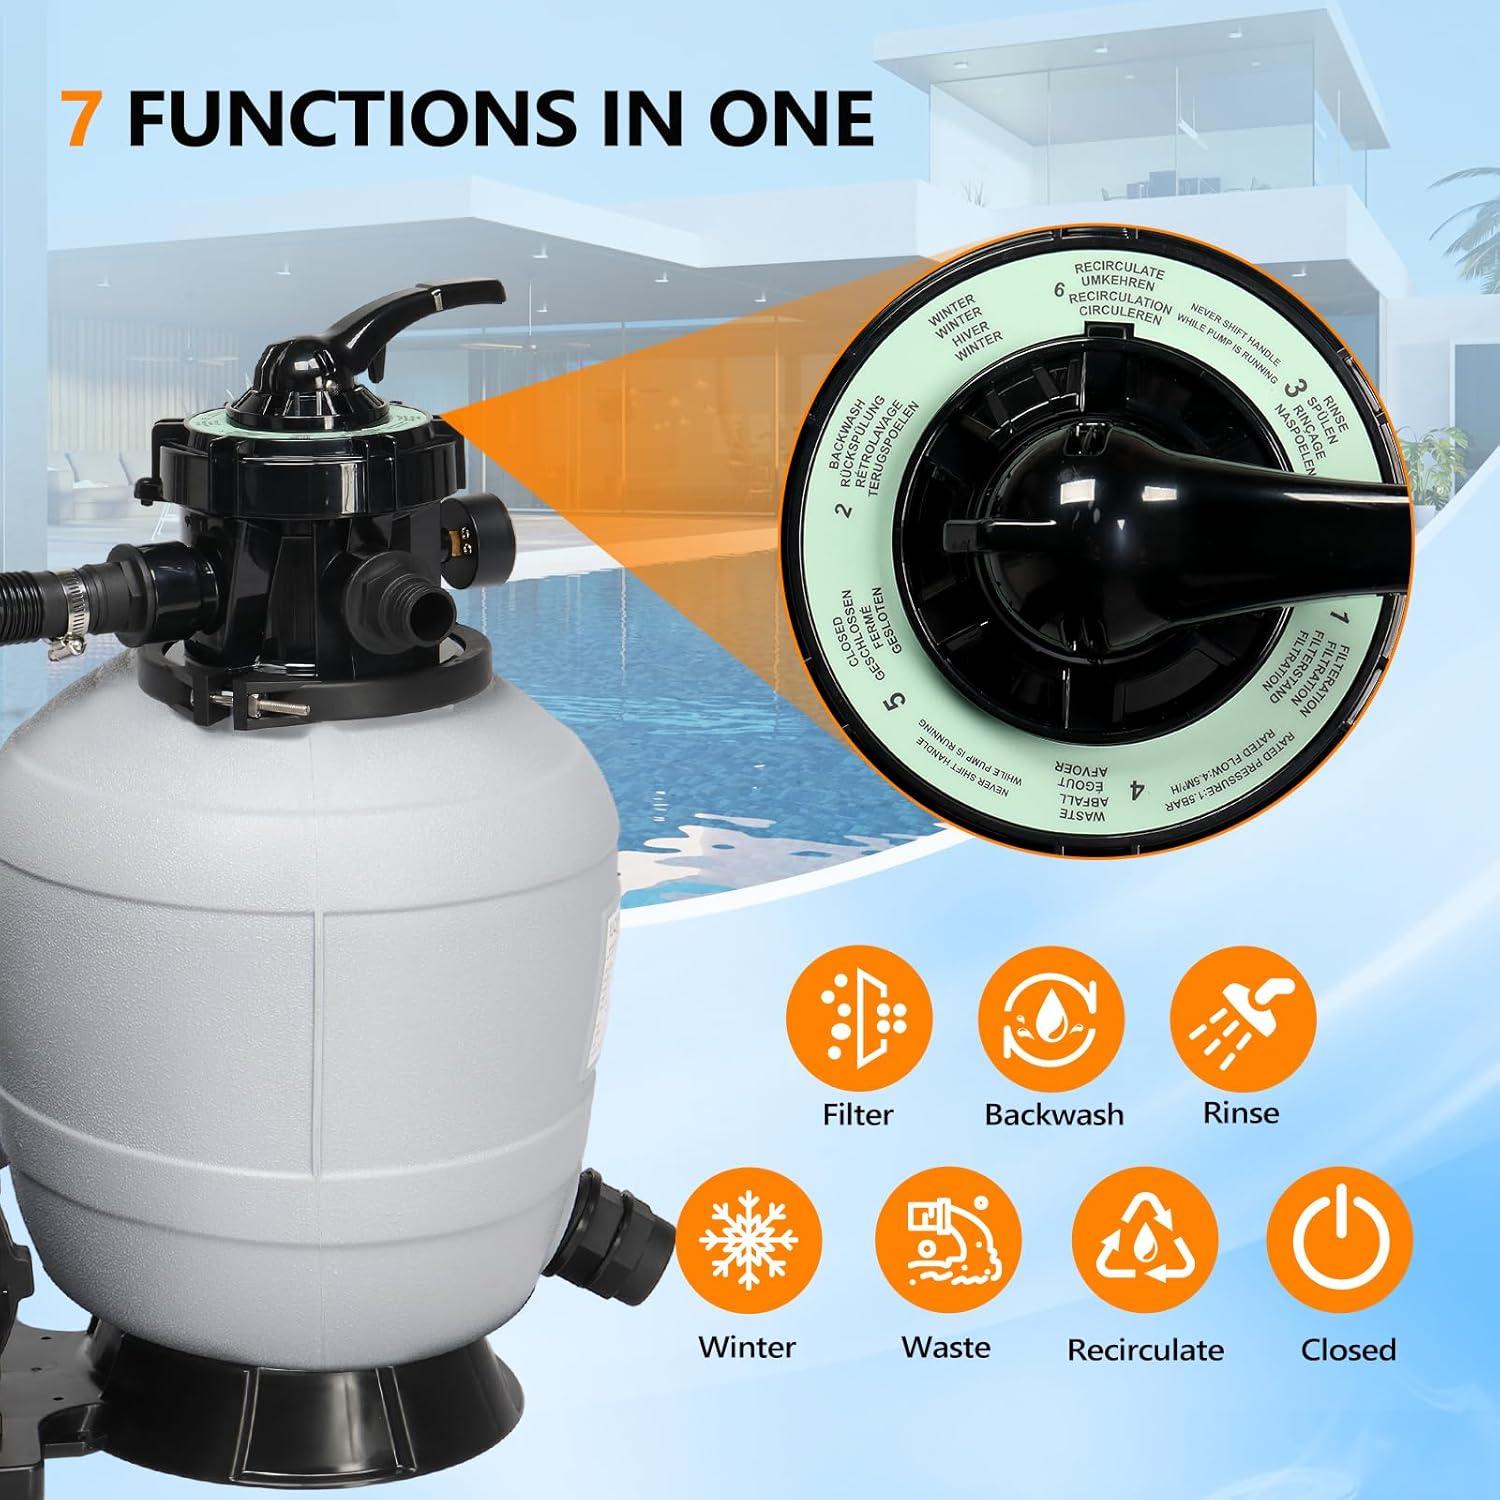
Figure 2.1: Multi-port valve with clearly labeled 7 functions.

Figure 2.2: The sand filter and pump assembly, illustrating the powerful filtration system.

Figure 2.3: The pump's control panel featuring the 24-hour timer for automated operation.

Figure 2.4: Detail of the pressure gauge, essential for monitoring filter performance.

Figure 2.5: Illustration of compatible filter media, including sand and filter balls.
3. Setup and Installation
Unpacking and Inspection
Carefully unpack all components and inspect for any shipping damage. If any parts are missing or damaged, contact customer support immediately.
Filling the Filter Tank
- Ensure the drain plug at the bottom of the tank is securely closed.
- Place the neck fitting (often a standpipe with laterals) inside the tank. This prevents sand from entering the laterals.
- Slowly add the recommended amount of filter sand or filter balls into the tank. Refer to the specifications section for the correct amount.
- Once filled, carefully remove the neck fitting. Ensure no sand is in the crevices where the multi-port valve will sit.
Video 3.1: This video demonstrates the process of assembling the filter tank, including installing the neck fitting and adding filter media (sand or filter balls). It also shows the attachment of the multi-port valve and initial hose connections.
Multi-Port Valve Assembly
- Lubricate the O-ring on the multi-port valve with a silicone-based lubricant.
- Carefully place the multi-port valve onto the filter tank, ensuring the main pipe from the tank aligns with the opening in the valve.
- Align the two triangles (or other alignment marks) on the valve and the tank.
- Secure the valve to the tank using the provided clamp and hardware. Tighten firmly.
- Install the pressure gauge into the designated port on the multi-port valve.
Connecting Hoses
- Connect the pump's discharge port to the 'PUMP' port on the multi-port valve using the provided hose and hose clamps. Ensure the 'Pump' markings on the valve are aligned with the direction of the pump.
- Connect the 'RETURN' port on the multi-port valve to the pool's return inlet.
- Connect the 'WASTE' port on the multi-port valve to a suitable waste line or area for discharge.
- Ensure all connections are tight to prevent leaks.
4. Operating Instructions
Multi-Port Valve Functions
The multi-port valve allows you to select different operating modes. Always turn off the pump before changing valve positions.
- FILTER: Normal filtering mode. Water flows through the sand bed, removing debris, and returns to the pool.
- RINSE: Used after backwashing to flush out any remaining dirt from the sand bed to the waste line.
- BACKWASH: Reverses water flow through the filter to clean the sand bed, sending dirty water to the waste line.
- RECIRCULATE: Bypasses the filter, circulating water directly back to the pool. Useful for chemical distribution without filtering.
- WASTE: Drains water directly from the pool to the waste line, bypassing the filter. Useful for lowering pool water level or vacuuming heavy debris directly to waste.
- WINTER: Used for winterizing the filter system.
- CLOSED: Shuts off all flow to the filter and pump. Use when cleaning the pump strainer basket or performing other maintenance.
Timer Operation
The integrated 24-hour timer allows for automatic pump operation. The digital display shows the remaining operating hours.
- Press the power button to turn the pump on or off.
- Use the gear/settings button to adjust the desired operating time (1-20 hours). The display will show the set duration.
- The 24H button activates the daily timer cycle. Once set, the pump will run for the programmed duration at the same time each day.
5. Maintenance
Backwashing
Backwash the filter when the pressure gauge reads 8-10 PSI above its clean operating pressure, or when water flow to the pool decreases significantly.
- Turn off the pump.
- Set the multi-port valve to 'BACKWASH'.
- Turn on the pump. Backwash until the water in the sight glass (if present) runs clear (typically 2-3 minutes).
- Turn off the pump.
Rinsing
After backwashing, always rinse the filter to settle the sand bed and prevent dirty water from returning to the pool.
- Turn off the pump.
- Set the multi-port valve to 'RINSE'.
- Turn on the pump. Rinse for approximately 30-60 seconds.
- Turn off the pump.
- Set the multi-port valve back to 'FILTER' for normal operation.
Winterizing
For areas with freezing temperatures, proper winterization is crucial to prevent damage.
- Backwash and rinse the filter thoroughly.
- Turn off the pump and disconnect power.
- Drain all water from the filter tank by opening the drain plug.
- Set the multi-port valve to 'WINTER' or an intermediate position between two settings to relieve pressure on the internal seals.
- Disconnect all hoses and store them in a dry, protected area.
- Store the pump and filter in a dry, frost-free location if possible.
6. Troubleshooting
| Problem | Possible Cause | Solution |
|---|---|---|
| Low water flow / Poor filtration | Clogged filter sand; Air in system; Clogged pump strainer basket. | Backwash and rinse the filter; Check for air leaks in plumbing; Clean pump strainer basket. |
| Sand returning to pool | Damaged laterals inside filter tank; Incorrect sand type/amount; Excessive backwashing. | Inspect/replace laterals; Ensure correct sand type and level; Reduce backwash duration. |
| Pump not starting | No power; Motor overload; Impeller jammed. | Check power supply/breaker; Allow motor to cool; Clear any debris from impeller. |
| Water leaking from connections | Loose hose clamps; Damaged O-rings/gaskets. | Tighten all hose clamps; Inspect and replace O-rings/gaskets as needed. |
7. Specifications
| Specification | Value |
|---|---|
| Product Dimensions | 21 x 19 x 15 inches |
| Item Weight | 32.1 pounds |
| Manufacturer | VINGLI |
| ASIN | B0CWXWPRQ3 |
| Item Model Number | sand pool filter 14in |
| Pump Horsepower | 3/4 HP |
| Filtration Flow Rate | Up to 3435 GPH |
| Voltage | 115V |
| Timer | 24-hour programmable |
| Recommended Pool Size | Up to 11000 gallons |

Figure 7.1: Recommended specifications for various filter tank sizes.
8. Warranty and Support
For warranty information or technical support, please refer to the product packaging or contact VINGLI customer service directly. Keep your purchase receipt as proof of purchase.