
Introduction
This manual provides comprehensive instructions for the installation, operation, and maintenance of your Camgeet 3 PC 3 Monitor KVM Switch. This device allows you to control up to three computers using a single set of keyboard, mouse, and three monitors, supporting high-resolution video output.

The Camgeet KVM Switch enables seamless control of three computers from a single workstation setup.
Package Contents
Before proceeding with the installation, please verify that all items are present in the package:
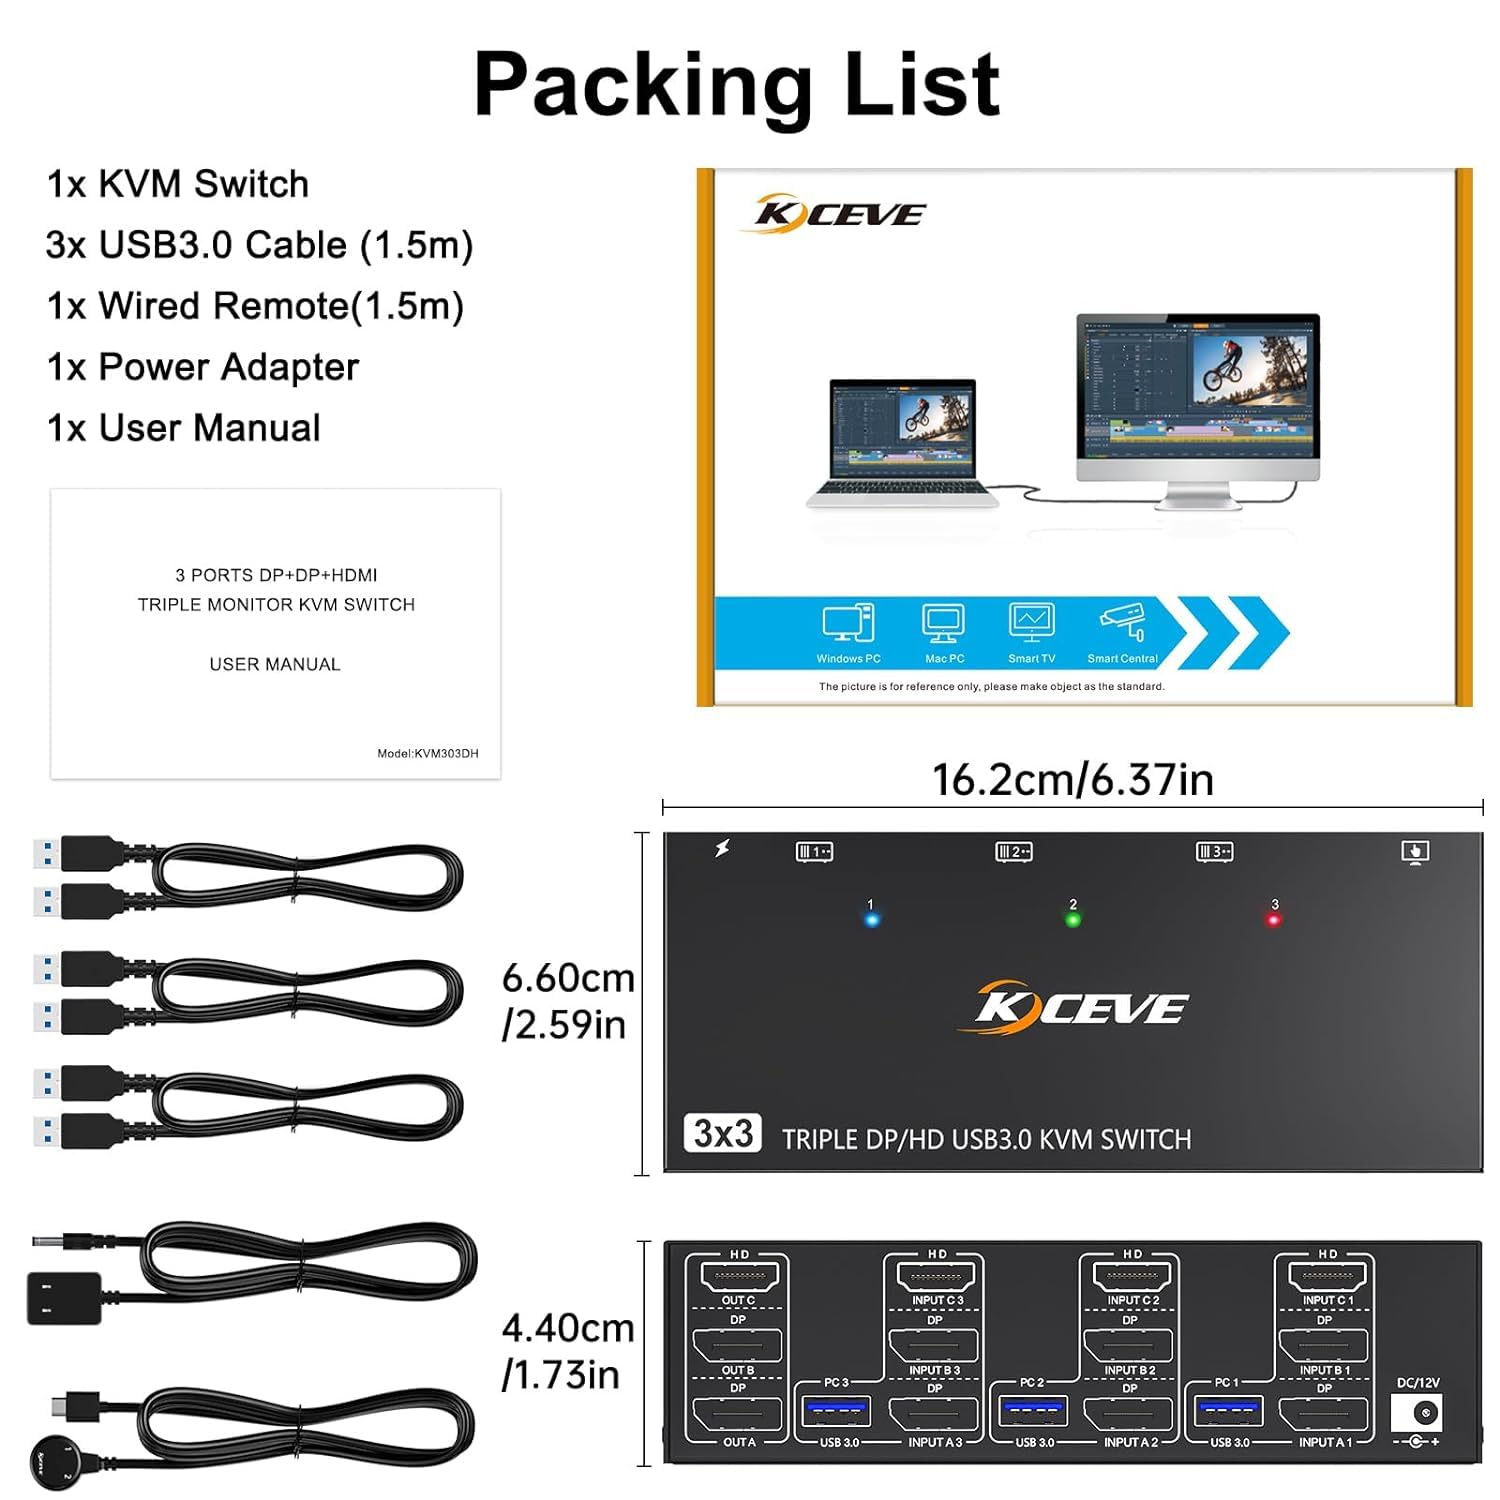
- 1x Camgeet 3 PC 3 Monitor KVM Switch
- 3x USB 3.0 Cables (1.5m)
- 1x Wired Remote Control (1.5m)
- 1x Power Adapter
- 1x User Manual

Ensure all listed components are included in your package.
Setup Instructions
Follow these steps to correctly set up your KVM switch:
- Power Off Devices: Ensure all computers and monitors are powered off before making any connections.
- Connect Monitors to KVM: Connect your three monitors to the KVM switch's output ports (HDMI OUT, DP OUT A, DP OUT B).
- Connect Computers to KVM (Video): For each computer (PC1, PC2, PC3), connect its video outputs to the corresponding KVM input ports. Each PC requires one HDMI cable and two DisplayPort cables to achieve a triple monitor setup.
- PC1: Connect to INPUT A1 (HDMI), INPUT B1 (DP), INPUT C1 (DP)
- PC2: Connect to INPUT A2 (HDMI), INPUT B2 (DP), INPUT C2 (DP)
- PC3: Connect to INPUT A3 (HDMI), INPUT B3 (DP), INPUT C3 (DP)
Important: If your computer lacks the necessary HDMI or DisplayPort outputs, you may need appropriate adapters (e.g., USB-C to DP/HDMI, powered HDMI to DP). Ensure you use 8K DP1.4 and HDMI 2.1 cables for optimal performance.
- Connect Computers to KVM (USB): For each computer, connect one of the included USB 3.0 cables from a USB port on your computer to the corresponding USB 3.0 input port on the KVM switch (USB A1, USB A2, USB A3). This enables keyboard, mouse, and other USB peripheral sharing.
- Connect Peripherals: Connect your keyboard, mouse, and other USB 3.0 devices (e.g., printer, USB drive) to the USB 3.0 ports on the front panel of the KVM switch.
- Connect Wired Remote: Plug the wired remote control into the dedicated port on the KVM switch.
- Power Connection: Connect the provided power adapter to the DC/12V port on the KVM switch and then to a power outlet.
- Power On: Power on the KVM switch using the ON/OFF switch, then power on your monitors and computers.

Connection diagram for the KVM switch, illustrating inputs and outputs for PCs, monitors, and USB devices.

The KVM switch features an ON/OFF power switch and a DC/12V power input for stable operation.
Operating Instructions
The Camgeet KVM Switch offers two convenient methods for switching between connected computers:
1. Button Switching
Press the corresponding "PC1", "PC2", or "PC3" button on the front panel of the KVM switch to switch control to the desired computer. The LED indicator will illuminate to show which computer is currently active.
2. Wired Remote Control
Use the included wired remote control to switch between computers. Simply press the button on the remote to cycle through the connected PCs. This allows for flexible placement of the KVM switch while keeping switching controls within easy reach.

The KVM switch provides both front panel buttons and a wired remote for convenient computer switching.
Display Modes: Extended and Mirror
The KVM switch supports both extended and mirror display modes across your three monitors. You can configure these modes directly from your computer's operating system.
- Extended Mode: Displays three different screens across your monitors, expanding your desktop workspace.
- Mirror Mode: Displays the same content on all three monitors.
To set the display mode on Windows, press "Windows Key + P". A small window will appear, allowing you to select "Mirror Mode" or "Extend Mode".

Visual representation of extended and mirror display modes and the Windows shortcut for configuration.
Compatibility
The Camgeet KVM Switch is designed for broad compatibility and operates driver-free with most major operating systems and devices:
- Operating Systems: Windows, Mac OS, Linux, Unix, Ubuntu, Chrome OS.
- Input Devices: PCs, Laptops, PS4, Raspberry Pi, DVR, NVR.
- USB Peripherals: Keyboard, Mouse, Printer, Scanner, USB drives, Hard Disk Drives, Headsets, USB Cameras, and other USB 3.0 devices.

The KVM switch offers plug-and-play functionality across multiple operating systems without requiring driver installation.
Maintenance
The Camgeet KVM Switch requires minimal maintenance to ensure optimal performance and longevity:
- Cleaning: Use a soft, dry cloth to wipe the exterior of the device. Avoid using liquid cleaners or abrasive materials.
- Ventilation: Ensure the KVM switch is placed in a well-ventilated area to prevent overheating. Do not block any ventilation openings.
- Cable Management: Keep cables organized and free from kinks or excessive bends to prevent damage and ensure stable connections.
- Power Cycle: If you experience any minor issues, try power cycling the KVM switch (turn off, unplug, wait 10 seconds, plug back in, turn on).
Troubleshooting
If you encounter issues with your KVM switch, please refer to the following common troubleshooting steps:
- No Display on Monitors:
- Ensure all HDMI and DisplayPort cables are securely connected between the computers, KVM, and monitors.
- Verify that the KVM switch is powered on and the correct PC input is selected.
- Check if your monitors are set to the correct input source (HDMI/DisplayPort).
- Important: Use high-quality HDMI 2.1 and DisplayPort 1.4 cables, especially for high resolutions (8K/4K@144Hz). Lower quality cables can cause signal loss or no display.
- If using adapters (e.g., USB-C to DP/HDMI), ensure they are active adapters and properly powered if required.
- Try connecting one monitor at a time to isolate the issue.
- Keyboard/Mouse Not Responding:
- Ensure the USB 3.0 cables are correctly connected from each PC to the KVM switch.
- Verify that your keyboard and mouse are connected to the dedicated USB 3.0 ports on the KVM front panel.
- Try connecting the keyboard and mouse directly to the computer to confirm they are functional.
- Some specialized gaming keyboards/mice with advanced features may require direct connection or specific drivers.
- Intermittent Signal/Flickering:
- This often indicates a cable quality issue. Replace HDMI/DisplayPort cables with certified high-speed versions.
- Ensure the KVM switch is receiving adequate power from the provided adapter.
- Reduce the resolution or refresh rate temporarily to see if the issue persists.
- USB 3.0 Devices Not Detected:
- Confirm the USB 3.0 cables from the PCs to the KVM are connected.
- Ensure the KVM switch is powered by the external power adapter, as USB 3.0 devices may require more power.
- Try connecting the USB device directly to the computer to check its functionality.
Specifications
| Feature | Detail |
|---|---|
| Model Number | KC-303DHCAKDEU |
| Input Ports (PC) | 3 x HDMI, 6 x DisplayPort, 3 x USB 3.0 |
| Output Ports (Monitor) | 1 x HDMI, 2 x DisplayPort |
| USB Peripheral Ports | 4 x USB 3.0 |
| HDMI Resolution Support | Up to 8K@60Hz, 4K@60Hz, 2K@60Hz (backward compatible) |
| DisplayPort Resolution Support | Up to 8K@30Hz, 4K@144Hz (backward compatible) |
| USB Data Transfer Rate | Up to 5 Gbps (USB 3.0) |
| Switching Methods | Front Panel Button, Wired Remote Control |
| Operating Systems | Windows, Mac OS, Linux, Unix, Ubuntu, Chrome OS |
| Power Supply | DC 12V Power Adapter |
| Dimensions (L x W x H) | 16.5 x 6.5 x 4.5 cm |
| Weight | 810 grams |
| Material | Metal |
| Color | Black |
Detailed technical specifications for the KVM switch.

The KVM switch supports Ultra HD 8K resolution for an enhanced visual experience.
High-speed USB 3.0 ports ensure rapid data transfer for connected peripherals.
Warranty and Support
The Camgeet KVM Switch comes with a 12-month warranty from the date of purchase. This warranty covers manufacturing defects and ensures reliable operation of your device.
For technical assistance, troubleshooting, or any questions regarding your product, please contact Camgeet customer support. Refer to the contact information provided on the product packaging or the official Camgeet website.
Please retain your proof of purchase for warranty claims.


