1. Introduction
This manual provides essential information for the safe and effective use of your TOPXCDZ 5mm Blue Flashing LED Diodes. These components are designed for various electronic projects requiring a blue, flashing light source.
1.1. Product Overview
The TOPXCDZ 5mm Blue Flashing LED Diodes are a set of 100 light-emitting diodes that produce a distinct blue flashing light. They are commonly used in DIY electronics, indicator lights, and decorative applications. Each LED features a clear lens and standard leads for easy integration into circuits.
1.2. What's in the Box
- 100 x TOPXCDZ 5mm Blue Flashing LED Diodes
2. Safety Information
Please read and understand the following safety precautions before using the LEDs:
- Voltage and Current: Do not exceed the specified operating voltage (2.2-3V) and current (20mA MAX) to prevent damage to the LED or other components. Higher voltages will burn out the LED.
- Polarity: LEDs are polarity-sensitive. Ensure correct connection of anode (+) and cathode (-) to avoid malfunction.
- Resistors: Always use an appropriate current-limiting resistor in series with the LED when connecting to a power source to prevent overcurrent.
- Heat: While LEDs generate minimal heat, prolonged operation at maximum current without proper heat dissipation can reduce lifespan.
- Eye Safety: Avoid staring directly into illuminated LEDs, especially at close range, as intense light can cause discomfort.
- Storage: Store LEDs in a dry, anti-static environment to prevent damage.
3. Setup and Connection
Proper connection is crucial for the functionality and longevity of the LED diodes.
3.1. Identifying Polarity
LEDs have two leads: an anode (+) and a cathode (-). The longer lead is typically the anode (+), and the shorter lead is the cathode (-). The cathode side may also have a flat edge on the LED casing.
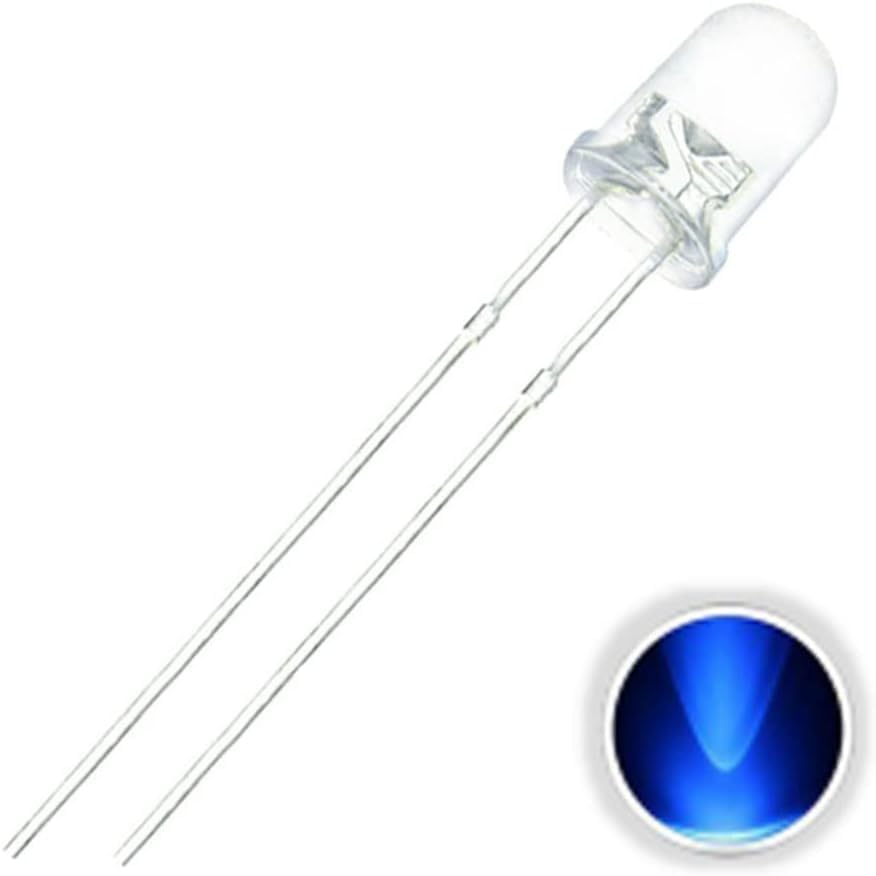
Image 1: A single 5mm blue LED diode. Note the clear lens and the two metal leads extending from the bottom. The longer lead is the anode (+), and the shorter lead is the cathode (-).
3.2. Circuit Connection
To connect the LED to a power source, you will need a current-limiting resistor. The resistor value depends on your power supply voltage and the LED's forward voltage and current.
- Determine the appropriate resistor value using Ohm's Law (R = (Vs - Vf) / I), where Vs is the supply voltage, Vf is the LED's forward voltage (approx. 2.2-3V for these blue LEDs), and I is the desired forward current (e.g., 15-20mA).
- Connect the anode (+) of the LED to the positive terminal of your power supply, typically through the current-limiting resistor.
- Connect the cathode (-) of the LED to the negative (ground) terminal of your power supply.

Image 2: Multiple 5mm blue flashing LEDs in operation, emitting a bright blue light. This illustrates the visual effect of the product when correctly powered.
4. Operating Instructions
Once correctly connected, the LEDs will begin to flash automatically when power is applied within the specified voltage and current limits.
- Power On: Apply power to your circuit. The LEDs should immediately begin their flashing sequence.
- Flashing Mechanism: These LEDs have an integrated flashing circuit, meaning no external components are needed to achieve the flashing effect, beyond the necessary current-limiting resistor.
- Brightness: The brightness is dependent on the current flowing through the LED. Ensure the current does not exceed 20mA for optimal performance and lifespan.
5. Maintenance
These LEDs require minimal maintenance to ensure long-term performance.
5.1. Cleaning
If the LED lens becomes dusty, gently wipe it with a soft, dry, lint-free cloth. Avoid using harsh chemicals or abrasive materials that could scratch the lens.
5.2. Recycling
LEDs are electronic components and should be disposed of responsibly. Please refer to local regulations for the recycling of electronic waste. For general information on recycling light bulbs and similar components, you may consult resources like Amazon's recycling information (Note: This link is a general example and may not be specific to these exact LEDs).
6. Troubleshooting
If your LED diodes are not functioning as expected, consider the following common issues:
- LED not lighting up:
- Check polarity: Ensure the anode (+) is connected to the positive supply and the cathode (-) to ground.
- Verify power supply: Confirm the power supply is providing the correct voltage (2.2-3V).
- Check resistor: Ensure a current-limiting resistor is used and its value is correct for your supply voltage. An incorrect resistor can prevent the LED from lighting or cause it to burn out.
- Inspect connections: Look for loose wires or poor solder joints.
- LED is too dim or too bright:
- Adjust resistor value: A higher resistance will reduce current and brightness; a lower resistance will increase current and brightness. Do not exceed 20mA.
- Check supply voltage: Ensure the voltage is within the 2.2-3V range.
- LED burned out: This usually indicates overcurrent or overvoltage. Always use a resistor and ensure correct voltage.
7. Specifications
| Feature | Specification |
|---|---|
| Brand | TOPXCDZ |
| Model | Blinkende Flimmern LED |
| Quantity | 100 pieces |
| Emitted Color | Blue (Flashing) |
| Lens Color | Clear |
| LED Diameter | 5 mm |
| Operating Voltage | 2.2 - 3 V |
| Max Current | 20 mA |
| Leg Length | 25-27 mm (random size) |
| Material | Semiconductors |
| Power | 4.6 Watts |
| Equivalent Incandescent Power | 27.6 Watts |
| Item Weight | 30 g |
| Package Dimensions | 10 x 6 x 2 cm |
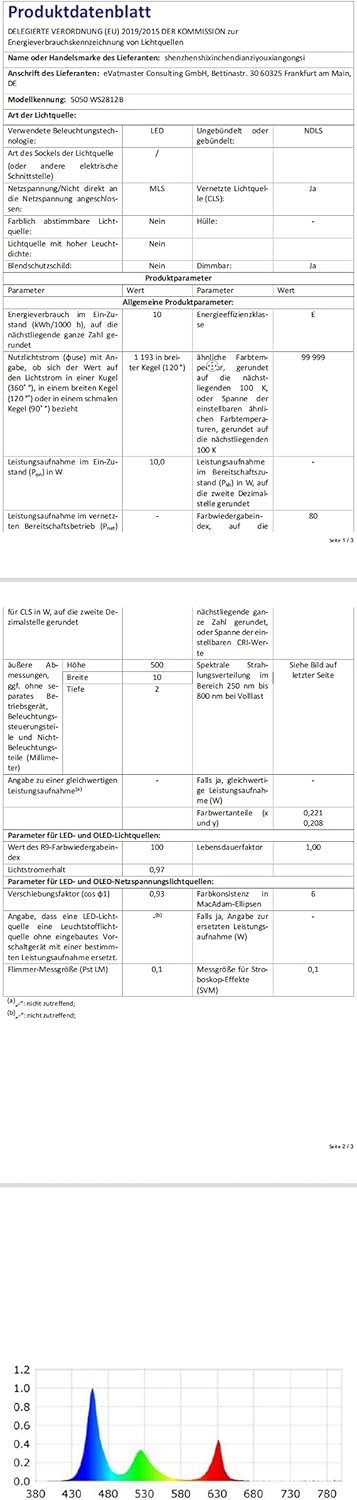
Image 3: Energy efficiency label, indicating an 'E' rating and energy consumption of 10 kWh per 1000 hours. For detailed product data, refer to the EPREL database.
8. Warranty and Support
Specific warranty information for TOPXCDZ products may vary. Please refer to your purchase documentation or contact the seller directly for details regarding warranty coverage.
8.1. Customer Support
For technical assistance or inquiries, please contact TOPXCDZ customer support through the retailer where the product was purchased.


