
BENETECH GM760
BENETECH GM760 pH Meter User Manual
1. Introduction
Thank you for choosing the BENETECH GM760 pH Meter. This device is designed for accurate measurement of pH levels in various liquids. Please read this manual thoroughly before operation to ensure proper use, optimal performance, and longevity of the instrument. Keep this manual for future reference.
2. Product Overview
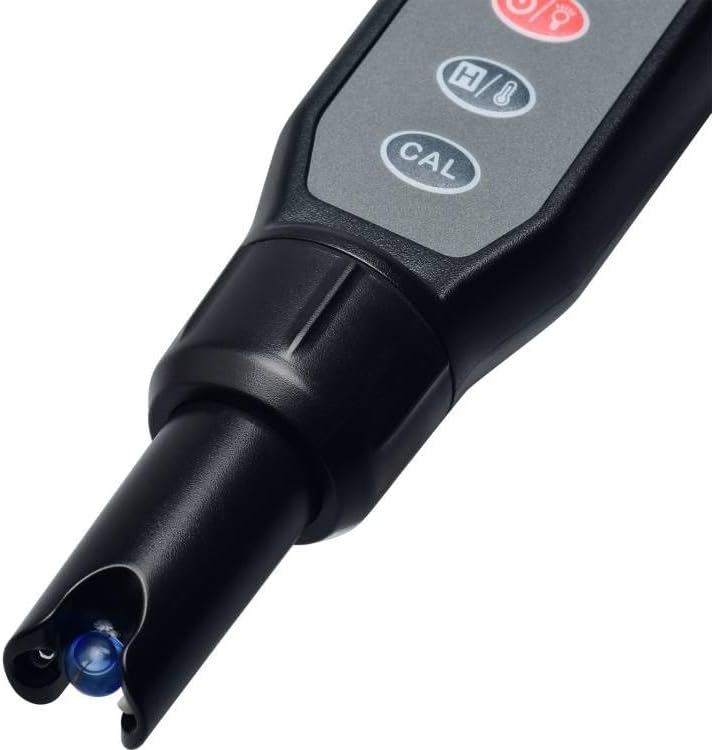
The BENETECH GM760 is a portable and precise pH meter. Familiarize yourself with its components:
- LCD Display: Shows pH readings and temperature.
- Power/Backlight Button: Turns the device on/off and controls backlight.
- Hold/Temperature Button: Freezes the reading or switches between temperature units.
- CAL Button: Initiates calibration mode.
- pH Electrode: The sensing probe for pH measurement.
- Protective Cap: Covers the electrode when not in use.


3. Setup
3.1. Battery Installation
The BENETECH GM760 pH Meter typically requires batteries for operation. Please check the battery compartment for the required type and ensure correct polarity when inserting them.
- Locate the battery compartment cover, usually at the top or back of the device.
- Slide or unscrew the cover to open the compartment.
- Insert the required batteries (e.g., 4 x 1.5V LR44 button cells, or as indicated on the device) ensuring correct polarity.
- Replace the battery compartment cover securely.
3.2. Initial Preparation
- Remove the protective cap from the electrode.
- Rinse the electrode with distilled water and gently blot dry with a clean tissue. Do not rub.
- The electrode should be kept moist. If it appears dry, soak it in pH 7.0 buffer solution or KCL storage solution for at least 30 minutes before first use.
4. Operating Instructions
4.1. Power On/Off
- Press the Power/Backlight button to turn the meter on.
- Press and hold the Power/Backlight button for a few seconds to turn the meter off.
- Briefly press the Power/Backlight button to toggle the backlight on/off.
4.2. Taking a Measurement
- Ensure the meter is calibrated (see Section 5. Calibration).
- Rinse the electrode with distilled water and gently blot dry.
- Immerse the electrode into the sample solution, ensuring the glass bulb is fully submerged.
- Gently stir the solution and wait for the reading to stabilize on the LCD display.
- Press the Hold/Temperature button to freeze the reading. Press again to release.
- After measurement, rinse the electrode with distilled water and replace the protective cap.
4.3. Temperature Unit Switching
While the meter is on, briefly press the Hold/Temperature button (without holding) to switch between Celsius (°C) and Fahrenheit (°F) temperature units.
5. Calibration
Calibration is essential for accurate pH measurements. Calibrate the meter regularly, especially after prolonged storage, after replacing batteries, or if readings seem inaccurate.
5.1. Preparation for Calibration
- Prepare fresh pH buffer solutions (e.g., pH 4.00, pH 6.86/7.00, pH 9.18/10.00). Use at least two points for calibration, typically pH 6.86/7.00 and either pH 4.00 or pH 9.18/10.00 depending on your expected measurement range.
- Ensure the buffer solutions are at room temperature.
- Rinse the electrode with distilled water before and after each buffer solution.
5.2. Calibration Procedure (Two-Point or Three-Point)
- Turn on the pH meter.
- Immerse the electrode into the first buffer solution (e.g., pH 6.86 or 7.00).
- Press and hold the CAL button until the display shows "CAL" and the pH value starts flashing.
- Wait for the reading to stabilize. The meter will automatically recognize the buffer and complete the calibration for that point. The display will show "END" or a similar indicator, then return to measurement mode.
- Rinse the electrode with distilled water.
- Immerse the electrode into the second buffer solution (e.g., pH 4.00 or 9.18/10.00).
- Press and hold the CAL button again. The display will show "CAL" and the new pH value will flash.
- Wait for stabilization. The meter will complete the calibration for the second point.
- (Optional for Three-Point Calibration): Repeat steps 5-8 for the third buffer solution (e.g., pH 9.18/10.00).
- After calibration, rinse the electrode with distilled water and replace the protective cap.
Note: If calibration fails or readings are erratic, ensure buffer solutions are fresh, the electrode is clean, and batteries are sufficient.
6. Maintenance
6.1. Electrode Care
- Always rinse the electrode with distilled water before and after each use.
- Do not touch the glass bulb of the electrode with your fingers.
- Store the electrode with the protective cap filled with a few drops of KCL storage solution or pH 7.0 buffer solution. Never store in distilled water, as this will deplete the electrode's internal electrolyte.
- If the electrode becomes dry, soak it in KCL storage solution or pH 7.0 buffer for several hours to rehydrate.
6.2. Cleaning the Meter
Wipe the body of the meter with a clean, damp cloth. Do not immerse the meter in water or use abrasive cleaners.
6.3. Storage
Store the meter in a cool, dry place away from direct sunlight and extreme temperatures. Ensure the electrode is properly stored with its protective cap and storage solution.
7. Troubleshooting
| Problem | Possible Cause | Solution |
|---|---|---|
| Meter does not turn on. | Dead or incorrectly installed batteries. | Check battery polarity; replace batteries. |
| Inaccurate readings. | Uncalibrated meter; dirty/dry electrode; expired buffer solutions. | Calibrate the meter; clean/rehydrate electrode; use fresh buffer solutions. |
| Slow response time. | Electrode is dry or contaminated. | Soak electrode in KCL storage solution or pH 7.0 buffer for several hours. Clean electrode. |
| "Err" or "---" displayed. | Measurement out of range; calibration error; electrode issue. | Ensure sample is within pH range; re-calibrate; check electrode for damage. |
8. Specifications
Based on typical specifications for the BENETECH GM760 pH Meter:
- pH Range: 0.00 - 14.00 pH
- pH Resolution: 0.01 pH
- pH Accuracy: ±0.05 pH
- Temperature Range: 0°C - 60°C (32°F - 140°F)
- Temperature Resolution: 0.1°C / 0.1°F
- Temperature Accuracy: ±0.5°C
- Automatic Temperature Compensation (ATC): 0°C - 60°C
- Power Supply: 4 x 1.5V LR44 Button Cells (Note: Product data indicated "No battery required", but device images show battery indicator. Please verify upon receipt.)
- Operating Temperature: 0°C - 60°C (32°F - 140°F)
- Dimensions: Approximately 183mm x 37mm x 37mm
- Weight: Approximately 80g
9. Warranty and Support
For warranty information and technical support, please refer to the documentation provided with your purchase or contact your retailer. Keep your purchase receipt as proof of purchase.
Related documentsGM760


Ask a question about this manual
Ask about setup, troubleshooting, compatibility, parts, safety, or missing instructions. Manuals+ will review the question and use this page’s manual context to help answer it.