1. Introduction
Thank you for choosing the Muse MH08MB Portable Radio. This device is designed for versatility and durability, offering multiple power sources, audio playback options, and emergency features. Please read this manual carefully to ensure proper use and maintenance of your device.

Figure 1: Muse MH08MB Portable Radio. This image displays the Muse MH08MB portable radio from a side angle, highlighting its integrated hand crank for dynamo charging, the solar panel on top, and the powerful LED flashlight on the front. A green lanyard is attached for portability.
2. Safety Information
- Do not expose the device to extreme temperatures or direct sunlight for prolonged periods.
- Avoid dropping the device or subjecting it to strong impacts.
- Keep the device away from water and moisture, despite its splash-proof design, to prevent damage.
- Do not attempt to disassemble or repair the device yourself. Refer all servicing to qualified personnel.
- Use only the specified charging methods (USB-C, solar, dynamo) to power the device.
3. Package Contents
Please check that all items are present:
- Muse MH08MB Portable Radio
- USB-C Charging Cable
- Power Adapter
- User Manual (this document)
4. Product Overview
Familiarize yourself with the various parts and controls of your Muse MH08MB radio.

Figure 2: Overview of Muse MH08MB Features. A detailed infographic summarizing all major features of the Muse MH08MB portable radio. It includes a jumbo display, FM radio with 5 presets, hands-free function, IP64 dust and splash resistance, siren, clock, 6 hours playtime, multiple charging options (USB-C, hand crank, solar), stereo pairing, LED flashlight, and an AUX-in jack.
Key Components:
- Digital Display: Shows frequency, time, and other indicators.
- Control Buttons: Power, Play/Pause, Skip, Preset selection (1-5).
- Telescopic Antenna: For improved radio reception.
- LED Flashlight: Integrated light source.
- Hand Crank: For dynamo charging.
- Solar Panel: For solar charging.
- USB-C Port: For charging the device and external devices.
- AUX-IN Jack: For connecting external audio sources.
- Microphone: For hands-free calls.
- Siren: Emergency alert function.

Figure 3: Top View with Antenna and Controls. This view of the Muse MH08MB portable radio features its telescopic antenna fully extended for improved radio reception. The top panel shows various control buttons, and the digital display is active.
5. Charging the Device
The Muse MH08MB offers multiple charging methods to ensure you always have power.
5.1. USB-C Charging
- Connect the provided USB-C cable to the USB-C port on the radio.
- Connect the other end of the cable to the power adapter and plug it into a wall outlet.
- The charging indicator on the display will show the charging status.
5.2. Solar Charging
Place the radio with the solar panel facing direct sunlight. The solar panel will convert sunlight into energy to charge the internal battery. This method is ideal for maintaining charge or slow charging in outdoor environments.
5.3. Dynamo (Hand Crank) Charging
Extend the hand crank located on the side of the radio. Rotate the crank clockwise or counter-clockwise at a steady pace. Continuous cranking will generate power to charge the internal battery, useful in emergency situations or when other power sources are unavailable.

Figure 4: Charging Options and IP64 Design. This infographic illustrates the versatile charging options of the Muse MH08MB, including solar power and hand-crank dynamo. It also points out the USB-C port for charging other devices and emphasizes its IP64 dust and splash-proof design.
6. Setup
6.1. Initial Power On
Press and hold the Power button to turn on the device. The digital display will illuminate.
6.2. Setting the Clock
When the device is on, press the Clock button (if available, or refer to the general controls for time setting). Use the Tune/Skip buttons to adjust the hour and minute. Press the Clock button again to confirm.
7. Operating Instructions
7.1. Power On/Off
Press and hold the Power button for approximately 2 seconds to turn the radio on or off.
7.2. Radio Operation (AM/FM)
- Turn on the radio.
- Extend the telescopic antenna for optimal FM reception.
- Press the Mode button to select FM or AM band.
- Use the Tune/Skip buttons to manually tune to a station or press and hold to auto-scan for the next available station.
- To save a preset, tune to your desired station, then press and hold one of the Preset (1-5) buttons until the display confirms it's saved. To recall a preset, simply press the corresponding Preset button.
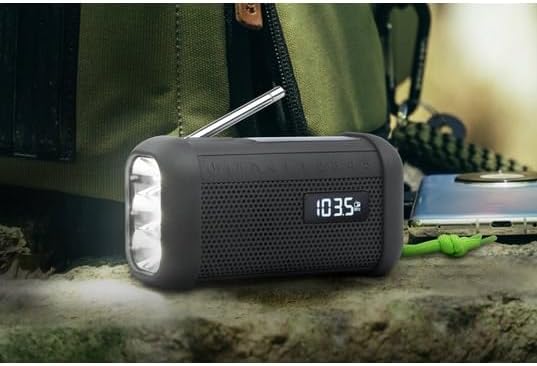
Figure 5: Digital Display in Radio Mode. The Muse MH08MB portable radio is shown resting on a surface, with its digital display clearly indicating "103.5 MHz", signifying active FM radio tuning. The speaker grille and flashlight are also visible.
7.3. Bluetooth Pairing
- Turn on the radio and switch to Bluetooth mode using the Mode button. The display will show a Bluetooth indicator.
- On your mobile device, enable Bluetooth and search for available devices.
- Select "MH08MB" from the list of devices.
- Once paired, the radio will confirm the connection, and you can play audio from your device.
7.4. Hands-Free Microphone
When connected via Bluetooth to a smartphone, the integrated microphone allows for hands-free calling. When a call comes in, the radio will pause playback. Press the Play/Pause button to answer or end a call.
7.5. LED Flashlight
Press the Flashlight button (or designated button) to turn the LED flashlight on or off. The flashlight features 3 ultra-bright LEDs.
7.6. Siren Function
In an emergency, press and hold the Siren button to activate the emergency siren and flashing light. Press again to deactivate.
7.7. Stereo Pairing (TWS)
If you have two Muse MH08MB units, you can pair them for True Wireless Stereo (TWS) sound. Turn on both units and ensure they are in Bluetooth mode. On one unit, press and hold the Stereo Pair button (refer to controls for exact button). The units will connect, providing a wider stereo soundstage.
7.8. AUX-IN Mode
Connect an external audio device (e.g., MP3 player) to the AUX-IN jack using a 3.5mm audio cable. Switch the radio to AUX mode using the Mode button. Audio from the external device will play through the radio's speaker.
8. Maintenance
- Cleaning: Wipe the device with a soft, dry cloth. Do not use abrasive cleaners or solvents.
- Storage: Store the radio in a cool, dry place away from direct sunlight when not in use for extended periods.
- Battery Care: To prolong battery life, avoid fully discharging the battery frequently. Charge it regularly, especially if stored for a long time.
9. Troubleshooting
| Problem | Possible Cause | Solution |
|---|---|---|
| No power | Battery is depleted | Charge the device using USB-C, solar, or dynamo. |
| Poor radio reception | Antenna not extended or weak signal | Extend the telescopic antenna fully. Try moving to a different location. |
| Bluetooth not connecting | Radio not in pairing mode or device too far | Ensure radio is in Bluetooth mode. Move your device closer. Forget and re-pair on your mobile device. |
| No sound | Volume too low or incorrect mode | Increase volume. Ensure the correct mode (Radio, Bluetooth, AUX) is selected. |
10. Specifications
| Feature | Detail |
|---|---|
| Model Number | MH08MB |
| Brand | MUSE |
| Color | Black |
| Connectivity | Bluetooth |
| Radio Bands | AM/FM (5 digital presets) |
| Power Sources | USB-C, Solar, Dynamo (Hand Crank) |
| Battery | 1 Lithium-ion (included) |
| Battery Life | Up to 6 hours (depending on volume/content) |
| Special Features | Integrated Clock, Hands-free Microphone, LED Flashlight (3 ultra-bright LEDs), Siren, Stereo Pairing (TWS), NFC |
| Water Resistance | IP64 (Dust and Splash-proof) |
| Dimensions (L x W x H) | 15.8 x 6.4 x 8 cm |
| Included Components | Power adapter, USB-C Charging Cable, User manual |

Figure 6: Product Dimensions. A technical diagram showing the dimensions of the Muse MH08MB portable radio: 158mm length, 80mm height, and 64mm width.
11. Warranty and Support
Muse products are designed for reliability and performance. For warranty information and technical support, please refer to the warranty card included with your purchase or visit the official Muse website. Keep your proof of purchase for any warranty claims.
For further assistance, please contact Muse customer service.


