
1. Introduction
This manual provides detailed instructions for the setup, operation, and maintenance of your Targus USB-C Universal DV4K Docking Station. This device is designed to expand your laptop's connectivity, allowing you to connect multiple displays, peripherals, and provide power delivery through a single USB-C connection.

Image 1.1: Targus USB-C Universal DV4K Docking Station with included Dockztorm hub.
2. Safety Information
- Read all instructions carefully before using the device.
- Do not expose the device to water, moisture, or extreme temperatures.
- Use only the power adapter provided with the docking station.
- Avoid placing the device in enclosed spaces without adequate ventilation.
- Do not attempt to disassemble or repair the device yourself. Refer all servicing to qualified personnel.
3. Package Contents
Verify that all items are present in your package:
- Targus USB-C Universal DV4K Docking Station
- Power Adapter (AC/DC)
- USB-C to USB-C Cable
- Dockztorm Hub (optional, may be included)
- Quick Start Guide (this manual serves as a comprehensive guide)
4. Product Overview
Familiarize yourself with the ports and features of your docking station.
4.1 Front/Side Panel
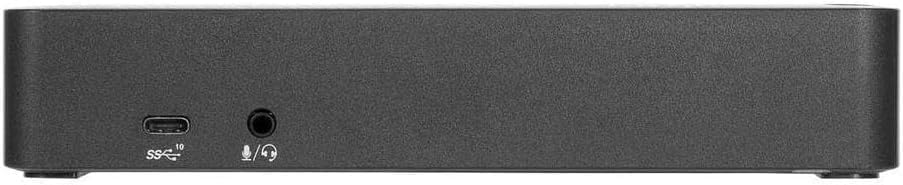
Image 4.1: Front panel with USB 3.2 Gen 2 Type-C and audio ports.
- USB 3.2 Gen 2 Type-C (10 Gbps) Port: For connecting USB-C peripherals.
- Audio In/Out (3.5mm Jack): For connecting headphones, speakers, or a microphone.
- Lock Slot: For security cable attachment.
4.2 Rear Panel

Image 4.2: Rear panel with power, video, Ethernet, and USB ports.
- Power In (DC 20V): Connects to the included power adapter.
- Power Out (DC 19.5V): For optional legacy power kit (sold separately).
- USB 3.2 Gen 2 Type-C to Host: Connects to your laptop for data, video, and power delivery.
- Gigabit Ethernet Port: For wired network connection.
- DisplayPort 1.2a (x2): For connecting external monitors.
- HDMI 2.0 (x2): For connecting external monitors.
- USB 3.2 Gen 1 Type-A (x4): For connecting USB-A peripherals.
4.3 Side Panel (Fast Charging)

Image 4.3: Side panel with a fast-charging USB 3.2 Gen 1 Type-A port.
- USB 3.2 Gen 1 Type-A (Fast Charging): For charging smartphones, tablets, or other devices.
5. Setup Instructions
- Connect Power: Plug the included power adapter into the "Power In (DC 20V)" port on the rear of the docking station, then connect it to a wall outlet.
- Install DisplayLink Driver: Before connecting your laptop, it is recommended to download and install the latest DisplayLink drivers from the official Targus support website. This ensures optimal performance for video output.
- Connect Displays: Connect your external monitors to the docking station using either the DisplayPort 1.2a or HDMI 2.0 ports. The docking station supports up to two 4K UHD displays at 60 Hz simultaneously.
- Connect Peripherals: Connect your USB devices (keyboard, mouse, external drives, etc.) to the available USB 3.2 Gen 1 Type-A ports or the USB 3.2 Gen 2 Type-C port.
- Connect Ethernet (Optional): For a wired network connection, connect an Ethernet cable from your router/modem to the Gigabit Ethernet port on the docking station.
- Connect to Laptop: Use the provided USB-C to USB-C cable to connect the "USB 3.2 Gen 2 Type-C to Host" port on the docking station to a USB-C port on your laptop. The docking station will provide up to 100W of power delivery to your laptop.

Image 5.1: Example setup showing the docking station connected to a laptop and various peripherals.
6. Operating Instructions
- Power On/Off: The docking station typically powers on automatically when connected to power and a host laptop. There is a power button on the top surface for manual control or to cycle power if needed.
- Display Configuration: Once connected, your operating system should detect the external displays. You can configure display settings (e.g., extend, duplicate, resolution) through your computer's display settings.
- USB Device Usage: Connected USB devices will function as if directly connected to your laptop.
- Audio: Select the docking station's audio output as your default playback device in your operating system's sound settings to use connected headphones or speakers.
- Charging: The dedicated fast-charging USB-A port can charge compatible devices even when the laptop is not connected, provided the docking station is powered.
7. Maintenance
- Cleaning: Use a soft, dry cloth to clean the exterior of the docking station. Do not use liquid cleaners or aerosols.
- Ventilation: Ensure the docking station has adequate airflow around it to prevent overheating. Do not block ventilation openings.
- Cable Management: Organize cables to prevent strain on ports and accidental disconnections.
8. Troubleshooting
- No Display Output:
- Ensure the DisplayLink driver is installed and up to date.
- Verify that display cables are securely connected to both the docking station and the monitors.
- Check your laptop's display settings to ensure external monitors are detected and configured correctly (e.g., extended or duplicated).
- Try different display ports or cables if available.
- Restart your laptop and the docking station.
- Laptop Not Charging:
- Confirm the docking station's power adapter is securely connected to a working power outlet.
- Ensure the USB-C cable connecting the docking station to your laptop supports power delivery.
- Verify your laptop's USB-C port supports power input.
- USB Devices Not Recognized:
- Try connecting the USB device to a different port on the docking station.
- Connect the USB device directly to your laptop to confirm it is functional.
- Ensure the docking station is properly powered and connected to the host laptop.
- Intermittent Connections:
- Ensure all cables are firmly seated. Loose connections can cause intermittent issues.
- Avoid excessive movement of the docking station or connected cables.
- Update DisplayLink drivers and your laptop's USB-C port drivers.
9. Specifications
| Feature | Detail |
|---|---|
| Model Name | USB-C Universal DV4K Docking Station |
| Part Number (ASIN) | B0CW26BMGN |
| Host Connection | USB 3.2 Gen 2 Type-C |
| Video Output | 2x DisplayPort 1.2a, 2x HDMI 2.0 |
| Max Resolution | Dual 4K UHD (4096x2160) @ 60Hz |
| USB Ports | 4x USB 3.2 Gen 1 Type-A, 1x USB 3.2 Gen 2 Type-C, 1x USB 3.2 Gen 1 Type-A (Fast Charging) |
| Ethernet | Gigabit Ethernet |
| Audio | 1x 3.5mm Combo Audio Jack (In/Out) |
| Power Delivery | Up to 100W to host laptop |
| Dimensions (LxWxH) | 3.5 x 8.8 x 6.9 inches (approx.) |
| Weight | 2.3 pounds (approx.) |
| Color | Black |
10. Warranty and Support
For warranty information and technical support, please refer to the official Targus website or contact their customer service. Keep your purchase receipt for warranty claims.
Official Targus Website: www.targus.com


