
1. Introduction
This manual provides detailed instructions for the installation, operation, and maintenance of your Biorunn Android 13 Stereo Double Din unit. Please read this manual thoroughly before use to ensure proper functionality and safety. This unit is designed to enhance your driving experience with advanced features and seamless integration.
2. Package Contents
Verify that all items listed below are included in your package:
- 1 x Biorunn Android 13 Stereo Unit
- 1 x Frame Kit
- 1 set Wire Harness
- 1 x Microphone
- 1 x RCA Cable
- 1 x GPS Antenna
- 1 x USB Cable

Figure 2.1: Included components and unit dimensions (9-inch screen, 8.98 inches width, 5.82 inches height).
3. Compatibility
This car stereo is designed for Honda Vezel HR-V HRV models manufactured between 2013 and 2022. It is compatible with vehicle console types A and B. For 'C' type consoles, which feature a knob, an additional wiring harness is required for proper installation. Please verify your vehicle's console type before proceeding with installation.

Figure 3.1: Console type compatibility for Honda Vezel HR-V HRV.
4. Features Overview
- Android 13 Operating System: Provides a modern and intuitive user interface.
- 9-inch IPS Touch Screen: Offers clear visuals and responsive touch control with 720 x 1280 resolution.
- Built-in Wireless/Wired CarPlay & Android Auto: Seamlessly integrate your smartphone for navigation, music, and calls.
- Bluetooth 5.0: Supports hands-free calling, phone book download, and audio streaming.
- FM RDS Radio: Features 18 preset stations with automatic and manual search capabilities.
- GPS Navigation: Supports worldwide map data for accurate routing.
- Steering Wheel Control Support: Allows control of the unit using existing vehicle steering wheel buttons.
- Reversing Video Input: Compatible with aftermarket rear cameras (camera not included).
- Cooling Fan: Integrated cooling system to maintain optimal operating temperature.
- Connectivity: Includes Wi-Fi, USB, and Bluetooth for versatile connections.
5. Setup and Installation
Professional installation is highly recommended for this product. Ensure the vehicle's battery is disconnected before beginning any installation work to prevent electrical damage or injury.
5.1 Wiring Diagram
Refer to the following diagram for proper connection of the main harness, RCA cables, microphone, GPS antenna, and USB cables. Ensure all connections are secure.

Figure 5.1: Wiring diagram for the stereo unit.
5.2 Installation Steps (General)
- Carefully remove the original car stereo unit and trim panels.
- Connect the provided wire harness to the vehicle's wiring and the new stereo unit.
- Connect the GPS antenna, microphone, and any other auxiliary cables (e.g., USB, RCA, reversing camera).
- Mount the new stereo unit into the dashboard opening using the provided frame kit.
- Reconnect the vehicle's battery and test the unit's functionality before reassembling all trim panels.
6. Operating Instructions
6.1 Basic Operation
Press the power button to turn the unit on or off. Adjust volume using the on-screen controls or steering wheel buttons (if configured).
6.2 FM RDS Radio
Access the FM Radio application from the main menu. You can perform an automatic search for available stations or manually tune to a specific frequency. Save your favorite stations to the preset list for quick access.

Figure 6.1: FM RDS Radio interface.
6.3 Bluetooth Function
Enable Bluetooth on your mobile device and on the stereo unit. Search for available devices on your phone and select the stereo unit to pair. Once paired, you can make hands-free calls, download your phone book, and stream audio.
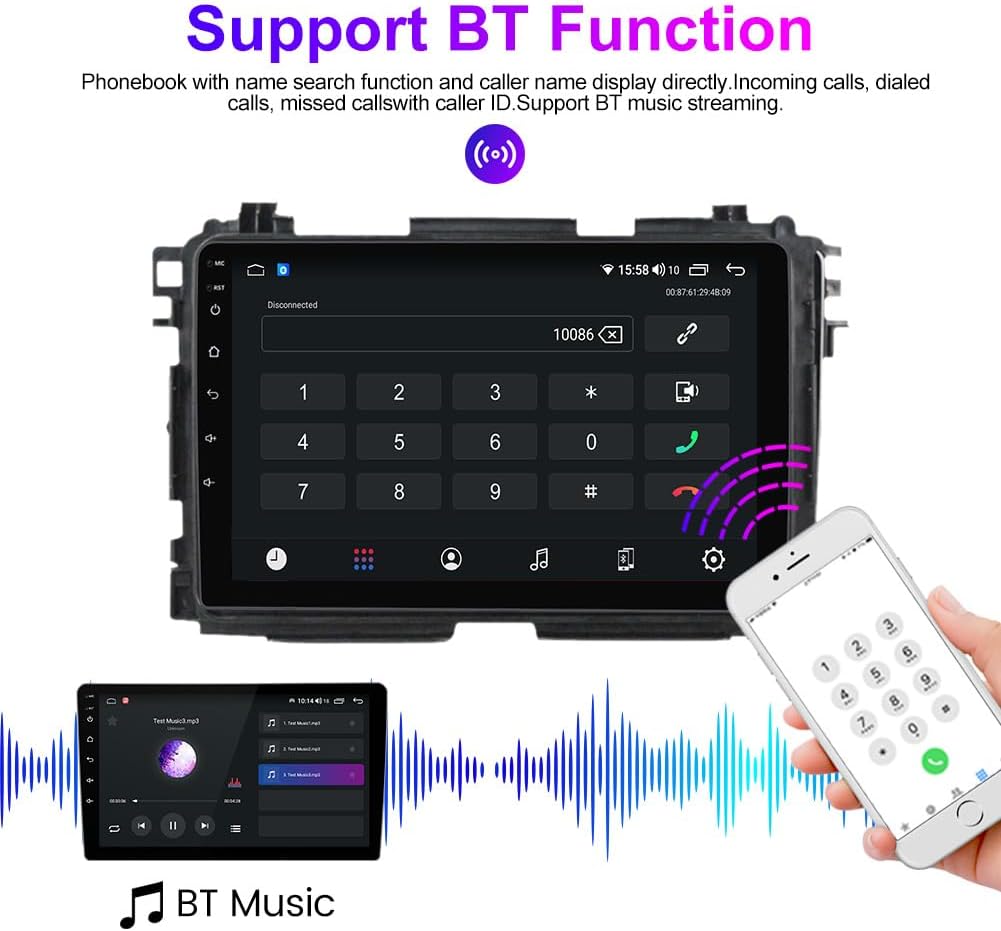
Figure 6.2: Bluetooth call and music interface.
6.4 CarPlay / Android Auto
This unit supports both wireless and wired CarPlay and Android Auto. Connect your smartphone via Bluetooth and/or USB cable. Once connected, you can access compatible apps for navigation, music, messages, and more directly on the stereo screen.

Figure 6.3: CarPlay and Android Auto functionality.
6.5 GPS Navigation
Utilize the built-in GPS module and pre-installed map applications for navigation. Ensure the GPS antenna is installed correctly for optimal signal reception.

Figure 6.4: GPS Navigation display.
6.6 Steering Wheel Control (SWC)
The unit supports original steering wheel remote control. Access the SWC settings in the system menu to program the buttons on your steering wheel to control various functions of the stereo, such as volume, track skipping, and call management.

Figure 6.5: Steering Wheel Control setup.
6.7 Reversing Video
If a compatible rear camera is connected, the stereo unit will automatically display the reversing video feed when the vehicle is shifted into reverse gear. (Note: Rear camera is not included).

Figure 6.6: Reversing video display.
7. Maintenance
To ensure the longevity and optimal performance of your Biorunn stereo unit, follow these maintenance guidelines:
- Screen Cleaning: Use a soft, dry, lint-free cloth to clean the touch screen. Avoid abrasive cleaners or solvents.
- Temperature Control: Avoid exposing the unit to extreme temperatures, direct sunlight, or high humidity for extended periods. The built-in cooling fan helps manage internal temperatures.
- Connection Checks: Periodically check all wiring connections to ensure they are secure and free from corrosion.
- Software Updates: Check for available software updates to ensure the system runs efficiently and has the latest features.

Figure 7.1: Internal cooling fan for temperature management.
8. Troubleshooting
If you encounter issues with your stereo unit, refer to the following common problems and solutions:
| Problem | Possible Cause | Solution |
|---|---|---|
| No Power | Loose power connection, blown fuse, incorrect wiring. | Check power harness connections. Inspect vehicle's fuse box for blown fuses. Verify wiring against diagram. |
| No Sound | Incorrect speaker wiring, volume too low, wrong audio source selected. | Ensure speaker wires are correctly connected. Increase volume. Select the correct audio input source. |
| Bluetooth Not Connecting | Bluetooth disabled, device not in pairing mode, interference. | Ensure Bluetooth is enabled on both devices. Put phone in pairing mode. Try re-pairing the devices. Clear previous pairings. |
| GPS Signal Weak/Lost | GPS antenna improperly installed, obstructed view of sky. | Ensure GPS antenna is securely connected and placed in a location with a clear view of the sky (e.g., dashboard). |
| Steering Wheel Controls Not Working | Incorrect wiring, controls not programmed. | Verify SWC wiring. Access SWC settings in the unit and perform the learning/programming procedure. |
| Touch Screen Unresponsive | System freeze, temporary software glitch. | Perform a soft reset (refer to system settings for reset option or hold power button). If issue persists, contact support. |
9. Specifications
| Feature | Detail |
|---|---|
| Brand | Biorunn |
| Model | 4-Core, FM RDS, 1GB+32GB |
| Operating System | Android 13 |
| Screen Size | 9 inches |
| Display Type | IPS Touch Screen (Capacitive) |
| Resolution | 720 x 1280 |
| Memory (RAM+ROM) | 1GB RAM + 32GB ROM |
| Bluetooth Version | 5.0 |
| Connectivity | Bluetooth, USB, Wi-Fi |
| Special Features | Built-in CarPlay/Android Auto, FM RDS Radio, GPS, Steering Wheel Control, Reversing Video Support |
| Audio Output Mode | Stereo |
| Mounting Type | Dashboard Mount |
| Included Components | Stereo unit, frame kit, wire harness, microphone, RCA cable |
10. Warranty Information
This Biorunn product is covered by a 1-year warranty from the date of purchase. This warranty covers manufacturing defects and malfunctions under normal use. Please retain your proof of purchase (receipt or order confirmation) as it will be required for any warranty claims. The warranty does not cover damage caused by improper installation, misuse, accidents, unauthorized repairs, or normal wear and tear.
11. Support
For technical assistance, troubleshooting beyond this manual, or any product-related inquiries, please contact the seller, RongNan International, directly through the Amazon platform. They are available to provide support and address any concerns you may have.

Figure 11.1: How to contact seller support.