
Verbatim 32173
Verbatim USB-C Pro Docking Station 15-in-1 with SSD Enclosure User Manual
Model: 32173
Introduction
The Verbatim USB-C Pro Docking Station 15-in-1 with SSD Enclosure is a comprehensive connectivity solution designed to expand the capabilities of your USB-C enabled computer. This docking station allows you to connect multiple peripherals, external displays, network cables, and memory cards, all while providing power delivery to your host device. Additionally, it features an integrated enclosure for M.2 NVMe or SATA SSDs, offering convenient external storage.
This manual provides detailed instructions on setting up, operating, and maintaining your docking station, along with troubleshooting tips and product specifications.
Key Features
- 15-in-1 Connectivity: Expands your device's ports significantly.
- Integrated SSD Enclosure: Supports NVMe 10Gb/s and SATA 5Gb/s M.2 SSDs for expanded storage.
- Dual HDMI & DisplayPort: Connect up to three external displays (two via HDMI, one via DisplayPort) with resolutions up to 8K@30Hz or 4K@120Hz.
- High-Speed USB Ports: Includes 1 x USB-A 3.2 Gen2 (10Gb/s), 2 x USB-A 3.2 Gen1 (5Gb/s), 1 x USB-A 2.0 (480Mb/s), and 1 x USB-C 3.2 Gen2 (10Gb/s).
- Gigabit Ethernet: Provides a stable wired network connection up to 1Gb/s.
- Memory Card Readers: Features SD 4.0 (up to 250MB/s) and microSD 3.0 (up to 104MB/s) slots.
- Audio Jack: A 3.5mm audio jack for headphones or speakers.
- Power Delivery (PD): USB-C PD port supports up to 100W power delivery to charge your host device.
- Durable Design: Robust construction for reliable performance.
Setup
Connecting the Docking Station
- Unpack: Carefully remove the docking station and its accessories from the packaging.
- Connect to Host: Plug the integrated USB-C host cable from the docking station into a compatible USB-C port on your laptop or desktop computer.
- Power Connection: If your host device requires charging via the docking station, connect your original USB-C power adapter to the USB-C PD (Power Delivery) port on the docking station.
- Peripheral Connection: Connect your desired peripherals (monitors, USB devices, Ethernet cable, etc.) to the corresponding ports on the docking station.

Image: The Verbatim USB-C Pro Docking Station connected to a laptop, extending the display to an external monitor, demonstrating a typical setup.
Installing an SSD in the Enclosure
- Open Enclosure: Gently slide open the top cover of the docking station to reveal the SSD slot.
- Insert SSD: Align your M.2 NVMe or SATA SSD with the slot and carefully insert it. Ensure it is fully seated.
- Secure SSD: Use the provided retention mechanism (e.g., screw or rubber stopper) to secure the SSD in place.
- Close Enclosure: Slide the top cover back into place until it clicks securely.
- Initialize/Format: Once connected to your computer, the SSD may need to be initialized and formatted through your operating system's Disk Management utility before use.
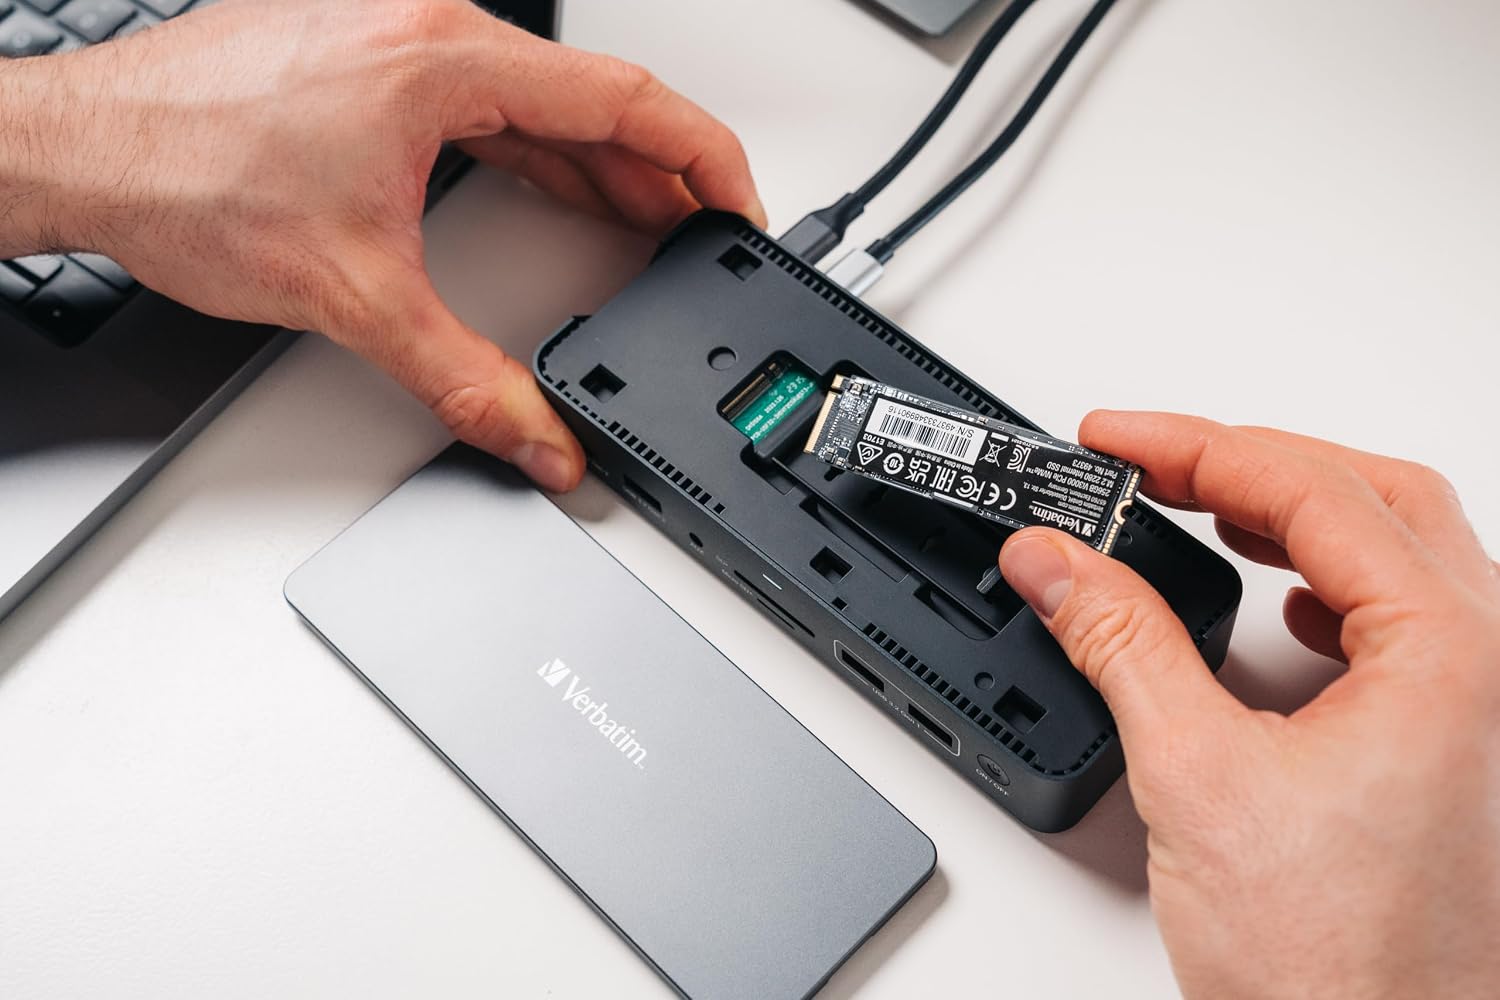
Image: A user's hands carefully inserting an M.2 SSD into the dedicated enclosure slot of the Verbatim docking station, with the top cover removed.
Operating Instructions
Video Output (HDMI & DisplayPort)
Connect your external monitors to the HDMI and/or DisplayPort outputs on the docking station. Your computer should automatically detect the displays. You can configure display settings (resolution, orientation, extended/mirrored mode) through your operating system's display settings.
USB Ports
Use the various USB-A and USB-C ports to connect peripherals such as keyboards, mice, external hard drives, USB flash drives, and other USB-compatible devices. The USB 3.2 Gen2 ports offer the fastest data transfer speeds.
Ethernet Connection
Plug an Ethernet cable from your router or network switch into the RJ45 port on the docking station for a stable wired internet connection. This is ideal for environments where Wi-Fi is unreliable or unavailable.
Memory Card Readers (SD & MicroSD)
Insert your SD or microSD cards into the corresponding slots to access data from cameras, drones, or other devices. The docking station supports high-speed data transfer for quick file access and transfer.
Audio Jack
Connect your 3.5mm headphones, earbuds, or speakers to the audio jack for audio output. Ensure your computer's audio settings are configured to use the docking station as the output device.
Maintenance
- Cleaning: Use a soft, dry cloth to clean the exterior of the docking station. Avoid liquid cleaners or abrasive materials.
- Storage: Store the docking station in a cool, dry place away from direct sunlight and extreme temperatures when not in use.
- Handling: Handle the device with care. Avoid dropping or subjecting it to strong impacts.
- Ventilation: Ensure the docking station has adequate ventilation to prevent overheating, especially during prolonged use or when multiple devices are connected.
Troubleshooting
- No Display Output:
- Ensure the USB-C host cable is securely connected to both the docking station and your computer.
- Verify that the display cables (HDMI/DisplayPort) are firmly connected to both the docking station and the monitors.
- Check your computer's display settings to ensure the external monitors are detected and configured correctly.
- Try updating your computer's graphics drivers.
- USB Devices Not Recognized:
- Reconnect the USB device to a different port on the docking station.
- Ensure the docking station is receiving sufficient power, especially if connecting power-hungry devices.
- Try connecting the USB device directly to your computer to rule out device issues.
- No Network Connection:
- Check the Ethernet cable connection at both ends (docking station and router/modem).
- Verify your computer's network settings.
- Restart your router/modem and computer.
- SSD Not Detected:
- Ensure the SSD is correctly seated and secured within the enclosure.
- Check Disk Management (Windows) or Disk Utility (macOS) to see if the SSD is detected but needs initialization or formatting.
- Verify the SSD is compatible with the enclosure (NVMe or SATA M.2).
- Docking Station Overheating:
- Ensure adequate airflow around the docking station. Do not cover ventilation holes.
- Reduce the number of connected power-hungry devices if possible.
Specifications
| Feature | Specification |
|---|---|
| Model Number | 32173 |
| Host Interface | 1 x USB-C Host Port |
| Video Output | 2 x HDMI (up to 8K@30Hz), 1 x DisplayPort (up to 8K@30Hz) |
| Ethernet | 1 x RJ45 (up to 1Gb/s) |
| USB-A Ports | 1 x USB-A 3.2 Gen2 (10Gb/s), 2 x USB-A 3.2 Gen1 (5Gb/s), 1 x USB-A 2.0 (480Mb/s) |
| USB-C Ports | 1 x USB-C 3.2 Gen2 (10Gb/s), 1 x USB-C PD (100W) |
| Memory Card Slots | 1 x SD 4.0 (up to 250MB/s R/W), 1 x microSD 3.0 (up to 104MB/s R, 80MB/s W) |
| Audio Jack | 1 x 3.5mm Audio Jack |
| SSD Enclosure | NVMe 10G and SATA 5G M.2 SSD compatible |
| Power Delivery | Max 100W via USB-C PD port |
| Product Dimensions (L x W x H) | 168mm x 68.5mm x 34mm (6.61 x 2.7 x 1.32 inches) |
| Product Weight | Approx. 340g (12.5 oz) |
| Cable Length | 1m (3.3 ft) |
| Operating Temperature | 0 ~ 40°C |
| Storage Temperature | -20 ~ 85°C |
Safety Information
- Do not expose the device to water, moisture, or extreme temperatures.
- Avoid dropping or subjecting the device to severe impacts.
- Do not attempt to disassemble or repair the device yourself. Refer to qualified service personnel.
- Keep the device away from strong magnetic fields.
- Use only compatible power adapters and cables.
- Ensure proper ventilation to prevent overheating.
Warranty and Support
Verbatim products are designed to meet high quality standards. For information regarding warranty coverage, technical support, or service, please refer to the warranty card included with your product or visit the official Verbatim website. Please retain your proof of purchase for warranty claims.
Related documents32173


Ask a question about this manual
Ask about setup, troubleshooting, compatibility, parts, safety, or missing instructions. Manuals+ will review the question and use this page’s manual context to help answer it.