
1. Introduction
The ENJOYWOOD XK4 Pocket Hole Jig Kit is a precision woodworking tool designed to create strong, concealed joints in various wood projects. This kit features an aluminum alloy guide for durability and accuracy, enabling users to drill angled holes for pocket screw joinery. Its adjustable design accommodates different board thicknesses, making it suitable for a wide range of applications from furniture assembly to repairs.
Key features include a 3-hole design for versatility with larger boards, a precise guide for burr-free holes, adjustable height settings with clear inch and millimeter scales, a sturdy toggle clamp for secure workpiece holding, and a high-duty aluminum body for a stable base. The jig also incorporates wood-chip relief and dust collection features for cleaner operation and a removable drill guide for use with benchtop or portable bases.

Image 1.1: Overview of the ENJOYWOOD XK4 Pocket Hole Jig Kit, showcasing its main features including 3-hole design, adjustable depth, sturdy toggle clamp, wood-chip relief, high-duty aluminum body, and removable drill guide.
2. Safety Information
Always prioritize safety when using woodworking tools. Failure to follow these safety guidelines may result in injury or damage to the tool.
- Read the Manual: Before operating the pocket hole jig, read and understand all instructions and safety warnings in this manual.
- Wear Eye Protection: Always wear ANSI-approved safety glasses or goggles to protect your eyes from flying debris.
- Wear Hearing Protection: Use hearing protection, especially when operating power drills in conjunction with the jig.
- Secure Workpiece: Ensure the workpiece is securely clamped in the jig before drilling to prevent movement and kickback.
- Use Sharp Bits: Always use sharp, clean drill bits. Dull bits can cause excessive heat, splintering, and inefficient drilling.
- Keep Hands Clear: Keep hands and fingers away from the drilling area and moving parts during operation.
- Maintain Work Area: Keep your work area clean, well-lit, and free of clutter to prevent accidents.
- Proper Ventilation: Ensure adequate ventilation when working with wood, especially when generating dust.
- Unplug Power Tools: Always unplug power drills or other associated tools before making adjustments, changing bits, or performing maintenance on the jig.
3. Package Contents
Carefully unpack the ENJOYWOOD XK4 Pocket Hole Jig Kit and verify that all components are present and undamaged. If any parts are missing or damaged, contact customer support.
- 1 x XK4 Pocket Hole Jig
- 1 x Portable Base
- 1 x 9.5mm (3/8") Drill Bit
- 1 x SQ2 Screwdriver Bit
- 1 x Stop Collar
- 40 x Pocket Hole Screws (assorted sizes: 1", 1.25", 1.5", 2")
- 1 x Hexagonal Wrench (not explicitly listed in product description but shown in image)

Image 3.1: Visual representation of all components included in the ENJOYWOOD XK4 Pocket Hole Jig Kit, including the main jig, portable base, drill bit, screwdriver bit, stop collar, hexagonal wrench, and various pocket hole screws.
4. Setup
Proper setup ensures accurate and consistent pocket holes.
4.1 Attaching the Portable Base (Optional)
The drill guide is removable and can be used with the portable base for increased versatility. To attach, align the drill guide with the base and secure it as needed. This allows for use in various configurations, including benchtop or handheld applications.

Image 4.1: The removable drill guide detached from the main jig, illustrating its flexibility for use with a portable base or other extension accessories for plate and scale measurement.
4.2 Adjusting Drill Hole Height
The jig features an adjustable drill hole height mechanism to match the thickness of your workpiece. Two clear scales, in inches and millimeters, are engraved on the jig for precise adjustments. Use the detachable slider design to set the appropriate height. This ensures the pocket hole is drilled at the correct depth and angle for optimal joint strength.

Image 4.2: Close-up of the 3-hole design on the jig, demonstrating how it can be used for larger and longer boards, providing flexibility beyond the limits of standard pocket hole jigs.
4.3 Inserting the Drill Bit and Stop Collar
Insert the 9.5mm (3/8") drill bit into your power drill. Place the stop collar onto the drill bit and secure it at the desired depth. The jig's precise guide design ensures perfectly placed pocket holes without burrs, thanks to its high hardness drill sleeve and replaceable drilling inserts.

Image 4.3: The precise guide design of the jig, showing a drill bit inserted. This design ensures accurate, burr-free pocket holes and features high-hardness, replaceable drill sleeves for longevity.
5. Operating Instructions
Follow these steps for effective and safe operation of your pocket hole jig.
- Step 1: Measure the Workpiece Thickness. Use a measuring tape to accurately determine the thickness of the wood you intend to join. This measurement is crucial for setting the jig correctly.
- Step 2: Set the Drill Hole Thickness. Adjust the jig's height according to the measured workpiece thickness. The engraved scales (inches and millimeters) on the jig will guide you. Ensure the setting is precise for optimal results.
- Step 3: Adjust the Position of the Fixture. Place your workpiece against the jig. Adjust the toggle clamp mechanism to firmly hold the workpiece in place. The clamping range is 12-42mm.
- Step 4: Fasten the Workpiece and Start to Drill. Engage the sturdy toggle clamp to secure the workpiece. This clamp provides incredible rigidity and uncompromising hold-strength. Once secured, begin drilling with your power drill, ensuring the drill bit enters the guide holes smoothly.
- Step 5: Tighten the Screws with Ease. After drilling the pocket holes, position the workpieces for assembly. Insert the appropriate pocket hole screws and use the SQ2 screwdriver bit to tighten them, creating a strong joint.
- Step 6: Use as Your Daily Tool. The ENJOYWOOD XK4 is designed for wide application, suitable for connecting various furniture components, DIY projects, new furniture construction, or repairing old furniture.

Image 5.1: A six-step visual guide demonstrating the easy operation of the pocket hole jig, from measuring the workpiece to tightening screws and its general use.
5.1 Wood-Chip Relief and Dust Collection
The jig is designed with wood-chip relief and dust collection features. This helps keep the drill bit clear of excess wood chips during drilling, allowing for a clean and efficient plunge. For optimal dust collection, connect a shop vacuum to the dust port if available.
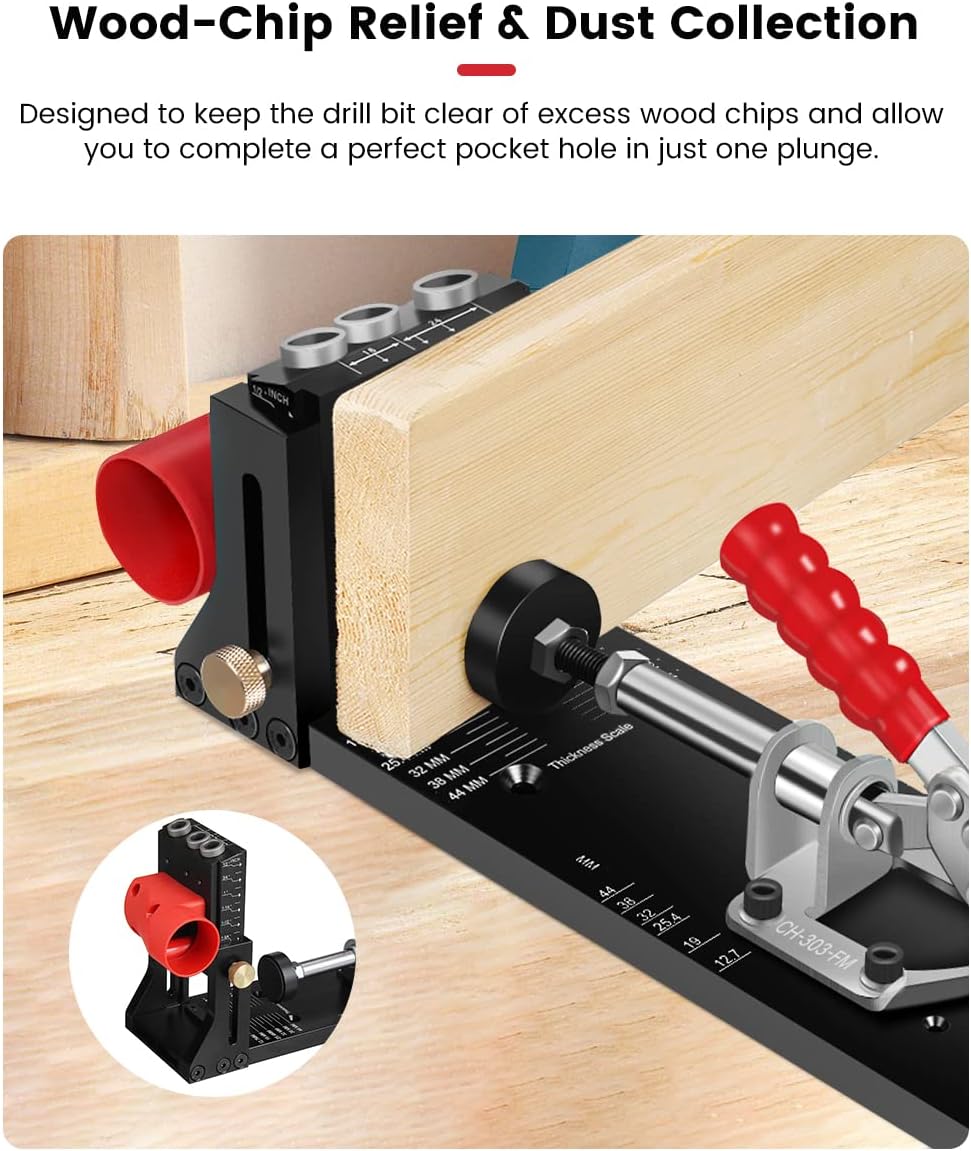
Image 5.2: Illustration of the wood-chip relief and dust collection system, showing how it helps keep the drilling area clear of debris for a perfect pocket hole.
5.2 Using the Sturdy Toggle Clamp
The integrated toggle clamp is designed for secure and rigid workpiece holding. It accommodates clamping thicknesses from 12mm to 42mm. Adjustments are made by releasing the locknut and rotating the clamp to the correct setting for your material, ensuring the workpiece remains stable during drilling.
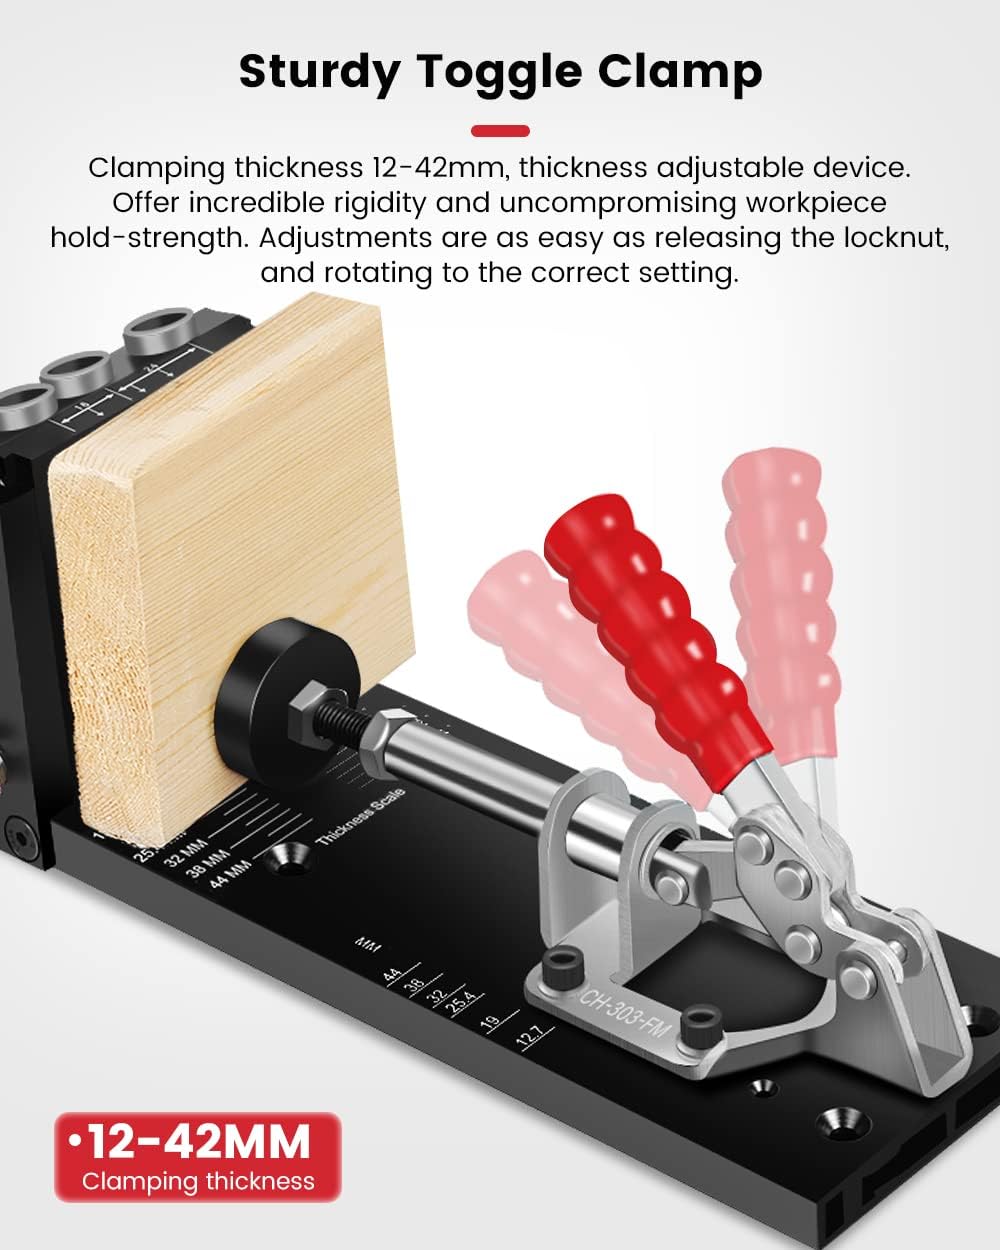
Image 5.3: The sturdy toggle clamp in action, securing a piece of wood. The image highlights the 12-42mm clamping thickness range and the adjustment mechanism.
6. Maintenance
Regular maintenance will prolong the life and ensure the continued accuracy of your ENJOYWOOD XK4 Pocket Hole Jig.
- Cleaning: After each use, clean the jig to remove wood dust and debris. Use a brush or compressed air. Avoid using solvents that may damage the finish or plastic components.
- Lubrication: Periodically apply a light coat of machine oil to the moving parts of the toggle clamp and adjustment mechanisms to ensure smooth operation.
- Drill Bit Care: Keep drill bits sharp and clean. Replace dull or damaged bits immediately to prevent splintering and ensure precise holes.
- Storage: Store the jig in a clean, dry environment away from direct sunlight and extreme temperatures.
- Inspection: Regularly inspect the jig for any signs of wear or damage, especially to the drill sleeves and clamping mechanism.
7. Troubleshooting
If you encounter issues while using your pocket hole jig, refer to the following common problems and solutions:
- Problem: Drill bit produces burrs or splintering.
Solution: Ensure the drill bit is sharp. Check that the workpiece is securely clamped and the drill speed is appropriate for the wood type. - Problem: Pocket holes are not consistently accurate or deep.
Solution: Verify that the jig's height adjustment and stop collar are set correctly for the workpiece thickness. Ensure the drill bit is fully inserted into the guide. - Problem: Workpiece slips during drilling.
Solution: Tighten the toggle clamp firmly. Ensure the clamping surfaces are clean and free of sawdust. The clamping range is 12-42mm; ensure your material falls within this range. - Problem: Difficulty inserting or removing the drill bit from the guide.
Solution: Clean the drill guide and drill bit to remove any accumulated debris. Ensure the drill bit is not damaged or bent.
8. Specifications
| Feature | Detail |
|---|---|
| Model | XK4 |
| Material | Aluminum Alloy |
| Pocket Hole Diameter | 9.5mm (3/8") |
| Clamping Range | 12-42mm |
| Item Weight | 6.6 pounds |
| Included Components | XK4 Pocket Hole Jig, Portable Base, 9.5mm (3/8") Drill Bit, SQ2 Screwdriver Bit, Stop Collar, Pocket Hole Screws (1"/1.25"/1.5"/2"): 40pcs |
| Power Source | No (manual jig, requires external power drill) |
9. Warranty and Support
For warranty information or technical support regarding your ENJOYWOOD XK4 Pocket Hole Jig Kit, please refer to the documentation provided at the time of purchase or contact the manufacturer directly. Keep your purchase receipt as proof of purchase.
Manufacturer: PriceDumb (as per product specifications)