1. Introduction and Compatibility
This manual provides detailed instructions for the installation, operation, and maintenance of your ViaBecs XC004 Android 12 Car Stereo. Please read this manual thoroughly before installation and use to ensure proper functionality and to avoid damage.
1.1 Product Overview
The ViaBecs XC004 is a 10.2-inch touch screen car stereo system designed to upgrade your vehicle's infotainment experience. It features Android 12.0, wireless Apple CarPlay, wireless/wired Android Auto, and a range of multimedia and navigation capabilities.
1.2 Vehicle Compatibility
This unit is specifically designed for:
- Toyota Tundra: 2007-2013 models
- Toyota Sequoia: 2008-2018 models
Important Note: This model is for vehicles without the JBL sound system. If your vehicle has a JBL sound system, a different harness (CAN005-X) may be required. Please verify your vehicle's factory radio model before installation.

Figure 1.1: Compatibility overview, illustrating the difference between factory radios without JBL (Model A) and with JBL (Model D) to ensure correct harness selection.
2. Key Features
2.1 Android 12.0 Operating System
The stereo operates on Android 12.0, powered by a UIS7862 Octa-core processor with up to 2.0GHz frequency. It includes 6GB RAM and 128GB internal storage, allowing for smooth performance and ample space for applications and media. Access thousands of applications from the Google Play Store.
2.2 Wireless CarPlay and Android Auto
Connect your smartphone wirelessly or via USB to access navigation, music, calls, and other applications directly on the 10.2-inch touchscreen. Supports hands-free control and voice commands (Siri/Google Assistant) for enhanced safety and convenience. The Tlink5 app facilitates CarPlay, Android Auto, and Mirror Link functions.
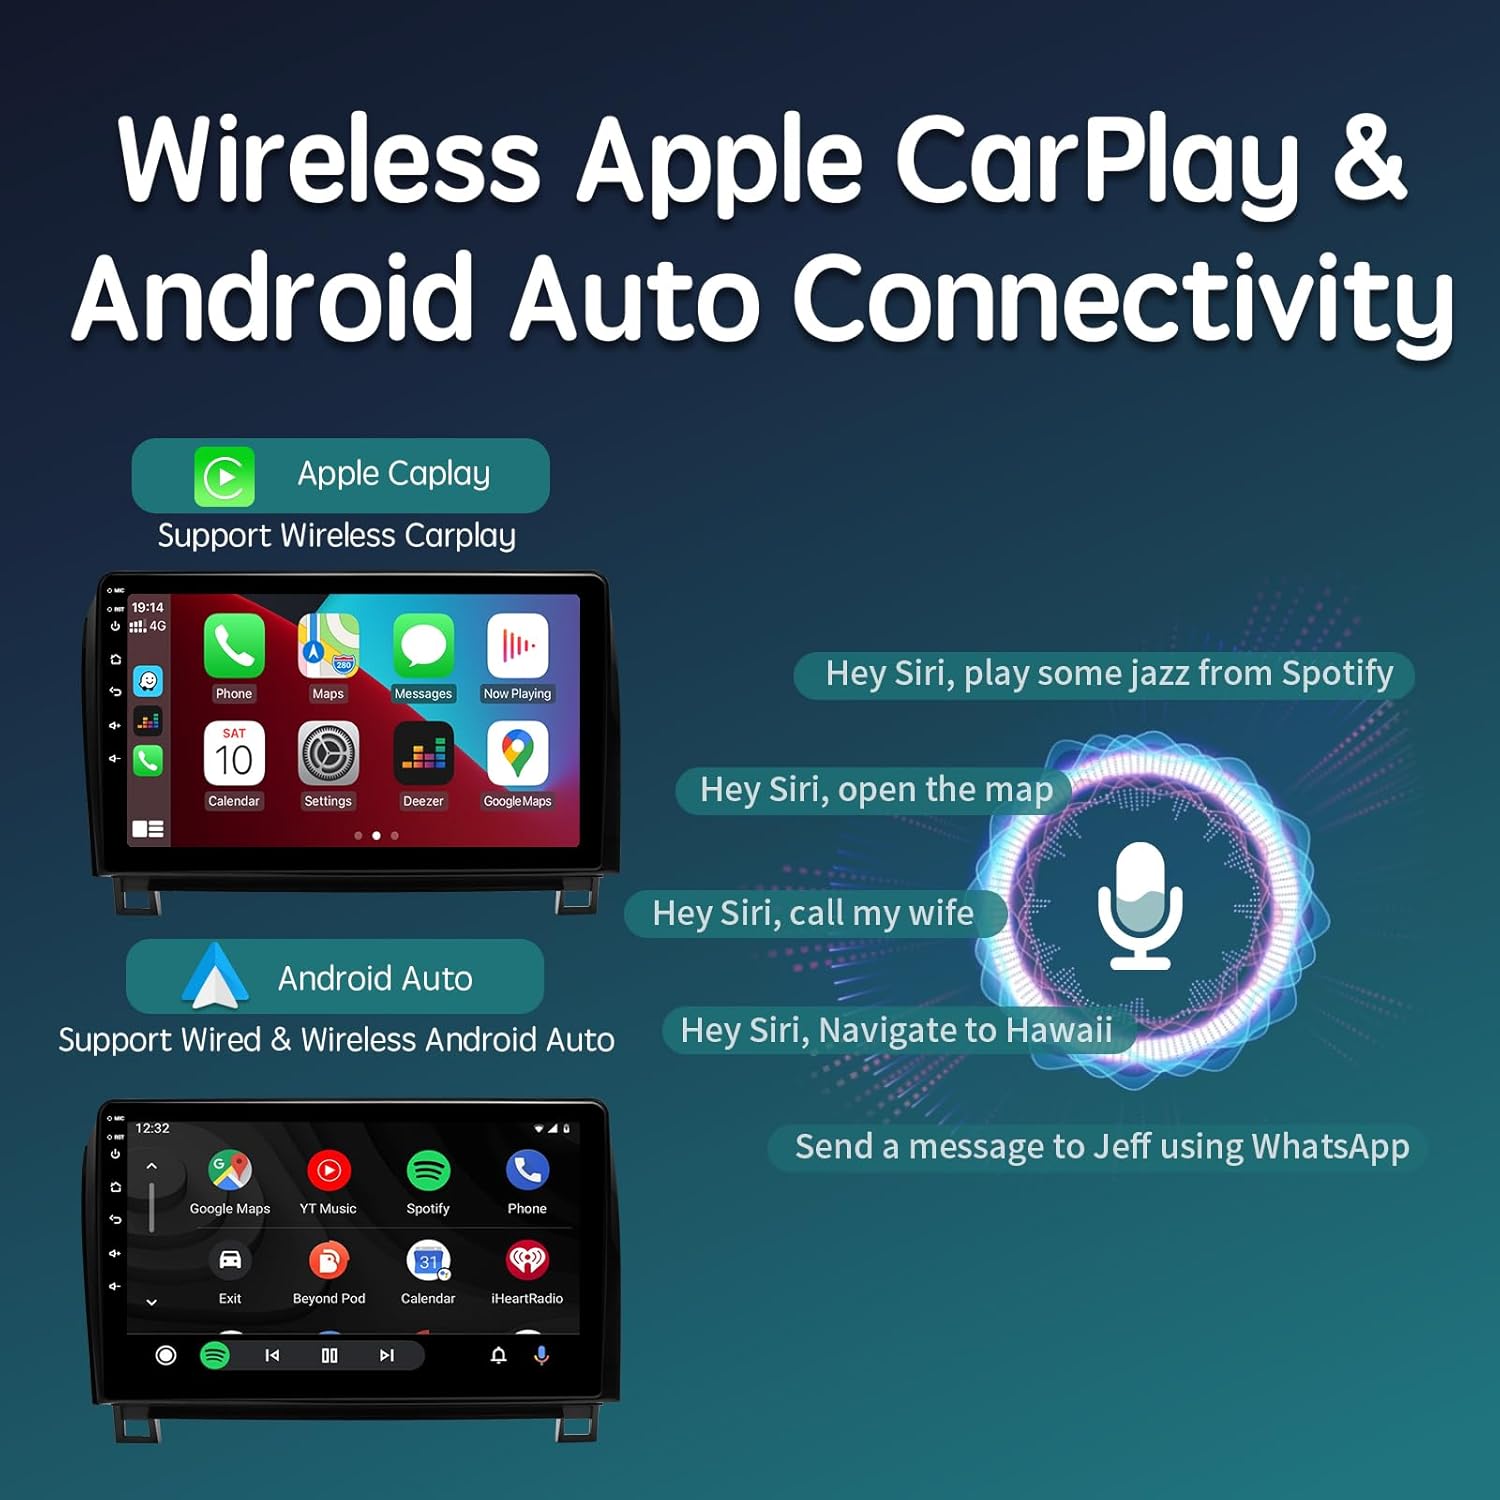
Figure 2.1: Wireless Apple CarPlay and Android Auto connectivity, showing smartphone integration and voice command capabilities.
2.3 10.2-inch QLED Touchscreen
The unit features a large, clear 10.2-inch QLED IPS screen with 1280x720 resolution, supporting 1080P HD video and multi-touch gestures. The QLED technology provides a brighter and more vivid display compared to standard IPS screens, offering a 178° full view angle. Adjust brightness and night mode settings as needed.

Figure 2.2: The 10.2-inch QLED touchscreen, emphasizing its high resolution and wide viewing angles for an enhanced visual experience.
2.4 Built-in DSP and 48-Band EQ
Experience superior audio quality with the integrated Digital Sound Processor (DSP) and a 48-band equalizer. This allows for precise tuning of audio frequencies from 20Hz to 20KHz, including subwoofer frequency, bass boost, and bass filter adjustments. The immersive surround sound feature enhances the listening experience.

Figure 2.3: Audio customization options, including the 48-band EQ and DSP for fine-tuning sound output.
2.5 Navigation and Connectivity
The system includes a built-in GPS module and WiFi antenna, providing accurate real-time navigation. Users can utilize Google Maps, Waze, or other navigation applications, and download offline maps. Connectivity options include 2.4GHz & 5GHz WiFi, Bluetooth 5.0 for hands-free calling and music streaming, and 4G network support via an external antenna.

Figure 2.4: Multi-function car stereo system, highlighting key features like navigation, WiFi, and various applications.
3. Setup and Installation
The ViaBecs XC004 is designed for a plug-and-play installation with the included harness and dash frame. Basic automotive electrical knowledge and tools are recommended. If you are unsure about any steps, professional installation is advised.
3.1 Package Contents
Before beginning installation, ensure all components are present:
- 1x Car Play Stereo Unit
- 1x Plug and Play Harness (XC004)
- 1x 4P USB Cable
- 1x 6P USB Cable
- 1x 20P Audio Cable
- 1x 10P Camera Cable & Wi-Fi antenna
- 1x GPS Antenna
- 1x 4G Antenna
- 1x External Microphone
- 2x User Manual
- 1x Warranty Card
3.2 Installation Steps (General)
- Preparation: Disconnect the vehicle's battery to prevent electrical shorts.
- Remove Factory Radio: Carefully remove the existing factory radio and dash trim. Refer to your vehicle's service manual or online resources for specific instructions on removing the dash components for your Toyota Tundra or Sequoia.
- Connect Harness: Connect the provided plug-and-play harness to the vehicle's factory wiring and to the new ViaBecs XC004 unit. Ensure all connections are secure.
- Connect Peripherals: Connect the GPS antenna, 4G antenna, external microphone, USB cables, and camera input cables to the corresponding ports on the stereo unit. Position antennas for optimal signal reception.
- Test Functionality: Before fully reassembling the dash, reconnect the vehicle's battery and power on the unit. Test all functions, including audio, touch screen, steering wheel controls, CarPlay/Android Auto, GPS, and backup camera (if applicable).
- Secure Unit: Mount the new stereo unit into the dash using the provided dash frame and secure it.
- Reassemble Dash: Carefully reassemble the dash trim and other components.
3.3 Wiring Diagram
Refer to the following diagram for detailed wiring connections. Ensure each cable is connected to its correct port.
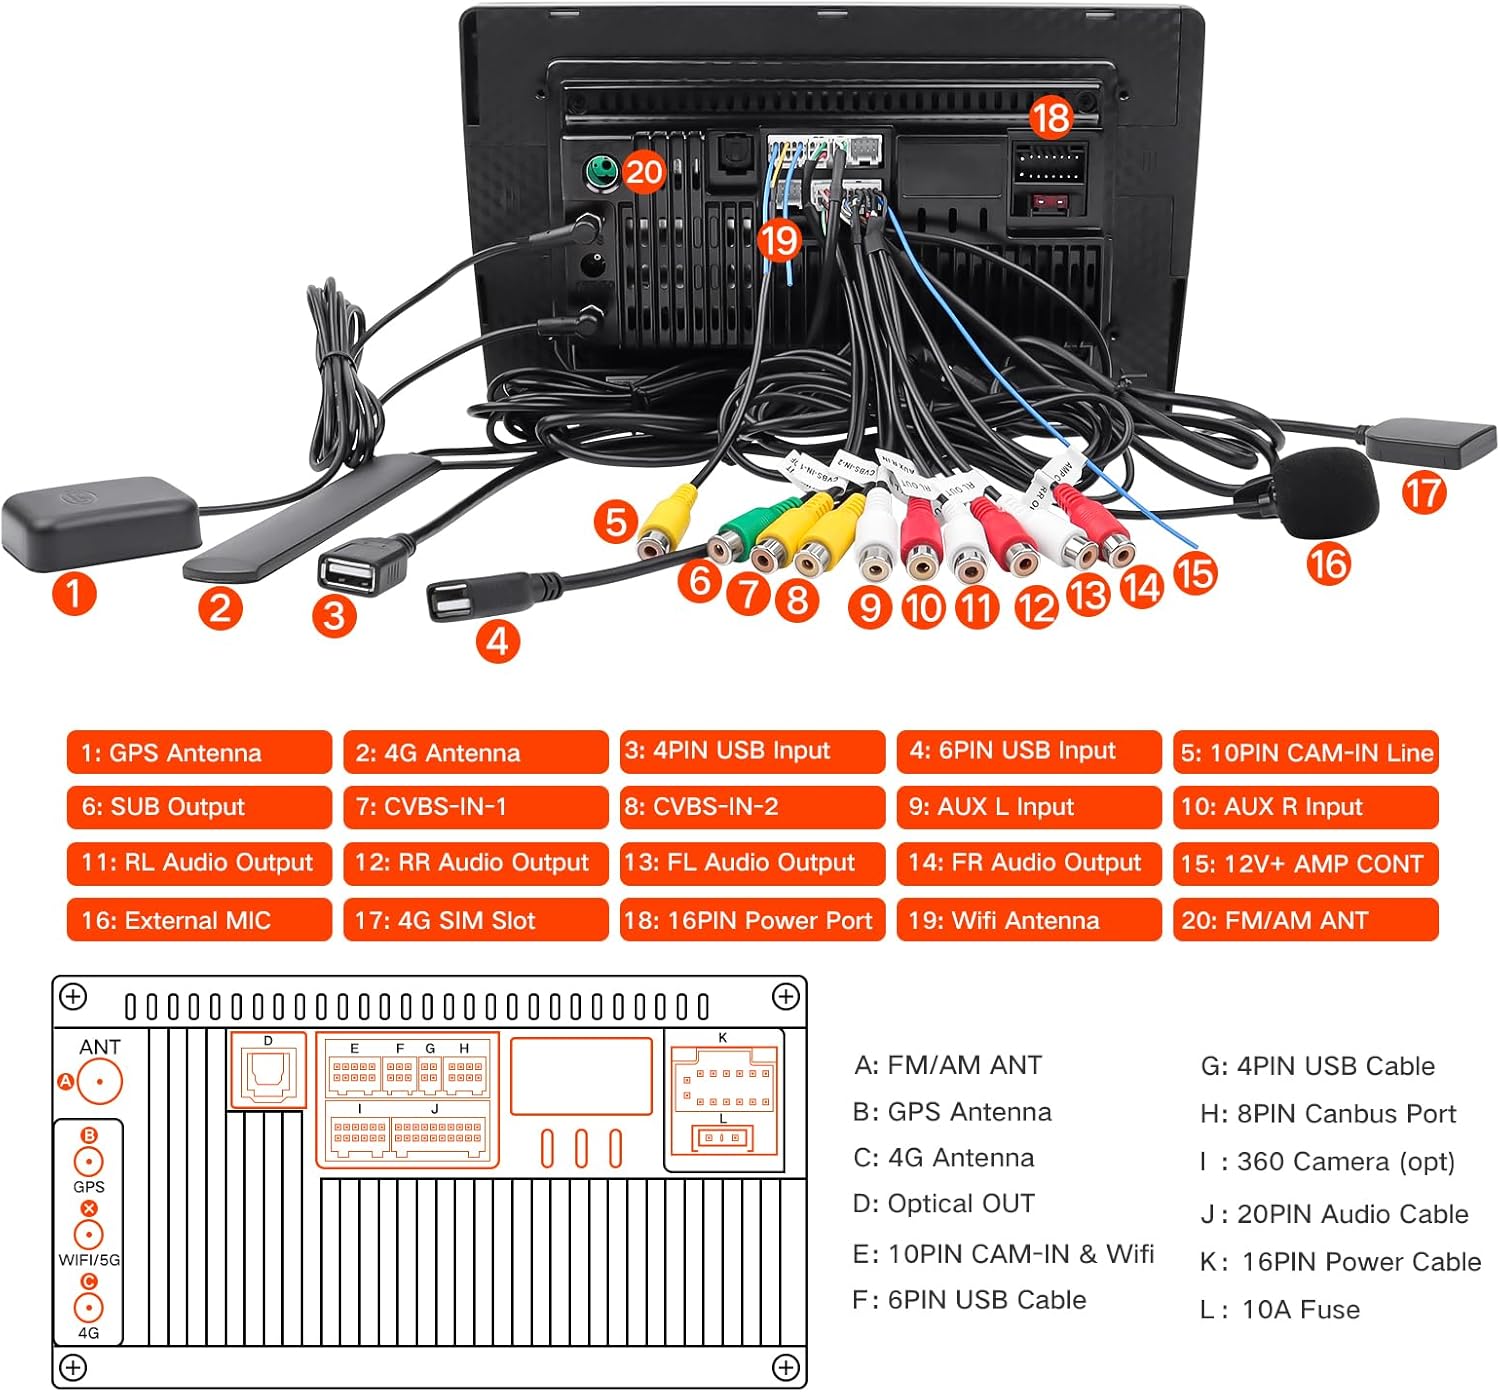
Figure 3.1: Rear view of the stereo unit with labeled ports and corresponding cable connections.
4. Operating Instructions
4.1 Basic Operation
- Power On/Off: Press and hold the power button (usually on the front panel) to turn the unit on or off. A short press typically mutes or unmutes audio.
- Volume Control: Adjust volume using the physical buttons or on-screen controls.
- Touchscreen Navigation: Use touch gestures (tap, swipe, pinch-to-zoom) to navigate the Android interface and applications.
- Home Screen: The main screen provides access to frequently used apps and widgets. Customize it by adding or removing icons.
4.2 Wireless CarPlay / Android Auto
- Ensure your smartphone's Bluetooth and Wi-Fi are enabled.
- On the car stereo, open the 'Tlink5' application.
- Follow the on-screen prompts to pair your phone via Bluetooth. Once paired, the system will automatically establish a Wi-Fi connection for CarPlay or Android Auto.
- For wired Android Auto, connect your phone via a USB cable to one of the stereo's USB ports.
4.3 Bluetooth Connectivity
The unit features Bluetooth 5.0 for hands-free calling and audio streaming.

Figure 4.1: Bluetooth music and hands-free calling interface.
- Go to the Bluetooth settings on the stereo.
- Enable Bluetooth and search for available devices.
- Select your phone from the list and pair using the provided PIN (default is usually 0000).
- Once connected, you can make/receive calls and stream audio. The external microphone ensures clear call quality.
4.4 Navigation
Utilize the built-in GPS module with pre-installed navigation apps or download your preferred ones from the Google Play Store. Connect to Wi-Fi or use a 4G connection for real-time traffic updates and online map services.
4.5 Radio (AM/FM)
Access the Radio application to tune into AM/FM stations. Use the scan function to find available stations and save your favorites for quick access.
5. Maintenance
Proper maintenance ensures the longevity and optimal performance of your car stereo.
- Screen Cleaning: Use a soft, lint-free cloth to clean the touchscreen. For stubborn smudges, lightly dampen the cloth with water or a screen-safe cleaner. Avoid harsh chemicals or abrasive materials.
- Software Updates: Periodically check for system updates via the 'Settings' menu to ensure you have the latest features and security patches. A stable internet connection is required for updates.
- Temperature Control: Avoid exposing the unit to extreme temperatures for extended periods.
- Cable Connections: Periodically check all cable connections to ensure they are secure and free from damage.
6. Troubleshooting
This section addresses common issues you might encounter. If problems persist, contact ViaBecs technical support.
6.1 No Power / Unit Not Turning On
- Check the vehicle's battery connection.
- Verify all power cables are securely connected to the stereo and the vehicle's wiring harness.
- Check the vehicle's fuse box for any blown fuses related to the stereo or accessory power.
6.2 No Audio Output
- Ensure the volume is not muted or set to minimum.
- Check all speaker wire connections at the back of the unit and to the vehicle's speakers.
- Verify the correct audio source is selected (e.g., Radio, Bluetooth, CarPlay).
6.3 Backup Camera Not Displaying
- Ensure the camera input cable is correctly connected to the stereo's camera input port.
- Verify the camera's power supply is correctly wired and receiving power when the vehicle is in reverse.
- Some factory backup cameras may require specific wiring or adapters not included with the standard harness. Consult ViaBecs support if issues persist.
6.4 Poor Microphone Quality
- Ensure the external microphone is securely plugged into the unit.
- Position the microphone in a clear area, away from air vents or direct road noise, for optimal voice pickup.
- Check microphone settings within the stereo's system settings.
6.5 Steering Wheel Controls Not Working
- Confirm the XC004 plug-and-play harness is correctly installed, as it is designed to retain factory steering wheel controls.
- Access the steering wheel control settings in the stereo's menu to program or recalibrate the buttons if necessary.
7. Specifications
| Feature | Specification |
|---|---|
| Model Number | XC004 |
| Operating System | Android 12.0 |
| Processor | UIS7862 Octa-core, up to 2.0GHz |
| RAM | 6GB |
| Internal Storage | 128GB |
| Screen Size | 10.2 Inches |
| Screen Type | QLED IPS Touchscreen |
| Screen Resolution | 1280 x 720 |
| Connectivity | Bluetooth 5.0, Wi-Fi (2.4GHz & 5GHz), 4G (external antenna) |
| Navigation | Built-in GPS, supports Google Maps, Waze, etc. |
| Audio Features | Built-in DSP, 48-band Equalizer |
| Special Features | Wireless Apple CarPlay, Wireless/Wired Android Auto, Mirror Link, Split-Screen, Steering Wheel Control support |
| Mounting Type | Dashboard Mount |
| Visible Screen Diagonal | 11" / 26 cm |
| Item Weight | 4.48 pounds |
| Package Dimensions | 13.58 x 9.96 x 5.75 inches |
8. Warranty and Support
The ViaBecs XC004 car stereo is backed by a 1-year warranty. ViaBecs provides professional technical support for setup assistance, connectivity issues, and troubleshooting.
For technical assistance or warranty claims, please contact ViaBecs customer service through the platform where the product was purchased or refer to the contact information provided on the warranty card included in your package.


