
1. Introduction
This manual provides instructions for the HBN U56B 24-Hour Mechanical Indoor Outlet Timer. This device is designed to automate the on/off cycles of indoor electrical appliances, offering convenience and energy management. It features dual 3-prong grounded outlets and allows for programming in 15-minute intervals over a 24-hour period.

Image 1.1: HBN U56B Timer plugged into a standard wall outlet.
2. Safety Information
- For indoor use only. Do not expose to water or damp conditions.
- Do not exceed the electrical ratings of the timer (125VAC, 60Hz, 1875W, 15A Resistive, 8A Tungsten, 1/2HP).
- Ensure the timer is securely plugged into a grounded outlet.
- Keep out of reach of children.
- Do not disassemble or attempt to repair the timer. Contact customer support if issues arise.
3. Product Overview
The HBN U56B timer features a mechanical dial for setting schedules and a side switch for mode selection. It includes two 3-prong grounded outlets for connecting appliances.
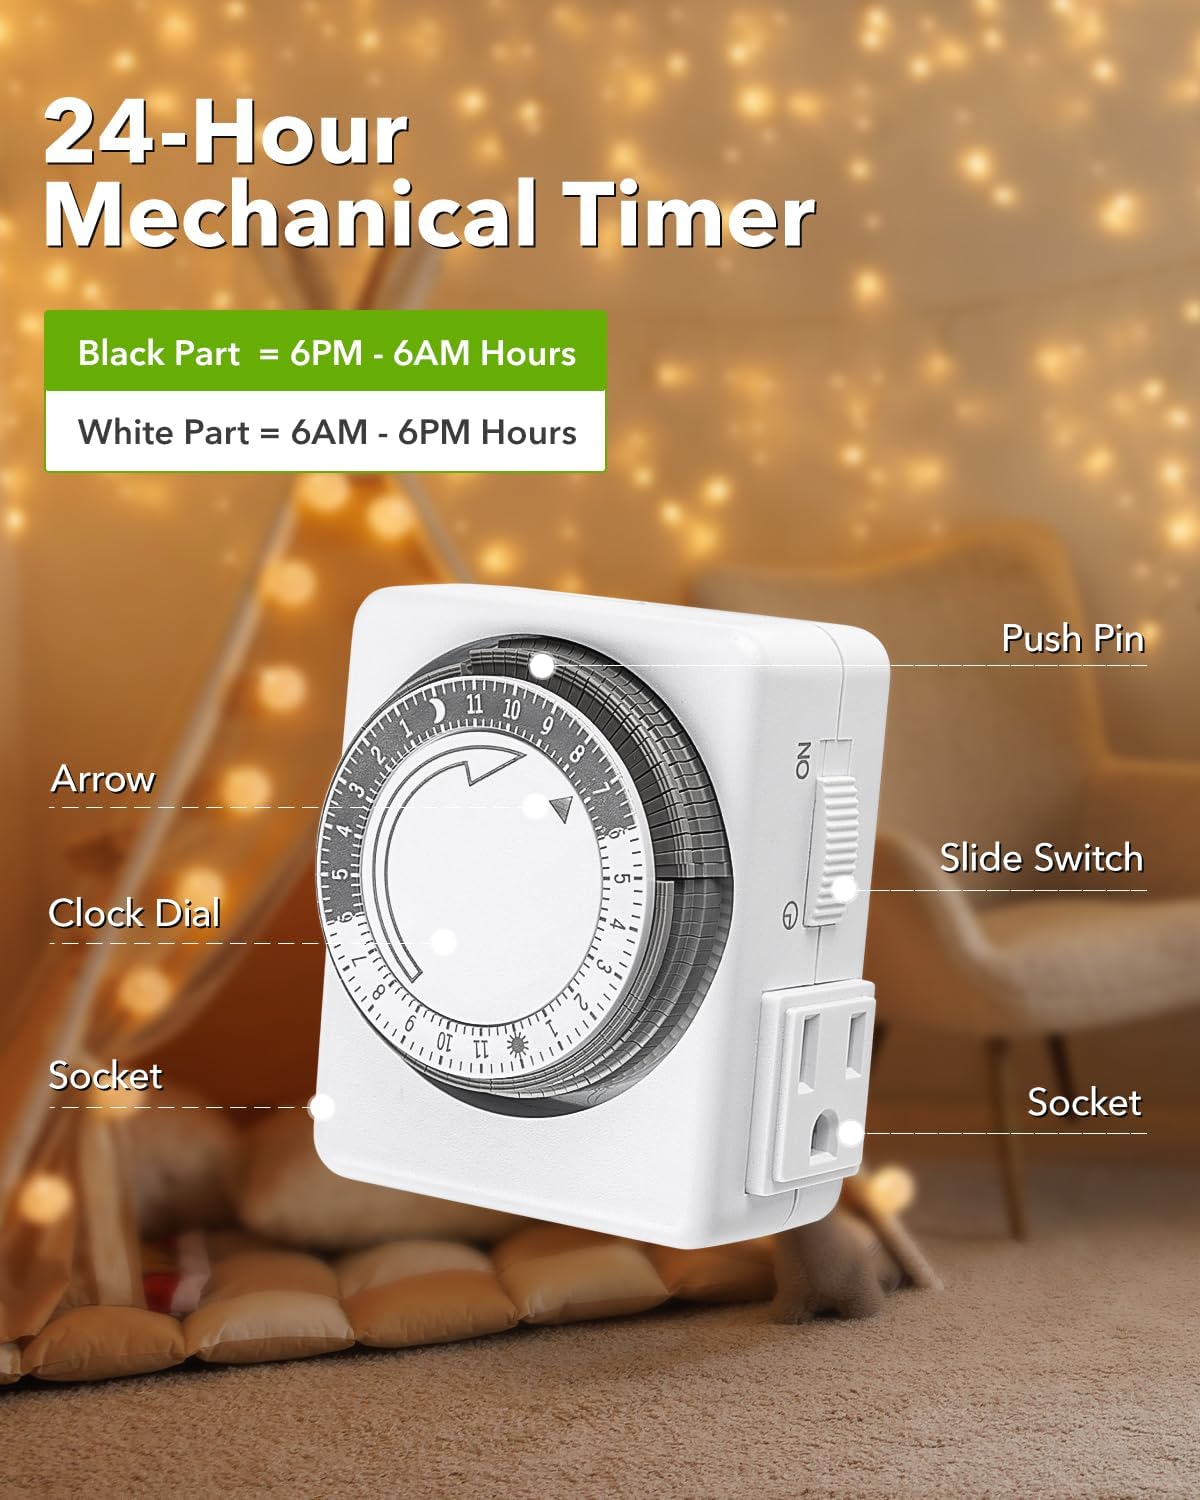
Image 3.1: Key components of the HBN U56B Timer.
- Clock Dial: The rotating dial with 24-hour markings (AM/PM) and push pins.
- Push Pins: Small segments around the dial. Each pin represents 15 minutes. Pushed down = ON, Pulled up = OFF.
- Arrow: Indicates the current time on the dial.
- Slide Switch: Located on the side, it allows selection between 'ON' (continuous power), 'OFF' (no power), and 'TIMER' (programmed schedule).
- Grounded Outlets: Two 3-prong outlets for connecting devices.
4. Setup and Programming
Follow these steps to set up and program your HBN U56B timer:
- Prepare the Pins: Before setting any schedule, ensure all push pins around the clock dial are in the 'UP' position (OFF).
- Set ON/OFF Times: Push down the pins corresponding to the time periods you want your connected device(s) to be 'ON'. Each pushed-down pin represents 15 minutes of 'ON' time. For example, to turn a device on from 6:00 PM to 11:00 PM, push down all pins between the '6 PM' and '11 PM' markings on the dial.
- Set Current Time: Rotate the entire clock dial clockwise until the arrow on the timer aligns with the current time. The dial is marked for 24 hours (AM/PM indicated by sun/moon icons).
- Select Operating Mode: Use the slide switch on the side to select 'TIMER' mode (indicated by a clock icon). This activates your programmed schedule.
- Plug In and Connect: Plug the timer into a grounded wall outlet. Then, plug your appliance(s) into the timer's outlets. Ensure your appliance is switched to the 'ON' position if it has its own power switch.

Image 4.1: Step-by-step guide for setting up the timer.
Video: Setting 15-Minute Intervals
Video 4.2: This official HBN video demonstrates how to set the 15-minute intervals on the 24-hour indoor timer, illustrating the process of pushing down pins to define ON periods.
5. Operating the Timer
Once programmed, the timer will automatically turn your devices on and off according to your set schedule, repeating daily. The slide switch offers additional control:
- 'ON' Position: Provides continuous power to the connected devices, overriding the programmed schedule.
- 'OFF' Position: Cuts power to the connected devices, overriding the programmed schedule.
- 'TIMER' Position (Clock Icon): Activates the programmed schedule.
Typical Applications
This timer is suitable for a variety of indoor appliances, including:
- Lamps and decorative lighting
- Coffee machines
- Humidifiers and diffusers
- Wi-Fi routers (for scheduled restarts)
- Electric fans
- Aquarium lights

Image 5.1: Examples of common household appliances used with the HBN timer.
6. Maintenance
The HBN U56B timer requires minimal maintenance:
- Keep the timer clean and free from dust. Wipe with a dry cloth.
- Avoid exposing the timer to extreme temperatures or humidity.
- Do not use abrasive cleaners or solvents.
7. Troubleshooting
- Device not turning ON/OFF at programmed times:
- Ensure the slide switch is set to 'TIMER' mode.
- Verify that the current time on the dial aligns with the arrow.
- Check that the correct pins are pushed down for the desired 'ON' periods.
- Confirm the connected appliance's power switch is in the 'ON' position.
- No power to connected devices:
- Check if the wall outlet is functioning correctly by plugging in another device.
- Ensure the timer is securely plugged into the wall outlet.
- Verify the slide switch is not in the 'OFF' position.
8. Specifications
| Specification | Detail |
|---|---|
| Model Number | U56B |
| Voltage | 125VAC, 60Hz |
| Max. Loading | 1875W, 15A Resistive |
| Tungsten Rating | 8A Tungsten |
| Motor Rating | 1/2HP |
| Intervals | 15-minute |
| Number of Settings | Up to 48 ON/OFF per day |
| Outlets | Dual 3-Prong Grounded |
| Dimensions | 3.3 x 2.7 x 1.8 inches |
| Weight | 5.9 ounces |
| Certification | ETL Listed |
9. Warranty and Support
HBN provides 12 months of professional customer support for this product. If you encounter any issues or have questions regarding your HBN U56B timer, please contact HBN customer service for assistance.
For further information or support, please visit the Official HBN Store on Amazon.


