
activeallbrite 5500128-01
activeallbrite Ceiling Fan User Manual
Model: 5500128-01
1. Introduction
Thank you for choosing the activeallbrite Ceiling Fan. This fan is designed to provide optimal air circulation and lighting for your living spaces. Featuring a quiet DC motor, 6 adjustable speeds, and a reversible function, it ensures comfort throughout the year. The integrated LED light offers multiple color temperatures (warm white, neutral white, cool white) and RGB options, all conveniently controlled by a smart remote with a timer function. Please read this manual thoroughly before installation and operation to ensure safe and efficient use.

Figure 1: activeallbrite Ceiling Fan with light wood blades and white housing.
2. Safety Instructions
Always follow basic safety precautions when installing and operating electrical appliances to reduce the risk of fire, electric shock, and personal injury.
- Read all instructions carefully before beginning installation.
- Ensure the power is turned off at the circuit breaker before installation or maintenance.
- All electrical connections must be made in accordance with local codes and ordinances, and the National Electrical Code (NEC). If you are unfamiliar with electrical wiring, consult a qualified electrician.
- The mounting structure must be capable of supporting the weight of the fan (approximately 4.91 kg).
- Do not operate the fan with damaged wiring or if it has been dropped or damaged in any way.
- Keep hands, clothing, and other objects away from the fan blades when the fan is operating.
- Do not attempt to repair or modify the fan yourself. Contact customer support for assistance.
3. Package Contents
Carefully unpack your ceiling fan and ensure all components are present and undamaged. If any parts are missing or damaged, contact customer support immediately.
| Item | Description | Quantity |
|---|---|---|
| A | Fan Motor Housing with LED Light | 1 |
| B | Fan Blades (Light Wood) | 3 |
| C | Downrod (various lengths may be included) | 1 |
| D | Canopy/Mounting Bracket | 1 |
| E | Remote Control | 1 |
| F | Hardware Pack (screws, washers, wire nuts, etc.) | 1 set |
4. Setup and Installation
The installation process for this ceiling fan is designed to be straightforward. However, if you are unsure about any steps, it is recommended to consult a qualified electrician.
4.1 Pre-Installation
- Turn off power at the main circuit breaker.
- Identify a suitable mounting location on the ceiling, ensuring it can support the fan's weight and has proper electrical wiring.
- Gather necessary tools: screwdriver, wire strippers, drill, ladder.
4.2 Mounting the Bracket
Secure the mounting bracket (D) to the ceiling junction box using the provided screws. Ensure the bracket is firmly attached and level. For concrete ceilings, use appropriate anchors.
4.3 Assembling the Fan
- Attach the fan blades (B) to the blade holders using the screws from the hardware pack. The blades are reversible, offering a light wood finish on one side and a darker finish (or black) on the other. Choose your preferred side.
- Secure the assembled blade and blade holder units to the motor housing (A).
- Feed the electrical wires from the motor housing through the downrod (C) and attach the downrod to the motor housing.
- Carefully lift the fan assembly and hang it from the mounting bracket using the hook provided on the downrod.
4.4 Electrical Connections
Connect the fan's electrical wires to the household wiring according to the wiring diagram provided in the detailed manual (if applicable) or general electrical standards. Typically, this involves connecting live, neutral, and ground wires. Ensure all connections are secure using wire nuts.
The fan includes a receiver for the remote control. Connect the fan's wires to the receiver, and then the receiver's wires to the household wiring. Ensure the receiver is tucked neatly into the canopy.
4.5 Final Assembly
Once wiring is complete, carefully lift the fan assembly and align the downrod ball joint with the mounting bracket. Secure the canopy (D) to the mounting bracket, covering the electrical connections.
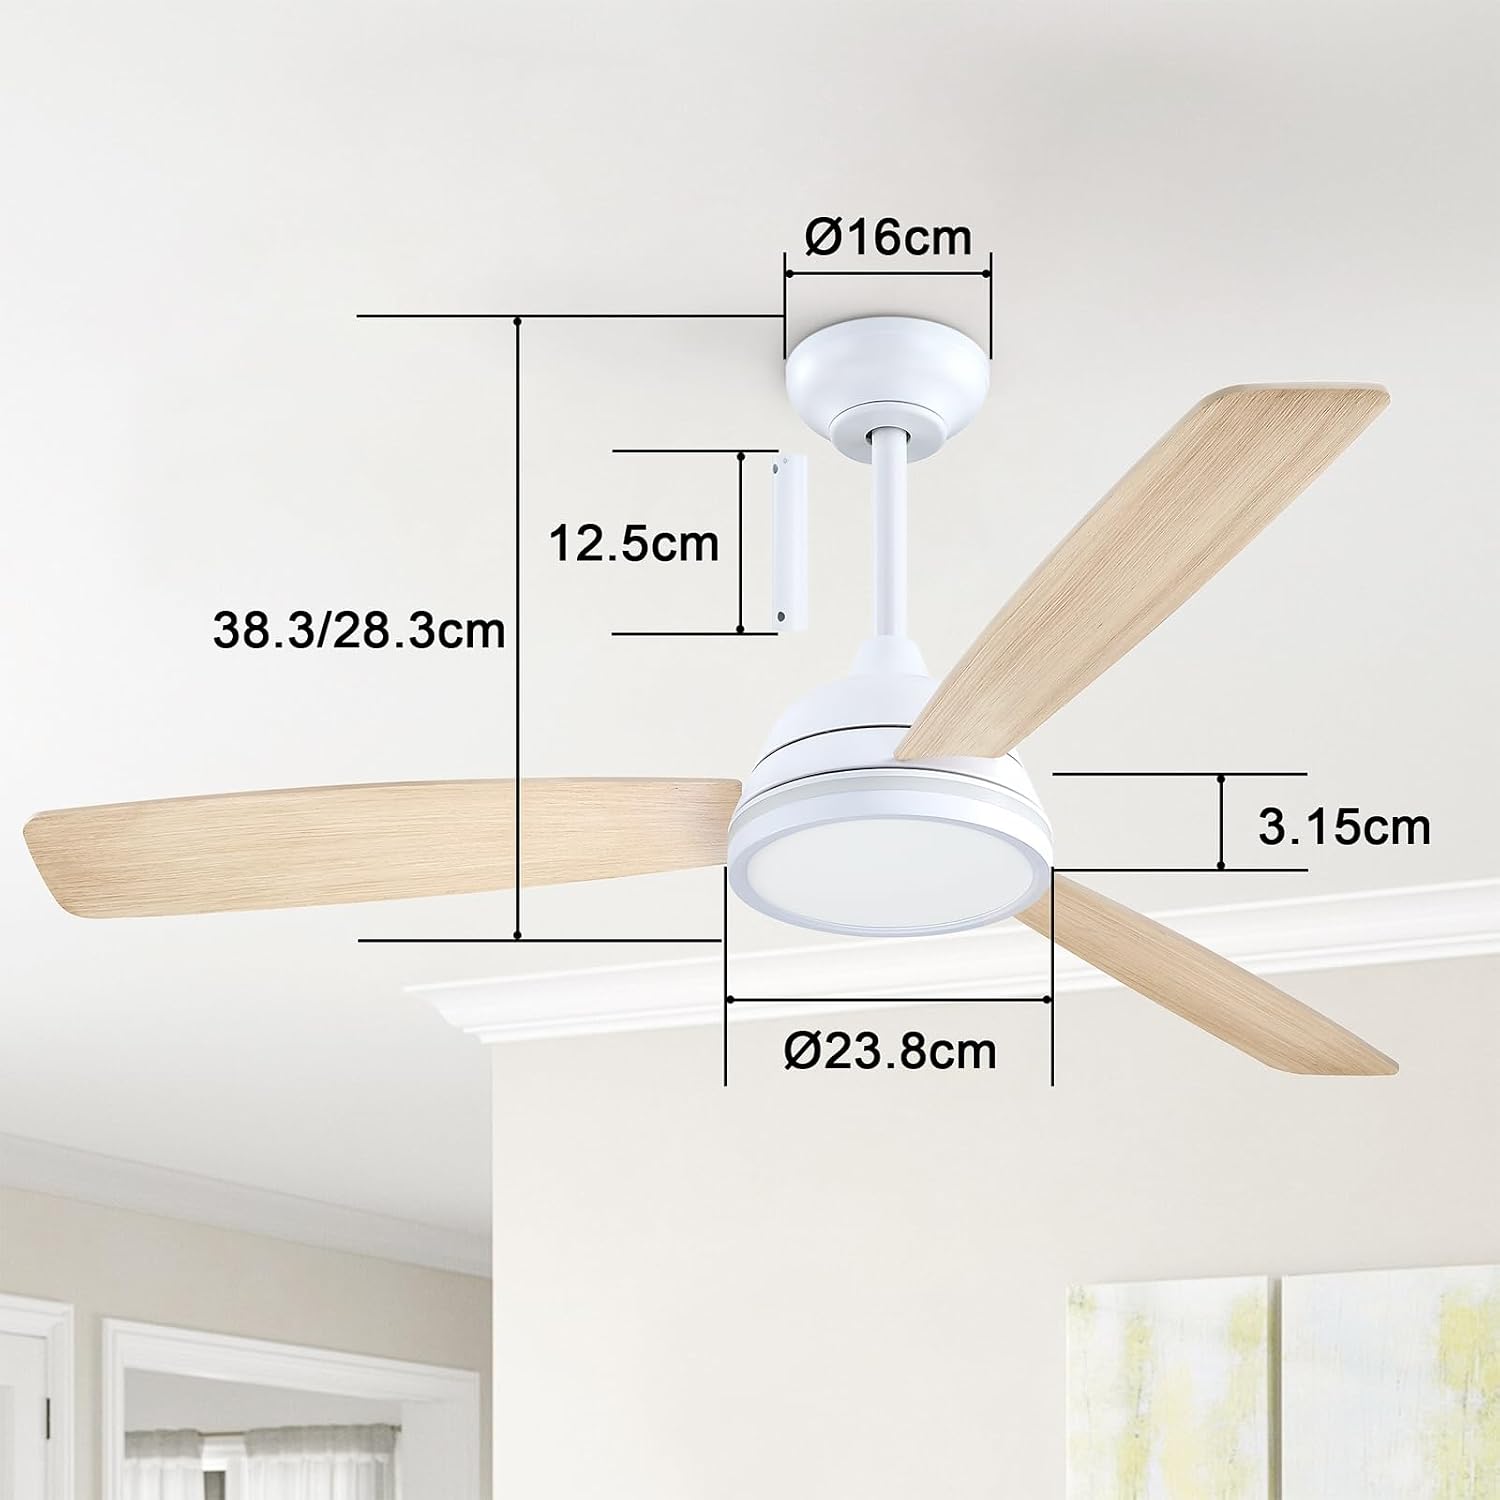
Figure 2: Diagram showing key dimensions of the ceiling fan for installation planning.
5. Operating Instructions
Your activeallbrite ceiling fan is controlled by the included remote control (E). Insert batteries into the remote control before use.
5.1 Fan Speed Control
- The remote control allows you to select from 6 fan speeds. Press the fan speed buttons to increase or decrease the airflow.
- Speeds 1-3 are typically very quiet, suitable for gentle air circulation.
- Speeds 4-6 provide stronger airflow for more effective cooling.
5.2 Light Control
The integrated LED light offers versatile lighting options:
- Color Temperature Adjustment: Cycle through Warm White (3000K), Neutral White (4500K), and Cool White (6500K) by pressing the light button.
- Brightness Dimming: Adjust the brightness from 10% to 100% using the dedicated dimming buttons on the remote.
- RGB Lighting: The fan also features RGB lighting modes, allowing you to select various colors or a multi-color cycle to set the ambiance.

Figure 3: Illustration of adjustable light color temperatures (Warm, Neutral, Cold) and brightness levels (10% to 100%).
5.3 Reversible Function (Summer/Winter Mode)
The fan features a reversible motor for year-round comfort:
- Summer Mode (Downward Airflow): Blades rotate counter-clockwise, creating a downward breeze that cools the room. Ideal for use with air conditioning.
- Winter Mode (Upward Airflow): Blades rotate clockwise, drawing warm air up towards the ceiling and circulating it down the walls. This helps to redistribute warm air trapped at the ceiling, improving heating efficiency.
- Switch between modes using the dedicated button on the remote control.

Figure 4: Visual representation of airflow patterns in Summer (downward) and Winter (upward) modes.
5.4 Timer Function
Set the fan to automatically turn off after a specified period using the timer function on the remote control. Available timer settings typically include 1, 2, or 4 hours.
6. Maintenance
Regular maintenance will help prolong the life and performance of your ceiling fan.
- Cleaning: To clean the fan, wipe with a soft, damp cloth. Do not use abrasive cleaners or solvents as they may damage the finish. Ensure power is off before cleaning.
- Blade Care: Periodically check the fan blades for dust accumulation. Clean them gently to maintain balance and prevent wobbling.
- Tighten Fasteners: Over time, some fasteners may become loose. Check all screws and connections periodically and tighten them as needed.
- No Lubrication Required: The fan's motor is permanently lubricated and does not require oiling.
7. Troubleshooting
If you encounter issues with your fan, refer to the following troubleshooting guide. If the problem persists, contact customer support.
| Problem | Possible Cause | Solution |
|---|---|---|
| Fan does not start | No power to the fan; Loose wire connections; Remote control battery low or not inserted correctly. | Check circuit breaker; Ensure all wire connections are secure; Replace remote control batteries or reinsert them. |
| Fan wobbles | Loose blades or mounting screws; Unbalanced blades. | Tighten all blade screws and mounting screws; Ensure blades are installed correctly and are not bent. |
| Light does not work | Loose wire connection to light kit; LED module failure. | Check light kit wiring; If LED module is faulty, contact customer support (note: LED is integrated and not user-replaceable). |
| Remote control not responding | Low or dead batteries; Remote not paired with receiver; Interference. | Replace batteries; Try removing and reinserting batteries to reset the remote; Ensure no obstructions between remote and fan. |
| Fan is noisy | Loose screws; Motor hum; Blades hitting an obstruction. | Check and tighten all screws; Ensure fan is securely mounted; Verify nothing is obstructing blade rotation. |
8. Specifications
| Feature | Detail |
|---|---|
| Brand | activeallbrite |
| Model Number | 5500128-01 |
| Color | White |
| Material | Wood (Blades) |
| Power | 24 Watts |
| Number of Speeds | 6 |
| Control Type | Remote Control |
| Special Features | Timer, Remote Control, Reversible Function (Summer/Winter), RGB Lighting |
| Item Weight | 4.91 Kilograms |
| Package Dimensions | 63.79 x 28.1 x 24 cm |
9. Warranty and Support
activeallbrite is committed to providing high-quality products. This product comes with a satisfaction guarantee.
- Warranty: We offer 30 days of free replacement or a 100% refund for any product issues. Please retain your proof of purchase.
- Customer Support: For technical assistance, troubleshooting, or warranty claims, please contact activeallbrite customer service through the retailer's platform or the contact information provided with your purchase.
Ask a question about this manual
Ask about setup, troubleshooting, compatibility, parts, safety, or missing instructions. Manuals+ will review the question and use this page’s manual context to help answer it.