1. Introduction
The LTC Nimbleback NB831 is a versatile 75% mechanical keyboard designed for various computing environments. It offers multiple connectivity options, customizable features, and a compact layout. This manual provides detailed instructions for setting up, operating, and maintaining your keyboard.

Image 1.1: Overview of the LTC Nimbleback NB831 Mechanical Keyboard.
2. Package Contents
Verify that all items are present in your package:
- LTC Nimbleback NB831 Mechanical Keyboard
- Keycap Puller
- USB Cable (USB-A to USB-C)
- User Manual Card
- Replacement Switches (4 pieces)

Image 2.1: Contents included in the LTC Nimbleback NB831 package, featuring the keyboard, USB cable, keycap/switch puller, and extra switches.
3. Setup
3.1 Connectivity Modes
The NB831 supports three connection modes:
- 2.4GHz Wireless: Use the included USB dongle for a stable wireless connection.
- Bluetooth 5.0: Pair with up to three Bluetooth-enabled devices.
- USB-C Wired: Connect directly via the USB-C cable for a wired connection and simultaneous charging.

Image 3.1: Visual representation of the three connectivity modes: 2.4GHz wireless, Bluetooth 5.0, and USB-C wired.
3.2 Operating System Compatibility
The NB831 keyboard is compatible with Windows (Win7, Win8, Win10, Win11), iOS, and macOS operating systems. Use the following key combinations to switch between modes:
- Windows Mode: Press Fn + A
- macOS Mode: Press Fn + S

Image 3.2: Illustration of switching between Windows and macOS modes using Fn key combinations.
3.3 Physical Adjustments
The keyboard features 2-level adjustable feet for ergonomic typing angles. The USB dongle can be stored in a dedicated magnetic socket on the underside of the keyboard when not in use. The USB-C cable can be routed through three different channels (left, center, right) for neat cable management.

Image 3.3: Details of the keyboard's underside, showing 2-level feet, 3-side cable routing, and the magnetic dongle socket.
4. Operating Instructions
4.1 Volume Control Knob
The integrated volume knob allows for quick audio adjustments:
- Rotate Clockwise: Increase volume.
- Rotate Counter-clockwise: Decrease volume.
- Press: Mute/Unmute audio.
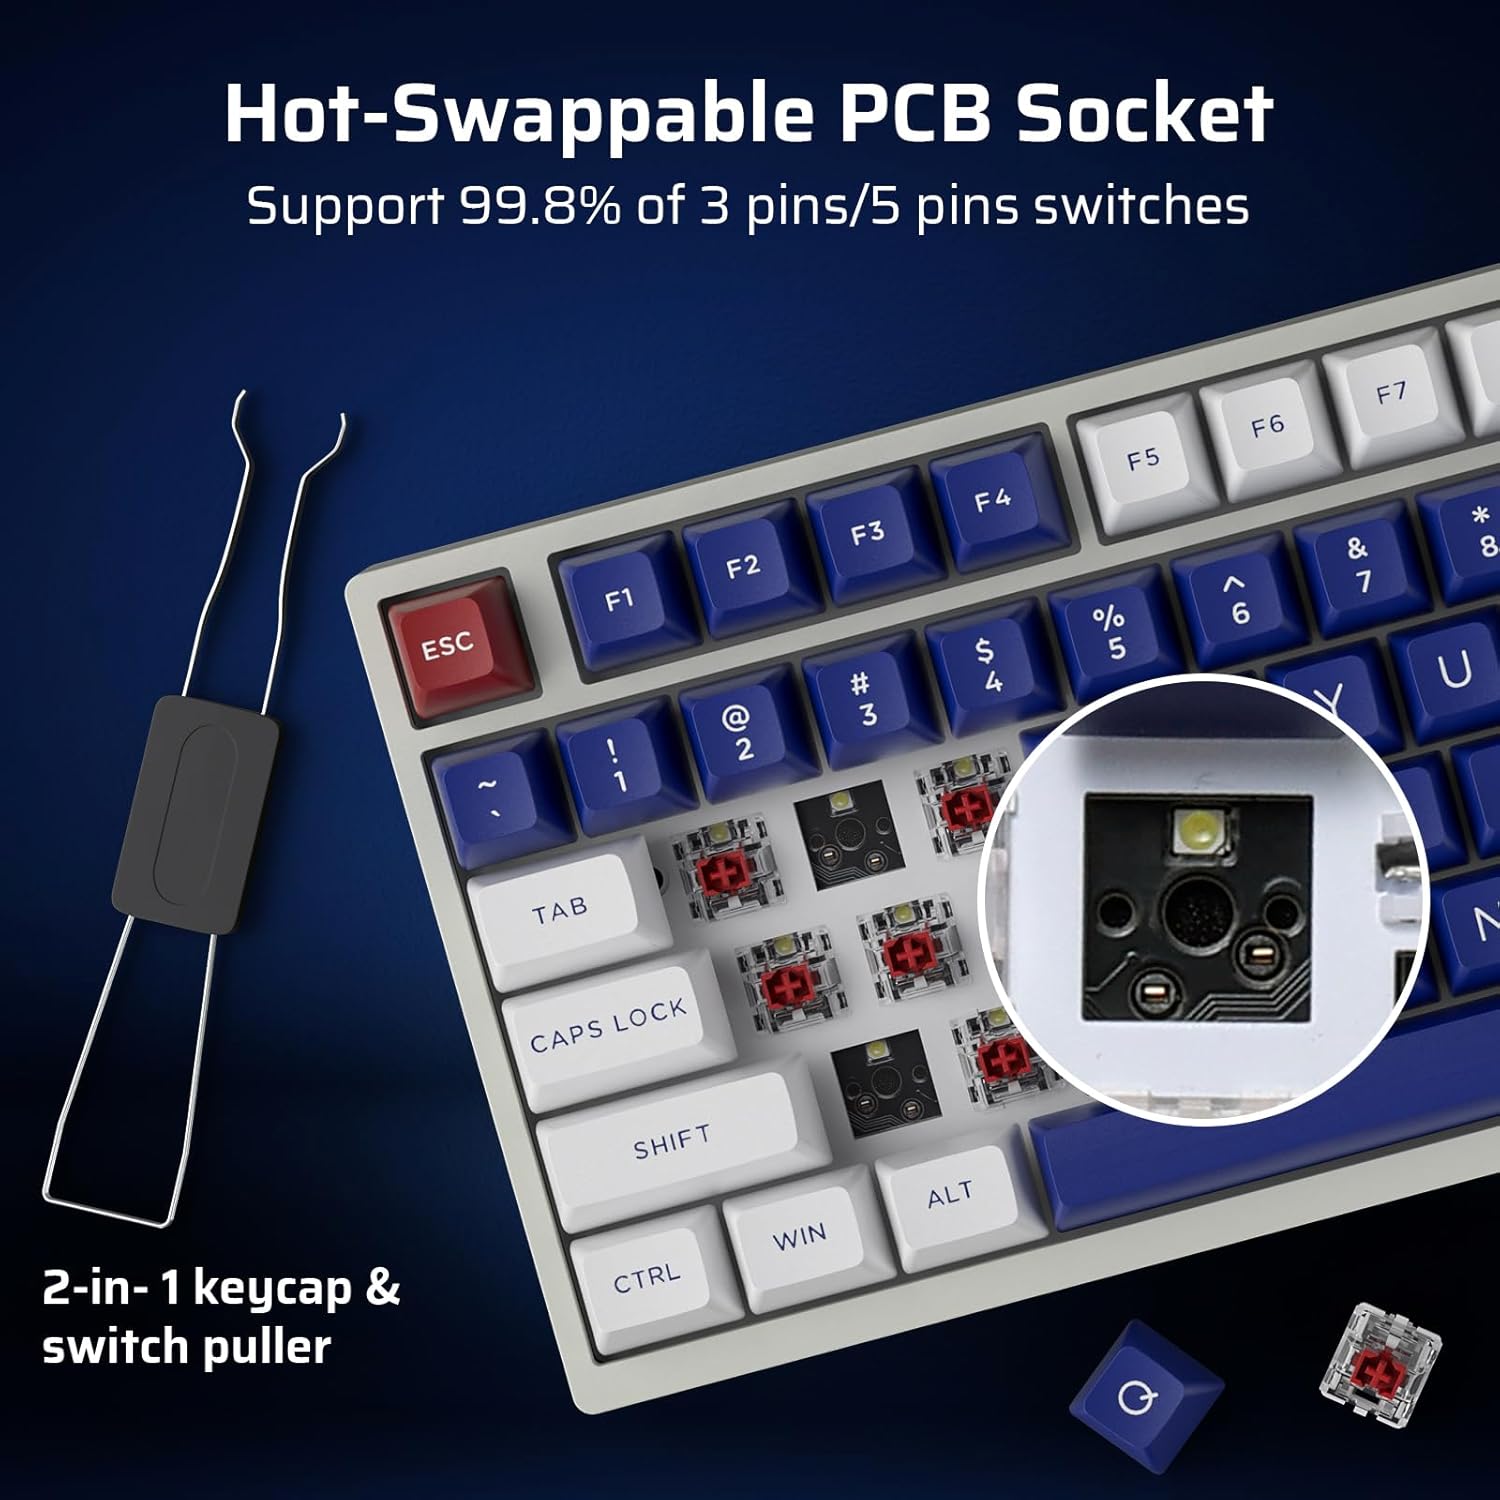
Image 4.1: Demonstrates the functionality of the convenient volume knob for adjusting audio levels and muting.
4.2 RGB Backlighting
The keyboard features 18 dynamic RGB lighting modes. Control them using the following key combinations:
- Switch Backlight Modes: Press Fn + ↑ (Up Arrow)
- Switch Backlight Colors: Press Fn + ↓ (Down Arrow)
- Backlight Speed +: Press Fn + → (Right Arrow)
- Backlight Speed -: Press Fn + ← (Left Arrow)
- Backlight On/Off: Press Fn + \
- Restore Factory Mode: Long press Fn + Space
4.3 Hot-Swappable Switches
The NB831 features a hot-swappable PCB, allowing you to change mechanical switches without soldering. It supports both 3-pin and 5-pin MX-style switches (e.g., Gateron, Kailh). Use the included 2-in-1 keycap and switch puller for easy removal and installation.

Image 4.2: Close-up view of the hot-swappable PCB socket, demonstrating compatibility with different switch types.
4.4 Pro Software Support
Utilize the dedicated LTC software to customize your keyboard experience. The software allows you to:
- Remap key combinations.
- Assign macros for complex commands.
- Customize RGB lighting effects and colors.

Image 4.3: Screenshot of the LTC Pro Software interface, showing options for key remapping, macro assignment, and RGB customization.
Video 4.1: A detailed review of the LTC Nimbleback NB831 keyboard, including a demonstration of its software features and customization options.
5. Maintenance
5.1 Cleaning
To maintain optimal performance and appearance, regularly clean your keyboard. Use a soft, dry cloth to wipe the surface. For deeper cleaning, remove keycaps using the provided keycap puller and use compressed air to clear debris from between switches. The PBT keycaps are oil-resistant, making them easier to clean.
5.2 Switch and Keycap Replacement
Leverage the hot-swappable design to replace switches or keycaps. Use the included 2-in-1 tool to carefully remove keycaps first, then switches. Ensure new switches are aligned correctly before pressing them into the PCB to avoid bending pins.
5.3 Sound Dampening
The keyboard is designed with dual layers of sound-damping foam to minimize hollow sounds and reduce noise, contributing to a satisfying typing experience.

Image 5.1: Diagram illustrating the two-layer silencing foam structure within the keyboard, designed to reduce hollow sounds and noise.
6. Troubleshooting
- Keyboard not responding: Ensure the keyboard is charged and properly connected (wired, 2.4GHz dongle, or Bluetooth paired). Try switching between connectivity modes.
- Bluetooth pairing issues: Ensure the keyboard is in Bluetooth mode and discoverable. Remove previous pairings on your device and try re-pairing.
- RGB lighting not working: Check if the backlight is turned on using Fn + \. If issues persist, try restoring factory settings with Fn + Space (long press).
- Software not detecting keyboard: Ensure the keyboard is connected via USB-C wired mode when using the software. Check for software updates.
- Battery life concerns: Check the battery level by pressing Fn + Backspace. Ensure the keyboard is fully charged.
7. Specifications
| Feature | Detail |
|---|---|
| Product Dimensions | 12.64 x 5.24 x 1.65 inches |
| Item Weight | 2.57 pounds |
| Manufacturer | LTC |
| Item Model Number | NB831 |
| Batteries | 2 Lithium Ion batteries required (included) |
| Connectivity Technology | Bluetooth, RF (2.4GHz), USB-C |
| Keyboard Description | Mechanical, 75% Layout (81-Keys) |
| Special Feature | Programmable Keys, Rechargeable, Volume Roller, Hot-Swappable |
| Keyboard Backlighting | RGB |
7.1 Battery Information
The keyboard is equipped with a 4000mAh battery, providing up to 12 hours of continuous use with RGB backlight and up to 80 hours without. To check the battery level, press Fn + Backspace.

Image 7.1: Visual guide for checking the battery level using the Fn + Backspace key combination.
8. Warranty and Support
For warranty information, technical support, or customer service inquiries, please refer to the official LTC website or contact your retailer. Keep your purchase receipt for warranty claims.


