
Introduction
This manual provides essential information for the safe and effective operation, maintenance, and troubleshooting of your RYOBI 18V ONE+ HP Compact Brushless 1/2-inch Drill/Driver Kit. Please read all instructions carefully before use and retain this manual for future reference.
Important Safety Information
Always observe basic safety precautions to reduce the risk of fire, electric shock, and personal injury. Failure to follow these warnings and instructions may result in serious injury.
General Power Tool Safety Warnings
- Work Area Safety: Keep the work area clean and well lit. Cluttered or dark areas invite accidents.
- Electrical Safety: Power tool plugs must match the outlet. Never modify the plug in any way. Do not abuse the cord.
- Personal Safety: Stay alert, watch what you are doing, and use common sense when operating a power tool. Use personal protective equipment such as eye protection, hearing protection, and a dust mask.
- Power Tool Use and Care: Do not force the power tool. Use the correct power tool for your application. Disconnect the battery pack from the power tool before making any adjustments, changing accessories, or storing power tools.
Product Overview
The RYOBI 18V ONE+ HP Compact Brushless 1/2-inch Drill/Driver Kit includes the following components:
- 18V ONE+ HP Compact Brushless 1/2-inch Drill/Driver
- 1.5 Ah Lithium-Ion Battery
- Charger
- Tool Bag
Drill/Driver Features
- Brushless Motor: Provides extended runtime, longer motor life, and increased power compared to brushed models.
- Compact Design: Measures approximately 6.4 inches in length, allowing for better access to tight workspaces and overhead applications.
- High Torque Output: Delivers up to 400 in./lbs. of torque for demanding drilling and driving tasks.
- Two-Speed Gearbox: Offers 0-450 RPM for high-torque applications and 0-1,700 RPM for faster drilling.
- 24-Position Clutch: Allows for precise torque adjustment to prevent overdriving screws or damaging materials.
- Single Sleeve Ratcheting Chuck: Ensures secure bit retention.
- Integrated LED Worklight: Illuminates the workspace for improved visibility.


Setup
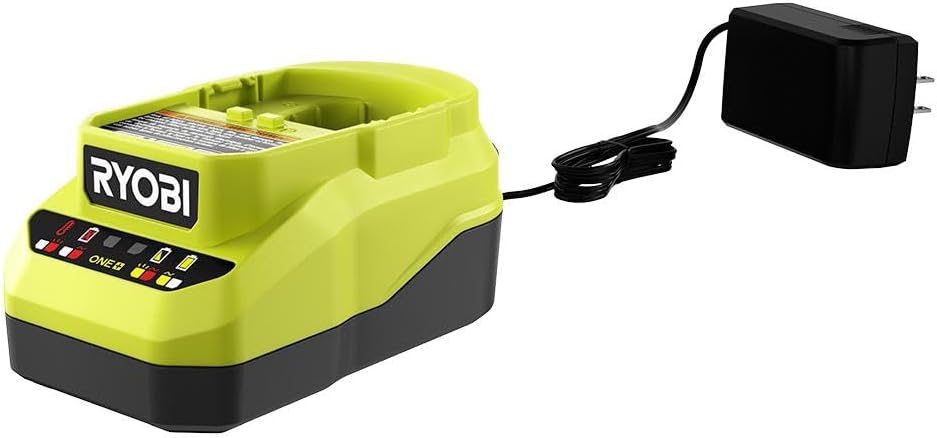
Battery Charging
- Connect the charger to a standard 120V AC electrical outlet.
- Slide the battery pack onto the charger. Ensure it is fully seated and makes proper contact.
- The charger's indicator lights will display the charging status. Refer to the charger's specific manual for detailed light patterns and charging times.
- Once fully charged, remove the battery from the charger.
Installing the Battery Pack
- Align the battery pack with the base of the drill/driver handle.
- Slide the battery pack into the handle until it clicks securely into place. Ensure it is fully seated and does not wobble.
- To remove the battery, press the release latches located on the sides of the battery pack and pull it out.
Installing Drill Bits and Accessories
- Ensure the drill/driver is off and the battery pack is removed to prevent accidental starting.
- Grasp the rear portion of the chuck with one hand and rotate the front portion counter-clockwise to open the chuck jaws.
- Insert the drill bit or accessory into the chuck. Ensure the shank is centered within the jaws.
- Rotate the front portion of the chuck clockwise to tighten the jaws securely around the bit. Hand-tighten firmly.
- Tug on the bit to ensure it is firmly seated and will not slip during operation.
Operating Instructions
Powering On/Off
The tool is activated by pressing the variable speed trigger switch. The speed of the tool increases as the trigger is pressed further. Release the trigger to turn off the tool.
Speed Selection
The drill/driver features a two-speed gearbox for versatility:
- Speed 1 (Low): Provides higher torque for demanding applications such as driving large fasteners or drilling large diameter holes.
- Speed 2 (High): Provides faster speed for quick drilling with smaller bits.
To change speeds, slide the speed selector switch located on top of the tool. Ensure the tool has come to a complete stop before changing speed settings to prevent gear damage.
Clutch Settings
The 24-position clutch allows you to adjust the torque output to match the application, preventing overdriving screws or damaging the workpiece. The clutch collar is located behind the chuck.
- Rotate the clutch collar to the desired setting. Lower numbers (1-5) are for smaller screws and softer materials. Higher numbers (6-24) are for larger screws and harder materials.
- The drill symbol setting (indicated by a drill bit icon) bypasses the clutch mechanism, providing maximum torque for drilling applications.
Forward/Reverse Rotation
The forward/reverse selector switch is located above the trigger. This switch controls the direction of rotation and also acts as a trigger lock.
- Push the switch to the left for forward rotation (for drilling and driving screws).
- Push the switch to the right for reverse rotation (for removing screws).
- When the switch is in the center position, the trigger is locked, preventing accidental starting. Always engage the trigger lock when not in use or when changing accessories.
Drilling and Driving Techniques
- Always secure your workpiece firmly to prevent movement during operation.
- Apply steady, even pressure directly in line with the drill bit or driver bit. Avoid excessive force.
- For larger screws or hard materials, consider drilling a pilot hole first.
- Use appropriate drill bits for the material (wood, metal, plastic) and driver bits that correctly fit the fastener head.
Maintenance
Cleaning
- Regularly clean the tool's air vents to prevent dust and debris buildup, which can lead to overheating. Use compressed air or a soft brush.
- Wipe down the exterior of the tool with a clean, dry cloth. Do not use harsh chemicals, solvents, or abrasive cleaners, as these can damage plastic parts.
Storage
- Store the tool, battery, and charger in a cool, dry place, away from direct sunlight, moisture, and extreme temperatures.
- Always remove the battery pack from the tool before storing it for extended periods.
- For optimal battery life, store lithium-ion batteries with a partial charge (around 50%).
Troubleshooting
Common Issues and Solutions
| Problem | Possible Cause | Solution |
|---|---|---|
| Tool does not start | Battery not charged | Charge battery fully. |
| Tool does not start | Battery not properly installed | Ensure battery is securely clicked into place. |
| Tool does not start | Forward/reverse switch in center (locked) position | Move switch to forward or reverse operating position. |
| Reduced power/performance | Low battery charge | Recharge battery. |
| Reduced power/performance | Incorrect clutch setting for the task | Adjust clutch to a higher setting or switch to drill mode. |
| Tool overheats | Blocked air vents | Clean air vents. Allow tool to cool down before resuming use. |
If you encounter issues not listed here or if problems persist, please contact RYOBI customer support for further assistance.
Specifications
Technical Data
- Model: PSBDD01
- Voltage: 18 Volts
- Battery Capacity: 1.5 Amp Hours (Lithium-Ion)
- Chuck Size: 1/2 inch
- No Load Speed: 0-450 / 0-1,700 RPM (2-speed)
- Maximum Torque: 400 Inch Pounds
- Clutch Settings: 24 + Drill Mode
- Product Dimensions: 10"L x 4"W x 8"H
- Item Weight: 5 Pounds
- Power Source: Battery Powered
Warranty and Support
Warranty Information
This RYOBI product is covered by a manufacturer's warranty. For specific warranty terms, conditions, and registration, please refer to the warranty card included with your product or visit the official RYOBI website. It is important to retain your proof of purchase for any warranty claims.
Customer Support
For technical assistance, replacement parts, or service inquiries, please contact RYOBI customer support. Contact information can typically be found on the product packaging or the official RYOBI website. Please have your model number (PSBDD01) and serial number ready when contacting support.


