
1. Introduction
This manual provides detailed instructions for the installation, operation, and maintenance of your CEMELI K6H-3A Tuya WiFi Smart Thermostat. Please read this manual thoroughly before installation and use to ensure proper function and safety. This thermostat is designed for controlling electric floor heating, TRV (Thermostatic Radiator Valve) systems, water boilers, and gas boilers, offering smart temperature control via touch buttons and mobile application.
Safety Information:
- Always disconnect power at the main circuit breaker before performing any wiring or installation.
- Installation should be performed by a qualified electrician in accordance with local electrical codes.
- Do not expose the thermostat to water or excessive humidity.
- Do not attempt to repair or modify the thermostat yourself. Contact customer support for assistance.
2. Product Overview
The CEMELI K6H-3A is a modern, programmable smart thermostat featuring a clear LCD display and touch controls. It integrates with Tuya Smart Life app for remote control and voice command compatibility with Google Home and Alexa.
2.1 Key Features
- LCD Display with Backlight
- Touch Button Control
- WiFi Connectivity (2.4GHz)
- Remote Control via Tuya Smart Life App (Android/iOS)
- Voice Control Compatibility (Google Home, Amazon Alexa)
- Programmable Scheduling
- Temperature Accuracy: ±1°C
- Flame Retardant PC+ABS Material
2.2 Product Components

Figure 1: Front view of the CEMELI K6H-3A Smart Thermostat. The display shows the current room temperature, time, day of the week, and status icons for Wi-Fi, heating mode, and child lock. Touch buttons are located at the bottom for power, mode, and temperature adjustment.

Figure 2: Two CEMELI K6H-3A Smart Thermostats. One unit is shown from the front, displaying its interface, while the other is angled to reveal its side profile, illustrating the compact design and mounting mechanism suitable for wall installation.
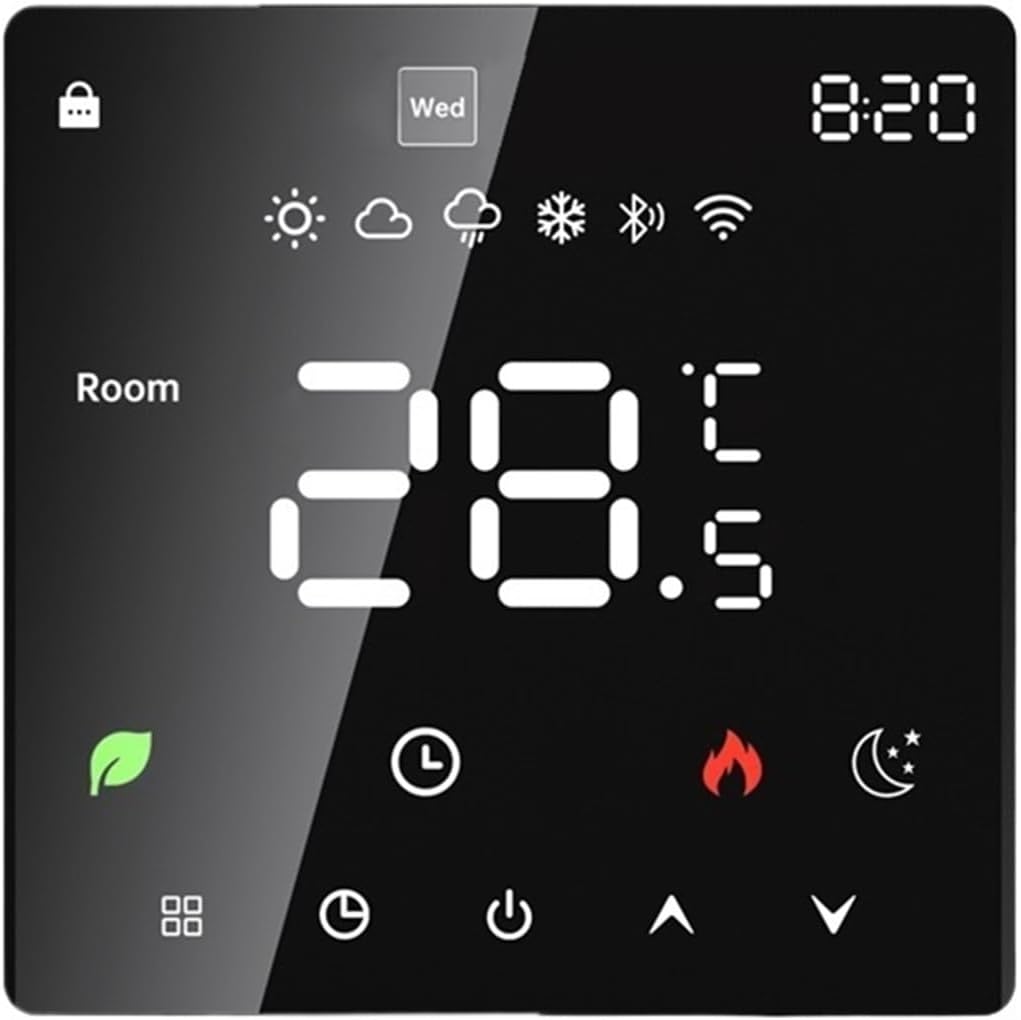
Figure 3: Detailed front view of the CEMELI K6H-3A Smart Thermostat's display. This image emphasizes the clarity of the LCD screen, showing a temperature reading of 28.5°C, current time, and various status indicators such as Wi-Fi connection, heating active, and eco mode.
3. Specifications
| Parameter | Value |
|---|---|
| Display | LCD with Backlight |
| Power Supply | 95-240VAC, 50/60Hz |
| Default Temperature Range | 5~60°C (Adjustable) |
| Temperature Accuracy | ±1°C |
| Sensor | NTC (Internal, optional external for 16A electric floor heating) |
| Dimensions | 86 x 86 x 40mm |
| Output Power | 16A (Electric Heating) / 3A (Water/Gas Boiler) |
| Power Consumption | <1W |
| Material | PC+ABS (Flame Retardant) |
| Connectivity | Wi-Fi (2.4GHz) |
| Control Method | Touch Buttons, Mobile App (Android/iOS) |
| Voice Control | Google Home, Amazon Alexa |
3.1 Packing List
- 1 x CEMELI K6H-3A Thermostat
- 1 x Sensor Probe (Included only with 16A electric underfloor heating models)
- 2 x Mounting Screws
- 1 x User Manual (this document)
4. Installation
Important: Installation must be carried out by a qualified professional. Ensure the main power supply is turned off before beginning any wiring work.
4.1 Wiring
- Disconnect power to the heating system at the circuit breaker.
- Open the thermostat's front panel carefully.
- Connect the live and neutral wires from your power supply to the designated L and N terminals on the thermostat.
- Connect the heating load wires (e.g., electric heating cables, boiler control wires) to the appropriate output terminals (e.g., LOAD1, LOAD2 for electric heating; NO, NC for boiler). Refer to the wiring diagram provided with your specific heating system.
- If using for 16A electric underfloor heating, connect the external NTC sensor probe wires to the designated sensor terminals.
- Ensure all connections are secure and properly insulated.
4.2 Mounting
- Mount the thermostat base into a standard 86x86mm wall box.
- Secure the base to the wall box using the provided screws.
- Carefully reattach the front panel of the thermostat to the mounted base, ensuring it clicks securely into place.
4.3 Initial Power On
After installation, restore power at the circuit breaker. The thermostat display should light up, indicating it is powered on. The initial setup may require setting the time, date, and system parameters.
5. Operating Instructions
The thermostat features a touch-sensitive interface. Gently press the icons to operate.
5.1 Button Functions
- Power Button (circle with vertical line): Short press to turn the thermostat ON/OFF.
- Mode Button (square with dots): Short press to switch between Manual mode and Program mode.
- Up Arrow (triangle pointing up): Increase temperature setting or navigate menu options.
- Down Arrow (triangle pointing down): Decrease temperature setting or navigate menu options.
- Clock Icon: Long press to enter time/date setting. Short press to confirm settings.
- Lock Icon: Appears when child lock is active. Long press Up and Down arrows simultaneously to toggle child lock.
5.2 Setting Temperature
In Manual mode, use the Up and Down arrow buttons to adjust the desired target temperature. The new setting will be displayed briefly before returning to the current room temperature.
5.3 Display Icons
- WiFi Icon: Indicates Wi-Fi connection status. Blinking means pairing mode, solid means connected.
- Heating Icon (flame): Appears when the heating system is active.
- Moon/Sun Icon: Indicates night/day period in program mode.
- Leaf Icon: Eco mode active.
- Lock Icon: Child lock enabled.
6. Mobile App Integration
The CEMELI K6H-3A thermostat can be controlled remotely via the Tuya Smart Life application.
6.1 App Download and Account Setup
- Download the "Smart Life" app from the Apple App Store (iOS) or Google Play Store (Android).
- Register a new account or log in with an existing one.
6.2 Adding the Thermostat to the App
- Ensure your smartphone is connected to a 2.4GHz Wi-Fi network.
- On the thermostat, turn it off, then long press the Down arrow button for 5-8 seconds until the Wi-Fi icon starts blinking rapidly. This indicates pairing mode.
- Open the Smart Life app, tap the "+" icon in the top right corner to add a device.
- Select "Small Home Appliances" > "Thermostat" or use the auto-scan feature.
- Follow the on-screen instructions in the app to connect the thermostat to your Wi-Fi network.
- Once connected, the Wi-Fi icon on the thermostat will become solid.
6.3 Voice Control Setup
After successfully adding the thermostat to the Smart Life app, you can link it with Google Home or Amazon Alexa:
- Open the Google Home or Amazon Alexa app.
- Navigate to the "Add device" or "Skills & Games" section.
- Search for and enable the "Smart Life" skill.
- Link your Smart Life account when prompted.
- Discover devices. Your thermostat should now be controllable via voice commands (e.g., "Hey Google, set thermostat to 22 degrees").
7. Maintenance
The CEMELI K6H-3A Smart Thermostat requires minimal maintenance.
- Cleaning: Wipe the display and casing with a soft, dry cloth. Do not use abrasive cleaners, solvents, or spray directly onto the thermostat.
- No User-Serviceable Parts: The thermostat contains no user-serviceable parts. Do not attempt to open or repair the unit.
8. Troubleshooting
| Problem | Possible Cause | Solution |
|---|---|---|
| Thermostat has no power/display is off. | No power supply; circuit breaker tripped; incorrect wiring. | Check circuit breaker. Verify wiring connections (consult a professional). |
| Heating system not responding. | Thermostat in OFF mode; incorrect temperature setting; wiring issue; heating system fault. | Ensure thermostat is ON and set to a temperature above room temperature. Check wiring. Consult heating system manual. |
| Wi-Fi icon is blinking rapidly. | Thermostat is in pairing mode. | Proceed with adding the device in the Smart Life app. |
| Wi-Fi icon is off or solid but no app control. | No Wi-Fi connection; incorrect Wi-Fi password; router issue; app not linked. | Ensure router is working and 2.4GHz band is active. Re-enter Wi-Fi password in app. Re-link Smart Life app if necessary. |
| Temperature reading seems inaccurate. | Thermostat located near heat source/draft; sensor fault. | Relocate thermostat if possible. If using external sensor, check its placement and connection. |
9. Warranty and Support
For warranty information and technical support, please refer to the purchase documentation or contact your retailer/manufacturer directly. Keep your proof of purchase for any warranty claims.