
PARTPHONER PARTPHONER_Model_001
PARTPHONER Outdoor Wall Lights and Pendant Light User Manual
Model: PARTPHONER_Model_001
1. Introduction
Thank you for choosing the PARTPHONER Outdoor Wall Lights and Pendant Light. This manual provides essential information for the safe installation, operation, and maintenance of your lighting fixtures. Please read these instructions thoroughly before installation and retain them for future reference.

Image 1.1: Overview of PARTPHONER Outdoor Wall Lights and Pendant Light. This image displays the various configurations of the lighting fixtures, including wall-mounted and pendant options, highlighting their modern design and bubble water glass elements.
2. Important Safety Information
WARNING: To avoid electric shock, ensure power is turned off at the circuit breaker before installation or servicing. All wiring connections must be in accordance with local and national electrical codes.
- Consult a qualified electrician if you are unsure about the installation process.
- Do not install near flammable materials.
- Ensure the fixture is securely mounted to a structural element.
- Do not exceed the maximum wattage specified for the bulb (60W E26 base).
- Handle glass components with care to prevent breakage.
3. Package Contents
Verify that all components are present before beginning installation:
- PARTPHONER Outdoor Lighting Fixture(s)
- 6W, 2700K, Dimmable T10 LED Light Bulb(s)
- Mounting Hardware (screws, wire nuts, mounting plate)
- Instruction Manual

Image 3.1: Detailed view of the PARTPHONER wall light, illustrating its robust metal frame and the distinctive bubble water glass shade. This image highlights the quality of materials used in the fixture's construction.
4. Product Specifications
| Feature | Specification |
|---|---|
| Brand | PARTPHONER |
| Model Number | PARTPHONER_Model_001 |
| Material | Glass, Metal |
| Color | Warm White (Light Color) |
| Installation Type | Hardwired |
| Power Source | Corded Electric |
| Voltage | 120 Volts (AC) |
| Bulb Base | E26 |
| Max Wattage | 60W (per socket) |
| Included Bulb | 6W, 2700K, Dimmable T10 LED |
| Special Feature | Dusk to Dawn Sensor, Dimmable |
| Water Resistance Level | Waterproof |
| Mounting Type | Wall Mount (for wall lights), Post Mount (for post lights), Ceiling Mount (for pendant lights) |
5. Setup and Installation
Before installation, ensure the power is OFF at the circuit breaker. Follow these general steps for hardwired installation. Specific mounting details may vary slightly between wall, pendant, and post light configurations.
5.1. Pre-Installation
- Unpack all components and inspect for any damage.
- Review the dimensions of your specific fixture to ensure proper placement and clearance.

Image 5.1: Dimensions for the PARTPHONER Wall Light. This image provides measurements for the wall-mounted fixture, including height, width, and depth, essential for planning installation space.

Image 5.2: Dimensions for the PARTPHONER Pendant Light. This image details the measurements for the pendant light, including chain length and fixture size, aiding in proper hanging and placement.
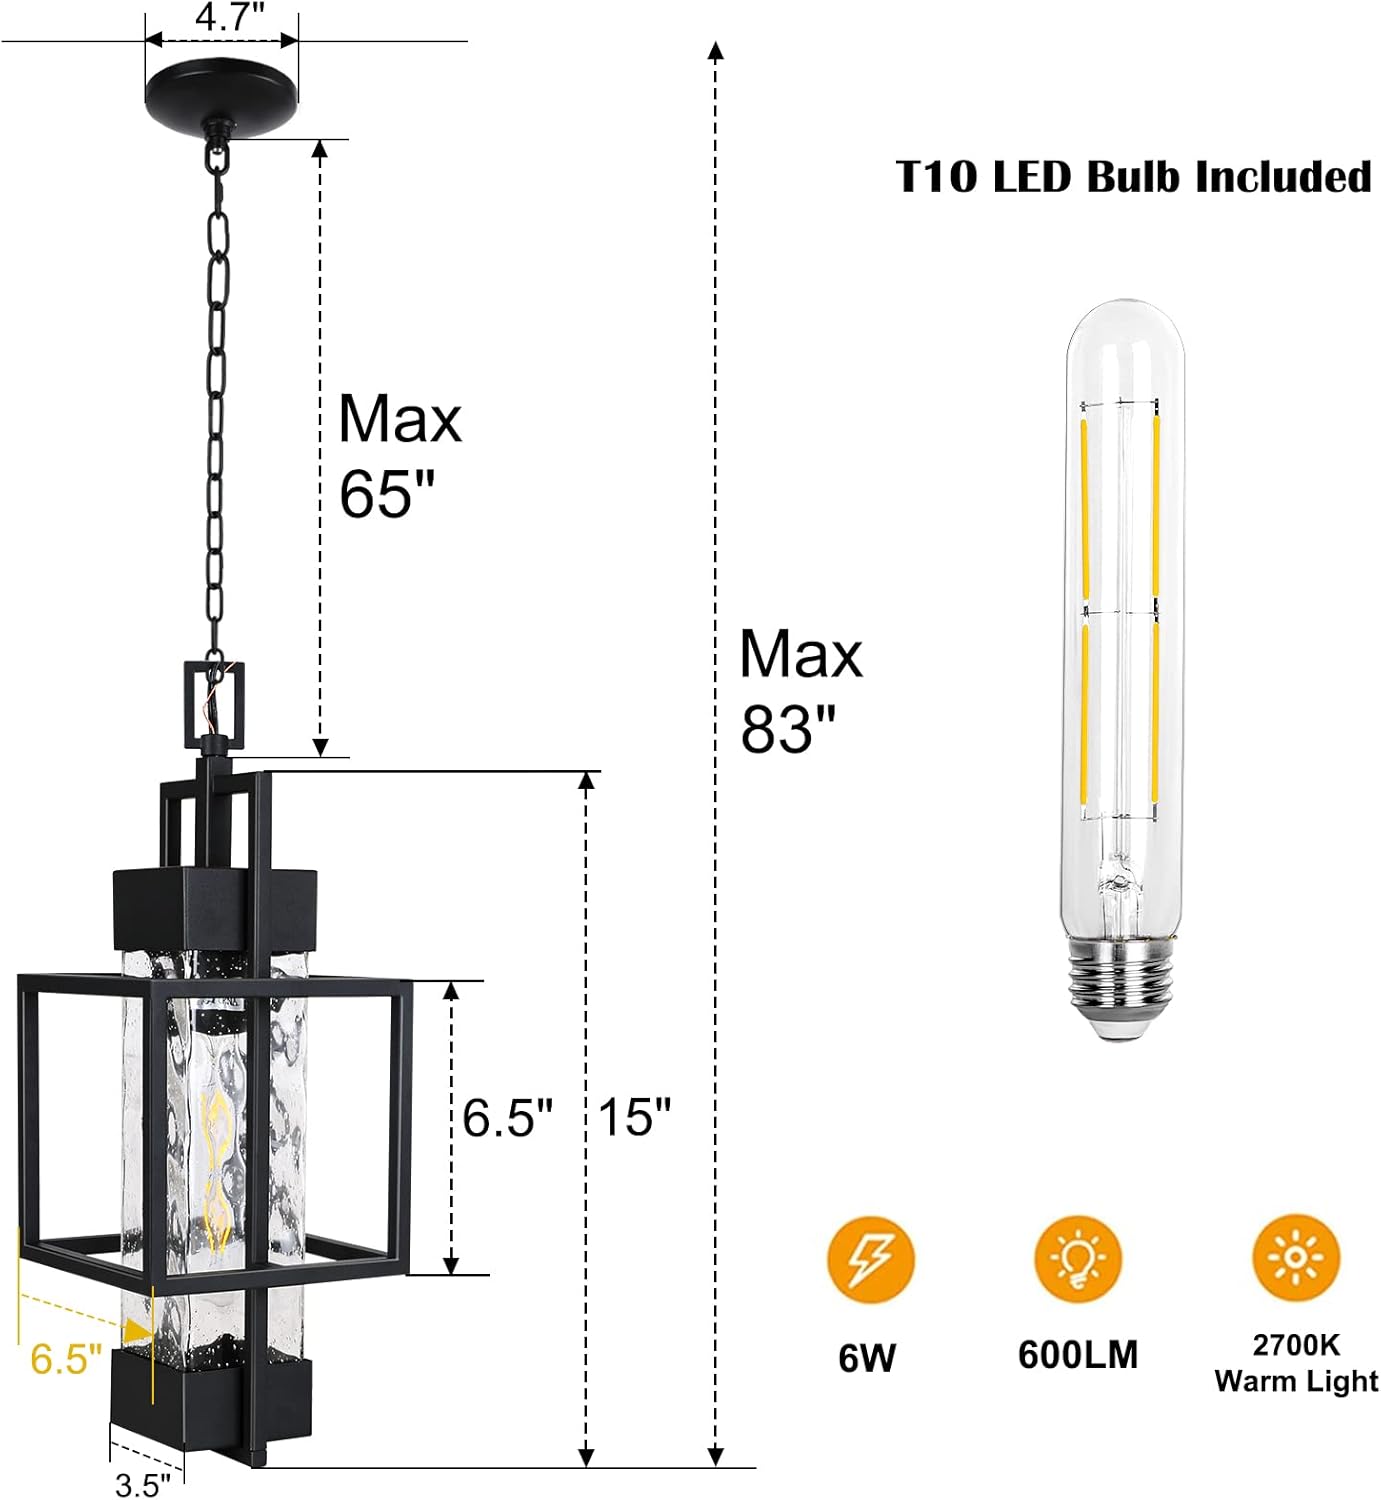
Image 5.3: Dimensions for the PARTPHONER Post Light. This image illustrates the measurements for the post-mounted fixture, including base and fixture dimensions, crucial for ground or pedestal installation.
5.2. Wiring Instructions
- Turn off power at the main circuit breaker.
- Connect the fixture's black wire to the house's black (live) wire.
- Connect the fixture's white wire to the house's white (neutral) wire.
- Connect the fixture's ground wire to the house's ground wire (or ground screw on the mounting plate).
- Secure all connections with wire nuts and electrical tape.

Image 5.4: Wiring connections for the PARTPHONER Post Light. This image shows the exposed wiring of the post light, indicating where electrical connections are made during installation.
5.3. Mounting the Fixture
- Attach the mounting plate to the junction box using the provided screws.
- Carefully tuck the wires into the junction box.
- Align the fixture with the mounting plate and secure it with the decorative nuts or screws.
- Install the included E26 base T10 LED bulb into the socket.
- Turn on power at the circuit breaker to test the light.

Image 5.5: PARTPHONER Wall Light installed. This image shows the wall-mounted fixture securely installed on an exterior brick wall, demonstrating its appearance in an outdoor setting.
6. Operating Instructions
6.1. Dusk to Dawn Sensor Functionality
Your PARTPHONER outdoor light fixtures are equipped with a built-in IC light sensor. This sensor automatically detects ambient light levels:
- The light will automatically turn ON when the surrounding environment becomes dark (at dusk).
- The light will automatically turn OFF when the surrounding environment becomes bright (at dawn).
Ensure the sensor is not obstructed by objects or direct artificial light sources, as this may interfere with its operation.
6.2. Dimmable Feature
The included T10 LED bulb is dimmable. If you wish to utilize the dimming functionality, you must connect the fixture to a compatible dimmer switch (sold separately). Follow the dimmer switch manufacturer's instructions for installation and operation.
7. Maintenance
Regular maintenance will help prolong the life and appearance of your PARTPHONER outdoor lights.
- Cleaning: To clean the fixture, turn off the power and wipe with a soft, damp cloth. Do not use abrasive cleaners or solvents, as they may damage the finish or glass.
- Bulb Replacement: Ensure power is off before replacing the bulb. Use only E26 base bulbs with a maximum wattage of 60W.
- Weather Resistance: The fixture is designed to be waterproof and withstand various weather conditions. Periodically check for any loose connections or signs of wear, especially after severe weather.
8. Troubleshooting
If you encounter issues with your PARTPHONER outdoor light, refer to the following common problems and solutions:
| Problem | Possible Cause | Solution |
|---|---|---|
| Light does not turn on. | No power, faulty bulb, incorrect wiring. | Check circuit breaker. Ensure bulb is securely tightened and not burnt out. Verify wiring connections. |
| Light stays on during the day. | Dusk to dawn sensor obstructed or receiving artificial light. | Ensure sensor is clear of obstructions. Relocate fixture if it's exposed to other light sources (e.g., streetlights). |
| Light flickers. | Loose bulb, unstable power, incompatible dimmer. | Tighten bulb. Check household wiring. If using a dimmer, ensure it is compatible with LED bulbs. |
| Light turns on/off erratically. | Sensor interference, power fluctuations. | Check for intermittent light sources near the sensor. Consult an electrician for power issues. |
9. Warranty and Customer Support
PARTPHONER products are manufactured with quality and durability in mind. For specific warranty details, please refer to the product packaging or contact PARTPHONER customer support directly.
If you have any questions, require technical assistance, or need to report a defective product, please contact PARTPHONER customer service through the retailer where the product was purchased or visit the official PARTPHONER website for support contact information.
Ask a question about this manual
Ask about setup, troubleshooting, compatibility, parts, safety, or missing instructions. Manuals+ will review the question and use this page’s manual context to help answer it.