
ELING B07KP8DC7N
ELING Universal Digital GPS Speedometer User Manual
Model: B07KP8DC7N
1. Introduction
This manual provides detailed instructions for the installation, operation, and maintenance of your ELING Universal Digital GPS Speedometer. This versatile gauge is designed for a wide range of applications including racing cars, boats, yachts, and motorcycles, operating on 12V or 24V systems. Please read this manual thoroughly before installation and use to ensure proper function and safety.
2. Product Features
- Wide Voltage Compatibility: Operates on 9-32V DC systems.
- Adjustable Speed Range: Displays speed from 0-999 in MPH, Knots, or KM/H.
- Odometer and Trip Meter: Features an adjustable odometer (0-999999 Mi, NMI, KM) and a resettable trip meter.
- GPS Blind Area Compensation: Ensures accurate mileage tracking even in areas with temporary GPS signal loss.
- Overspeed Buzzer Alarm: Provides an audible alert for exceeding a set speed limit.
- Integrated Indicator Lights: Includes indicators for high beam, neutral, fuel level, oil pressure, right turn, left turn, and hazard warning.
- Compact Design: 52mm (2-1/16") diameter for easy dashboard integration.

Figure 2.1: Front view of the ELING Digital GPS Speedometer, displaying speed, odometer, and trip meter readings.
3. Specifications
| Brand | ELING |
| Model Number | B07KP8DC7N |
| Product Dimensions | 2.05 x 2.05 x 2.17 inches (52mm diameter) |
| Item Weight | 6.38 Ounces |
| Material | Stainless Steel |
| Working Voltage | 9-32V DC |
| Speed Range | 0-999 (MPH, Knots, KM/H adjustable) |
| Mileage Range | 0-999999 (Mi, NMI, KM available) |
| UPC | 680465131275 |
4. Installation Guide
Follow these steps for proper installation of your GPS speedometer:
- Panel Preparation: Open a 52mm (2-1/16") diameter hole in your dashboard. Ensure a clearance of 55mm (2-3/16") behind the panel to accommodate the gauge.
- Gauge Mounting: Remove the fastening ring from the gauge. Insert the gauge through the dashboard panel from the front. Securely fasten the gauge using the fastening ring from the rear.
- Wiring Connections: Connect the wires according to the provided wiring diagram. Refer to Section 4.1 for detailed wiring instructions.
- GPS Antenna Installation: Securely fasten the GPS antenna, ideally outdoors or inside the front windscreen, ensuring it has a clear view of the sky to receive satellite signals. Connect the antenna cable to the designated socket at the back of the gauge. Do not cut the antenna cable.
- Initial GPS Signal Acquisition: After powering on the device, allow approximately 1 minute for the gauge to search for and acquire a satellite signal. Once acquired, the gauge will display the current speed in the selected unit (knots/km/h/mph).

Figure 4.1: ELING GPS Speedometer kit components.
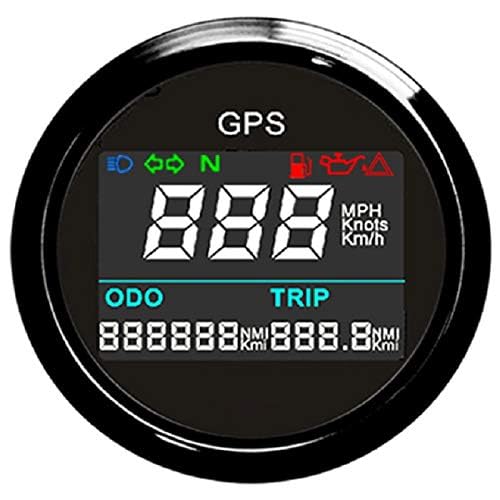
Figure 4.2: Side view showing the threaded housing for panel mounting.

Figure 4.3: Rear view with wiring harness and GPS antenna port.
4.1 Wiring Diagram and Connections
Refer to the diagram below for correct wiring connections. Ensure all connections are secure to prevent malfunction.

Figure 4.4: Wiring diagram for the ELING GPS Speedometer.
| Wire Color | Function |
|---|---|
| Red | Power (+) 12V/24V |
| Black | Power (-) Ground |
| Green + White | External Button (for function selection) |
| Green | Neutral (N) Indicator |
| Yellow | Fuel Level Indicator |
| White | High Beam Indicator |
| Purple | Right Turn Indicator |
| Blue | Left Turn Indicator |
| Brown | Oil Pressure Indicator |
| Orange | Hazard Warning Lamp |
5. Operation and Function Selection
The gauge features an internal button on the back and an external button (if wired) for function selection and adjustment. To access functions, press and hold the button while the power is on. The LCD will display "ODO", "BUZZ", or "UNIT". Release the button to select the desired function.
5.1 ODO (Change Total Odometer)
To adjust the total odometer reading, select "ODO". The LCD will display "5000" (example). Press the button to change the flashing digit from 0 to 999999. Set the target odometer value and release the button to save.
5.2 BUZZ (Change Overspeed Buzzer Alarm Threshold)
To set the overspeed alarm, select "BUZZ". The LCD will display "B 80" (example, buzzer will activate when speed exceeds 80 km/h). Press the button to change the flashing digit from 10 to 240. Set your desired overspeed buzzer alarm threshold value and release the button to save.
5.3 UNIT (Switch Unit between km/h, mph, or knots)
To change the speed unit, select "UNIT". The LCD will display "km/h", "mph", or "knots". Press the button to cycle through the available units. Release the button to select your preferred unit.
5.4 Reset Trip Odometer
To reset the trip odometer to zero, press the button at the back of the GPS speedometer, or the external button, and hold it for 2-3 seconds. The trip odometer will then reset to zero.
6. Applications
The ELING Universal Digital GPS Speedometer is suitable for a wide range of vehicles and applications, including:
- Automobiles (Cars, Trucks, Buses)
- Motorcycles
- Boats and Yachts
- Recreational Vehicles (RVs)
- Off-road Vehicles

Figure 6.1: Examples of vehicle types compatible with the ELING GPS Speedometer.
7. Troubleshooting
- No Power: Check power connections (Red wire to +12/24V, Black wire to Ground). Ensure the vehicle's ignition is on if wired to an ignition-switched circuit.
- No GPS Signal (Display shows "GPS" but no speed): Ensure the GPS antenna has a clear, unobstructed view of the sky. Relocate the antenna if necessary. Allow up to 1-3 minutes for initial signal acquisition. Verify the antenna cable is securely connected to the gauge.
- Inaccurate Speed Reading: Ensure the GPS antenna is positioned optimally. Compare readings with another GPS-enabled device if possible.
- Display Malfunction: Check power supply. If the display remains blank or shows incorrect characters after verifying power, contact customer support.
- Button Unresponsive: Ensure the external button (if used) is correctly wired to the Green+White wires. If using the internal button, ensure it is accessible and functioning.
8. Maintenance
- Cleaning: Clean the gauge display and bezel with a soft, damp cloth. Avoid abrasive cleaners or solvents that could damage the surface.
- Connections: Periodically check all wiring connections to ensure they remain secure and free from corrosion.
- Environmental Protection: While designed for various environments, avoid exposing the gauge to extreme temperatures or direct water spray for extended periods if not rated for such conditions.
9. Warranty and Support
For warranty information or technical support, please contact ELING customer service through the retailer where the product was purchased or visit the official ELING website. Keep your purchase receipt as proof of purchase.
Manufacturer: ELING
Date First Available: August 3, 2017

Figure 9.1: ELING Brand Logo.
Related documentsB07KP8DC7N

Ask a question about this manual
Ask about setup, troubleshooting, compatibility, parts, safety, or missing instructions. Manuals+ will review the question and use this page’s manual context to help answer it.