
1. Introduction
Thank you for purchasing the HANNLOMAX HX-129CR Alarm Clock Radio. This device combines a digital clock with dual alarms, PLL FM radio, Bluetooth streaming, and USB ports for both charging and MP3 playback. Please read this manual carefully before operating the unit and retain it for future reference.
2. Safety Information
- Do not expose this unit to rain or moisture to prevent fire or shock hazards.
- Do not remove the cover or back. There are no user-serviceable parts inside. Refer servicing to qualified service personnel.
- Ensure the AC/DC adapter is easily accessible.
- Avoid placing the unit near heat sources such as radiators, heat registers, stoves, or other apparatus (including amplifiers) that produce heat.
- Clean only with a dry cloth.
3. Package Contents
Please check that the following items are included in your package:
- HANNLOMAX HX-129CR Alarm Clock Radio Unit
- AC/DC Power Adapter
- User Manual (this document)
4. Product Overview
The HANNLOMAX HX-129CR features a clear 0.6-inch green LED display and intuitive controls. Familiarize yourself with the layout for optimal use.
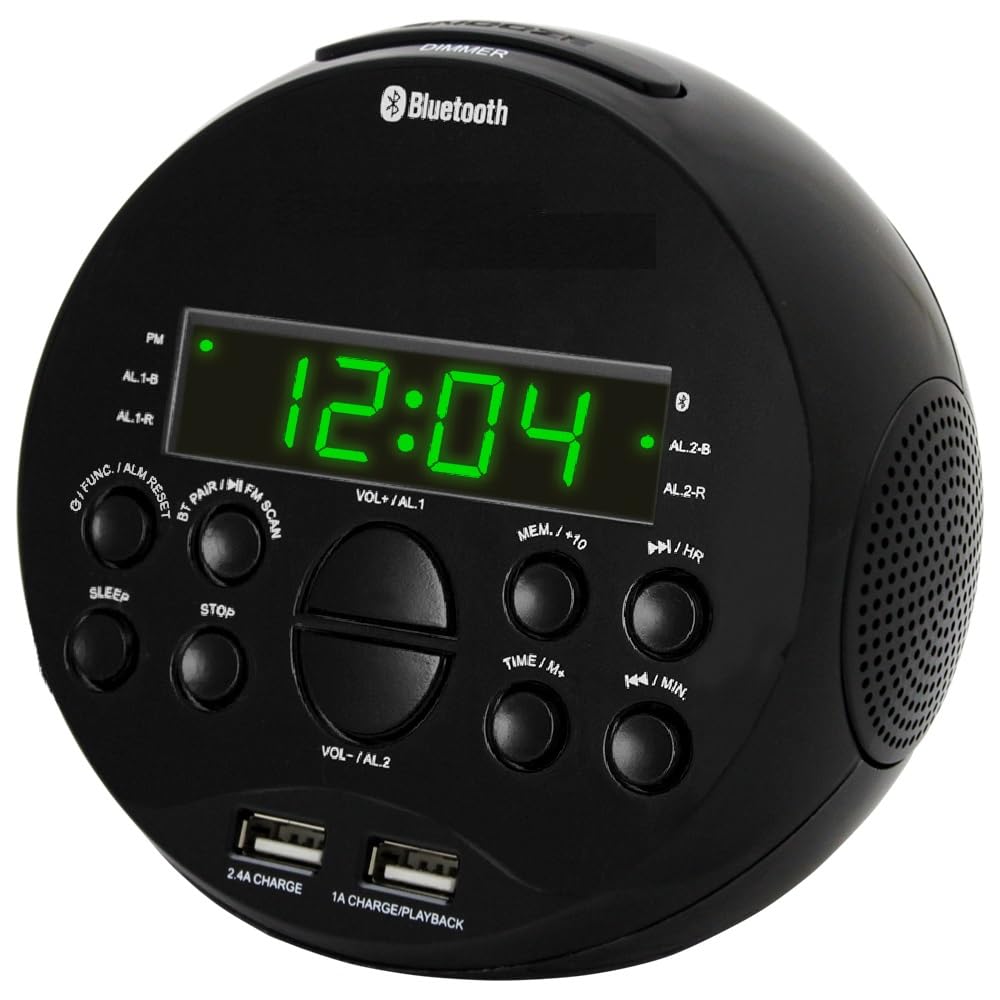
This image displays the HANNLOMAX HX-129CR Alarm Clock Radio, highlighting its 0.6-inch green LED display and front-facing control buttons for easy access to functions like alarm setting, radio tuning, and volume control. The compact design is suitable for bedside tables.
Key Features:
- 0.6" Green LED Display with Dimmer Function
- PLL FM Radio with Preset Stations and External Antenna
- Bluetooth Streaming Capability
- Dual USB Ports for Charging (2.4A and 1A)
- USB Port for MP3 Playback
- Dual Alarm Setting (Wake to Radio or Buzzer)
- Sleep and Snooze Functions
- Memory Backup (requires batteries, not included)
5. Setup
5.1 Power Connection
- Plug the AC/DC adapter into the DC input jack located on the back of the unit.
- Plug the other end of the adapter into a standard wall outlet.
- The unit will power on, and the display will illuminate.
Note: For memory backup during power outages, insert 2 x AAA batteries (not included) into the battery compartment on the bottom of the unit. This will preserve time and alarm settings.
5.2 Setting the Time
- In standby mode, press and hold the TIME SET button. The hour digits will flash.
- Press the HOUR button repeatedly to adjust the hour.
- Press the MINUTE button repeatedly to adjust the minute.
- Press the TIME SET button again to confirm and exit time setting mode.
5.3 Display Dimmer Function
To adjust the brightness of the 0.6" Green LED display, press the SNOOZE button repeatedly. There are typically three levels of brightness (High, Medium, Low) and an Off setting to cycle through.
6. Operating Instructions
6.1 FM Radio Operation
- Press the POWER button to turn on the unit.
- Press the MODE button to select FM radio mode.
- Auto Scan: Press and hold the PLAY/PAUSE button (or similar scan button) to automatically scan and store available FM stations as presets.
- Manual Tuning: Press the TUNE+ or TUNE- buttons to manually adjust the frequency.
- Select Presets: Press the PRESET+ or PRESET- buttons to cycle through stored stations.
- Adjust volume using the VOLUME+ or VOLUME- buttons.
Tip: Extend the external FM antenna fully for improved radio reception.
6.2 Bluetooth Streaming
- Press the POWER button to turn on the unit.
- Press the MODE button to select Bluetooth mode. The display will show "BT" and flash, indicating it is ready for pairing.
- On your smartphone or Bluetooth-enabled device, enable Bluetooth and search for new devices.
- Select "HX-129CR" (or similar name) from the list of available devices.
- Once paired, the unit will emit a confirmation tone, and "BT" will stop flashing.
- You can now play music from your device through the alarm clock radio. Use the unit's VOLUME+/VOLUME- buttons or your device's volume controls.
6.3 USB MP3 Playback
- Insert a USB memory stick containing MP3 audio files into the designated USB port for MP3 Playback (usually marked with a music note or specific icon).
- The unit should automatically switch to USB mode and begin playing the first track. If not, press the MODE button to select USB mode.
- Use the SKIP+/SKIP- buttons to navigate between tracks.
- Press the PLAY/PAUSE button to pause or resume playback.
6.4 Dual Alarm Settings
The unit features two independent alarms (Alarm 1 and Alarm 2).
- Set Alarm Time: Press and hold the ALARM 1 or ALARM 2 button. The hour digits will flash.
- Press the HOUR button to adjust the hour.
- Press the MINUTE button to adjust the minute.
- Press the ALARM 1 or ALARM 2 button again to confirm the time.
- Select Alarm Source: After setting the time, press the ALARM 1 or ALARM 2 button repeatedly to cycle through wake-up options: Buzzer (BUZ), FM Radio (RAD). The selected icon will appear on the display.
- To turn off an alarm, press the corresponding ALARM 1 or ALARM 2 button until the alarm icon disappears from the display.
6.5 Sleep Timer Function
The sleep timer allows you to fall asleep to radio or music, which will automatically turn off after a set period.
- While the radio or music is playing, press the SLEEP button.
- Repeatedly press the SLEEP button to cycle through available sleep times (e.g., 90, 60, 30, 15 minutes, OFF).
- The unit will automatically turn off after the selected duration.
6.6 Snooze Function
When an alarm sounds, press the SNOOZE button to temporarily silence the alarm for approximately 9 minutes. The alarm will sound again after the snooze period.
6.7 USB Charging Ports
The unit features two USB ports for charging external devices:
- One 2.4A USB port for faster charging of compatible devices.
- One 1A USB port for standard charging.
Simply connect your device's USB charging cable to the appropriate port on the back of the alarm clock radio. Charging will begin automatically.
7. Maintenance
- Cleaning: Use a soft, dry cloth to clean the exterior of the unit. Do not use abrasive cleaners or solvents.
- Power Cord: Regularly inspect the power cord for any damage. If damaged, discontinue use and contact customer support.
- Battery Replacement: If using memory backup, replace AAA batteries annually or when the unit frequently loses settings during power interruptions.
8. Troubleshooting
| Problem | Possible Cause | Solution |
|---|---|---|
| No power / Display off | Power adapter not connected or faulty. | Ensure AC/DC adapter is securely plugged into the unit and a working wall outlet. |
| Poor FM radio reception | Antenna not extended or interference. | Fully extend the external FM antenna. Try repositioning the unit. |
| Bluetooth not pairing | Unit not in pairing mode or device too far. | Ensure the unit is in Bluetooth mode and flashing "BT". Move your device closer to the unit. Forget the device on your phone and try pairing again. |
| USB MP3 playback not working | USB stick not inserted correctly or unsupported file format. | Ensure the USB stick is fully inserted into the MP3 playback port. Verify files are in MP3 format. |
| Alarm does not sound | Alarm not activated or set incorrectly. | Check that the alarm time is set correctly and the alarm icon (1 or 2) is visible on the display. Ensure the volume is not set to minimum if waking to radio. |
9. Specifications
- Brand: HANNLOMAX
- Model: HX-129CR
- Display Type: Digital, 0.6" Green LED
- Power Source: Corded Electric (AC/DC Adapter included)
- Memory Backup: Requires 2 x AAA batteries (not included)
- Connectivity: Bluetooth
- USB Ports: 1x 2.4A Charging, 1x 1A Charging/MP3 Playback
- Radio: PLL FM Radio with Presets
- Alarm: Dual Alarm (Wake to Radio or Buzzer)
- Functions: Sleep Timer, Snooze Function, Dimmer Function
- Product Dimensions: Approximately 5.24"W x 5.12"H
- Item Weight: Approximately 1.21 pounds
- Manufacturer: Hannix Ltd.
10. Warranty and Support
HANNLOMAX products are designed for reliability and performance. For specific warranty information, please refer to the warranty card included with your purchase or contact your retailer. For technical support or service inquiries, please visit the official HANNLOMAX website or contact their customer service department.


