
1. Introduction
Thank you for choosing the Longse LMCM36FW400W Mini Wi-Fi Camera. This compact camera is designed for discreet surveillance, offering Ultra HD 2K resolution, advanced video compression, and versatile connectivity options. This manual provides essential information for setting up, operating, and maintaining your camera.
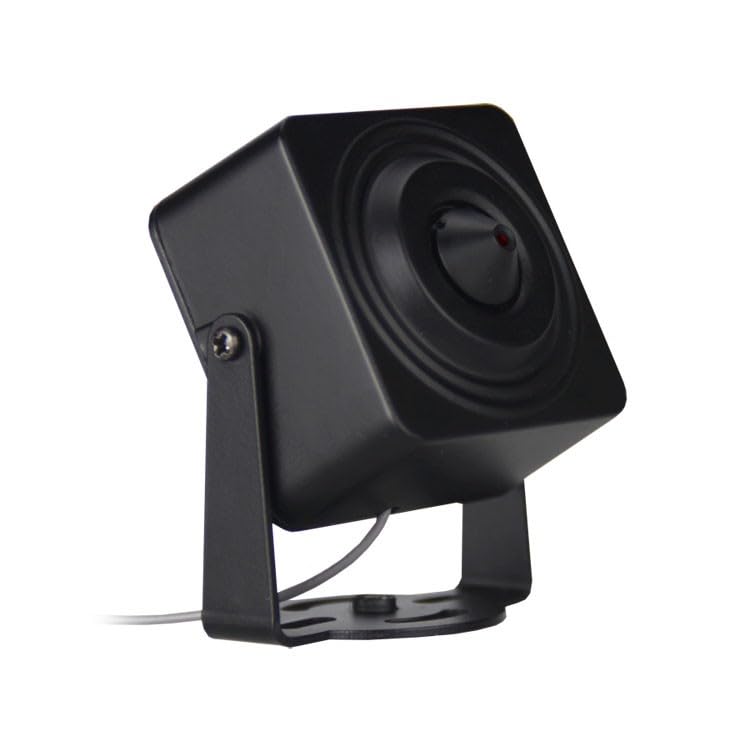
Figure 1: Front view of the Longse LMCM36FW400W Mini Wi-Fi Camera with its adjustable bracket.
2. Product Features
- Ultra HD 2K Resolution: Captures video at up to 2688 x 1512p (4.0 Megapixels) for clear imaging.
- Wide Dynamic Range (WDR): Ensures optimal video quality in various lighting conditions.
- 3D Noise Reduction: Enhances image sharpness by reducing digital noise.
- H.265+ Video Compression: Efficiently reduces data traffic while maintaining high video quality.
- Integrated Microphone: Built-in audio capture.
- External Audio Support: Input/output connectors for external microphone and speaker (3.5mm jack).
- MicroSD Card Slot: Supports up to 512GB for local storage.
- Wi-Fi Connectivity: 802.11 b/g/n with flexible external antenna for wireless connection.
- Ethernet Port: RJ-45 10/100M for wired network connection.
- ONVIF 2.4 Compatible: Ensures interoperability with various NVRs and surveillance systems.
- Human Detection Alarm: Configurable person detection with email alerts and recording options.
- P2P Simplified Setup: Easy connection via QR code using the Bitvision app.
- Compact Design: Small form factor (3.6 x 3.6 x 2.7 cm) for discreet placement.
3. Package Contents
Please check the package for the following items:
- Longse LMCM36FW400W Mini Wi-Fi Camera
- Adjustable Mounting Bracket (integrated)
- DC Power Supply (12V - 1A) - Note: Some packages may not include the power adapter. Please verify upon receipt.
- Flexible External Wi-Fi Antenna
- Quick Start Guide (if included)

Figure 2: Connection cables for power, Ethernet, and external audio.
4. Setup
4.1 Physical Installation
- Choose Location: Select a suitable location for the camera. The camera's small size allows for discreet placement, requiring only a 3.7mm diameter hole for the lens if concealed.
- Mounting: Use the integrated adjustable bracket to mount the camera on a wall or ceiling. Ensure the camera is securely fastened.
- Connect Power: Connect the 12V DC power adapter to the camera's power input.
- Connect Wi-Fi Antenna: Screw the flexible external Wi-Fi antenna onto the designated port.
- (Optional) Ethernet Connection: For a wired network connection, connect an Ethernet cable to the RJ-45 port.
- (Optional) External Audio: If using an external microphone or speaker, connect them to the 3.5mm audio input/output jacks.

Figure 3: Side view of the camera showing connection ports.
4.2 Network Configuration (Wi-Fi)
- Download App: Download the "Bitvision" app from the App Store (iOS) or Google Play Store (Android).
- Register/Login: Open the app and register a new account or log in if you already have one.
- Add Camera: In the app, select the option to add a new device.
- Scan QR Code: Use your smartphone's camera to scan the QR code located on the camera or its packaging. This simplifies the P2P (Peer-to-Peer) connection process.
- Connect to Wi-Fi: Follow the in-app instructions to connect the camera to your local Wi-Fi network. Ensure your Wi-Fi network is 2.4GHz (802.11 b/g/n).
- Set Password: Create a strong password for your camera for security.
For remote viewing, no additional modem/router configuration is typically required due to P2P technology.
5. Operating Instructions
5.1 Live View and Playback
- Access Live View: Open the Bitvision app and select your camera from the device list to view the live feed.
- Video Streams: The camera supports three video streams:
- Main Stream: For local viewing with highest quality.
- Sub Stream: For remote viewing, optimized for network bandwidth.
- Tri Stream: For remote viewing with weak connections or data saving.
- Playback: Access recorded footage via the app. You can view recordings stored on the microSD card, NVR, or cloud storage (if configured).
5.2 Recording and Storage
- MicroSD Card: Insert a microSD card (up to 512GB) into the camera's slot for local recording. Configure recording schedules (continuous or programmed) via the app.
- NVR: Connect the camera to an ONVIF-compatible Network Video Recorder (NVR) for centralized recording and management.
- Cloud/FTP/PC: The camera supports recording to Google Drive, FTP servers, or a PC. Refer to the app settings for configuration.
5.3 Human Detection and Alarms
- Enable Detection: Activate Human Detection in the app settings.
- Customize Settings: Adjust sensitivity levels and define specific detection areas to minimize false alarms.
- Alarm Actions: Configure the camera to send email alerts with attached photos, trigger video recording to microSD/NVR/cloud, or activate external alarm systems via the I/O alarm input.
- Video Tamper Alarm: The camera can detect attempts to obscure, manipulate, or displace it, triggering an alert.
6. Maintenance
- Cleaning: Gently clean the camera lens with a soft, dry cloth. Avoid abrasive cleaners.
- Firmware Updates: Periodically check the Bitvision app for available firmware updates to ensure optimal performance and security.
- Environmental Conditions: Operate the camera within the specified temperature range of -20℃ to 60℃ and humidity of 95% (non-condensing).
- Outdoor Use: If installing outdoors, place the camera inside a waterproof enclosure to protect it from elements.
7. Troubleshooting
- Camera Not Powering On:
- Ensure the power adapter is correctly connected and supplying 12V DC.
- Verify the power outlet is functional.
- Cannot Connect to Wi-Fi:
- Ensure the camera is within range of your Wi-Fi router.
- Confirm your Wi-Fi network is 2.4GHz.
- Double-check the Wi-Fi password.
- Restart the camera and your router.
- No Remote Viewing:
- Verify the camera has a stable internet connection.
- Ensure the Bitvision app is updated to the latest version.
- Check your smartphone's internet connection.
- Recording Issues:
- Ensure a microSD card is inserted and properly formatted (if using local storage).
- Check recording schedules in the app.
- Verify sufficient storage space on the microSD card or NVR.
- Image Quality Issues:
- Clean the camera lens.
- Ensure adequate lighting in the surveillance area.
- Check network bandwidth for remote viewing quality.
8. Specifications
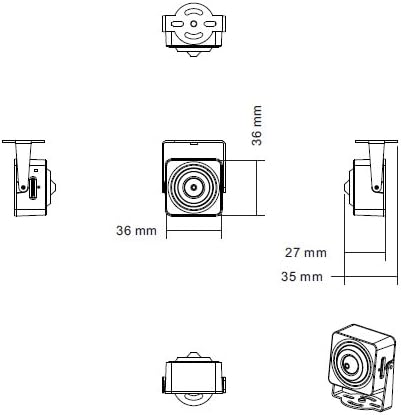
Figure 4: Dimensions of the Longse LMCM36FW400W Mini Wi-Fi Camera.
| Feature | Specification |
|---|---|
| Model Name | LMCM36FW400W |
| Sensor | 1/3 inch GC4663 CMOS |
| Chipset | FH8656 |
| Lens | F: 3.7mm, F: 2.8 |
| View Angle | 75 degrees |
| Resolution | Up to 2688 x 1512p (4.0 Megapixels) |
| Frame Rate | Up to 30 fps |
| Video Compression | H.264, H.264+, H.265, H.265+, AVI, JPEG |
| Audio Compression | G711A, G711U, AAC |
| Microphone | Integrated |
| External Audio | 3.5mm Jack for Mic/Speaker |
| Storage | MicroSD up to 512GB |
| Ethernet | RJ-45 10/100M |
| Wi-Fi | 802.11 b/g/n with external antenna |
| Wi-Fi Security | WEP, WPA, WPA2 |
| Protocols | ONVIF 2.4 compatible, HIKVISION compatible |
| Power Supply | DC 12V - 1A |
| Power Consumption | 4.2 Watts |
| Operating Temperature | -20 ℃ ~ 60 ℃ (-4 °F ~ 140 °F) |
| Operating Humidity | 95% (non-condensing) |
| Dimensions | 3.6 x 3.6 x 2.7 cm (1.42 x 1.42 x 1.06 inches) |
| Weight | 300 g (0.66 lbs) |
| Material | Metal |
| Compatible OS | Windows, Mac, Android, iOS |
| Compatible Browsers | Internet Explorer, Microsoft Edge, Safari, Firefox, Chrome |
9. Warranty and Support
For warranty information and technical support, please refer to the documentation provided with your purchase or contact your retailer. You may also visit the official Longse website for further assistance and resources.
