
1. Introduction
Thank you for choosing the SunnyGator RGB LED Controller. This manual provides detailed instructions for the safe and efficient use of your 28-key RF remote control and 36A controller, designed for RGB LED strip lighting. Please read this manual thoroughly before installation and operation to ensure proper functionality and longevity of your product.
2. Safety Information
- Ensure the input voltage (DC 12-24V) matches your LED strip and power supply requirements. Incorrect voltage can damage the controller and LED strips.
- Do not exceed the maximum total output current of 36A. Overloading can cause overheating and damage.
- Disconnect power before making any connections or performing maintenance.
- This device is designed for indoor use in dry environments. Avoid exposure to moisture or extreme temperatures.
- Keep out of reach of children.
- Do not attempt to disassemble or modify the controller or remote control. This will void the warranty and may lead to electrical hazards.
3. Package Contents
Please check the package for the following items:
- 1 x SunnyGator RGB LED Controller (36A)
- 1 x 28-Key RF Remote Control (Battery not included)
4. Product Overview
The SunnyGator RGB LED Controller allows you to manage the color, brightness, and dynamic modes of your RGB LED strips using a convenient 28-key RF remote control.
4.1. Controller Unit
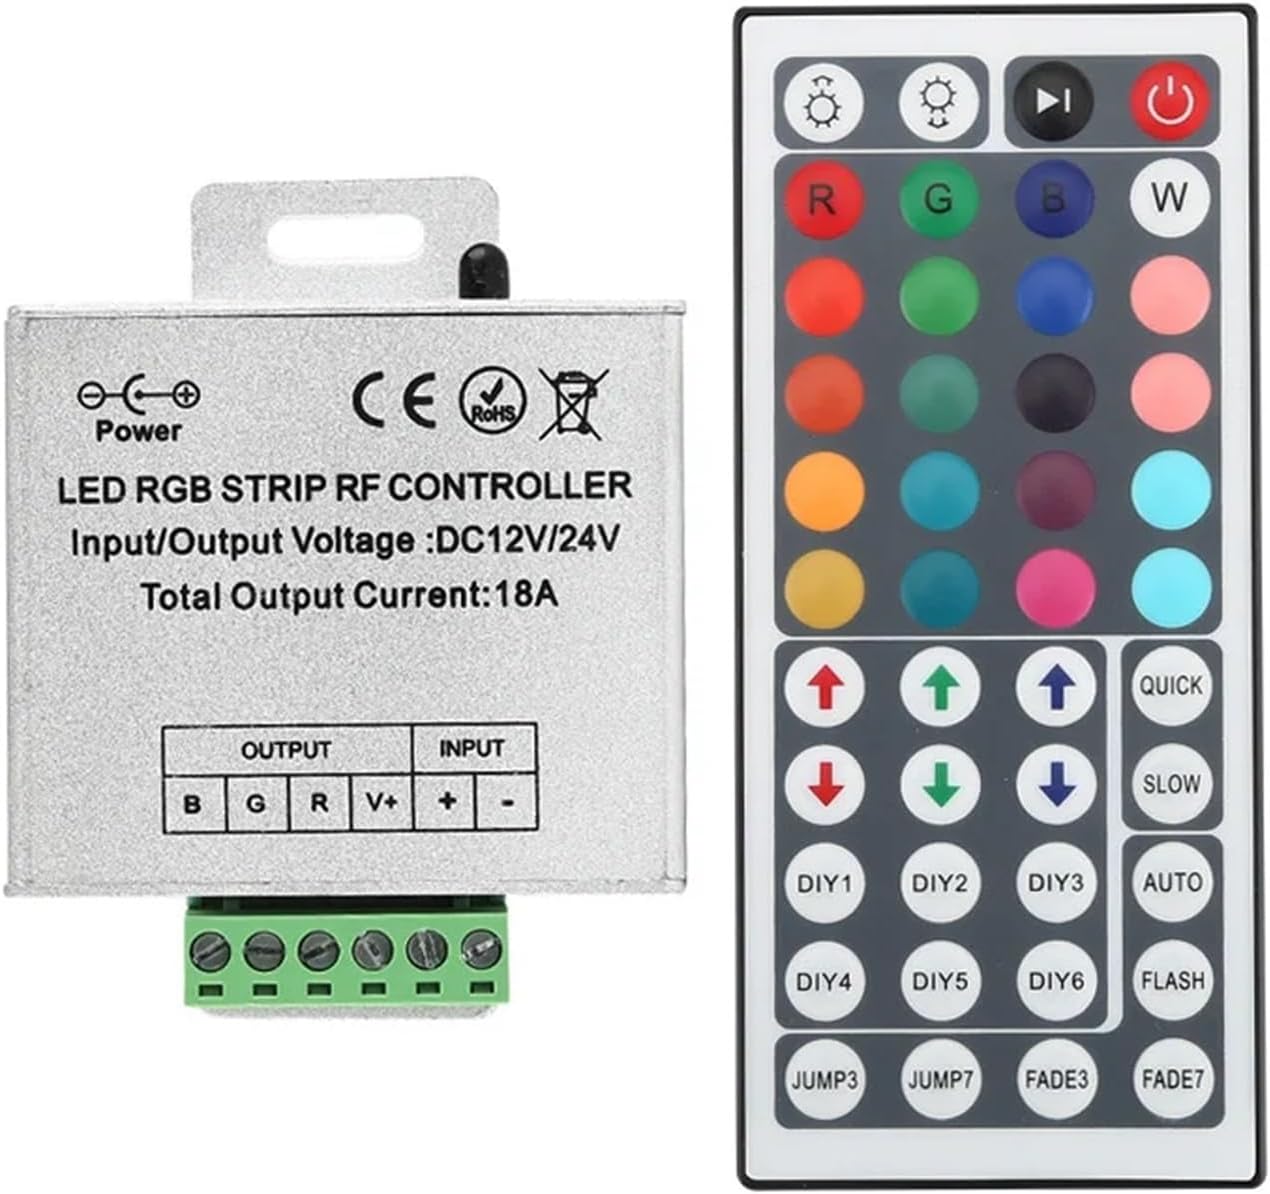
Image Description: This image displays the SunnyGator RGB LED Controller unit on the left and its accompanying 28-key RF remote control on the right. The controller is a silver-colored aluminum casing with "LED RGB STRIP RF CONTROLLER" printed on it, along with input/output voltage (DC12V/24V) and total output current (note: the controller shown in the image indicates 18A, but the product variant is 36A). It features screw terminals for output (B, G, R, V+) and input (V+, V-). The remote control is black with numerous buttons for color selection, brightness adjustment, and dynamic modes.
The controller unit features input terminals for power (V+ and V-) and output terminals for connecting your RGB LED strip (R, G, B, and V+). It is housed in a durable aluminum casing for heat dissipation.
4.2. 28-Key RF Remote Control
The remote control provides intuitive access to all functions. Key buttons include:
- Power On/Off: Turns the LED strip on or off.
- Brightness Adjustment: Up/Down arrows to increase or decrease brightness.
- Color Selection: Dedicated buttons for Red, Green, Blue, White, and various mixed colors.
- Dynamic Modes: Buttons for Quick, Slow, Auto, Flash, Jump3, Jump7, Fade3, Fade7, and DIY modes.
- DIY Buttons (DIY1-DIY6): For custom color storage.
5. Setup Instructions
Follow these steps to set up your SunnyGator RGB LED Controller:
- Prepare the Power Supply: Ensure you have a DC 12-24V power supply that can provide sufficient current for your LED strip. The total current draw of your LED strip should not exceed 36A.
- Connect the LED Strip:
- Identify the R, G, B, and V+ (or +) terminals on your RGB LED strip.
- Connect the Red wire of your LED strip to the 'R' terminal on the controller.
- Connect the Green wire of your LED strip to the 'G' terminal on the controller.
- Connect the Blue wire of your LED strip to the 'B' terminal on the controller.
- Connect the Common Positive wire (V+ or +) of your LED strip to the 'V+' terminal on the controller.
- Connect the Power Supply:
- Connect the positive (+) output of your DC 12-24V power supply to the 'V+' input terminal on the controller.
- Connect the negative (-) output of your DC 12-24V power supply to the 'V-' input terminal on the controller.
- Important: Double-check all connections before applying power. Incorrect polarity can damage the unit.
- Insert Remote Control Battery: Open the battery compartment on the back of the 28-key RF remote control and insert one CR2025 battery, observing the correct polarity.
- Apply Power: Once all connections are secure, plug in your DC 12-24V power supply to an electrical outlet.
6. Operating Instructions
Use the 28-key RF remote control to operate your LED strip lighting system.
- Power On/Off: Press the Power button (red circle with line) to turn the LED strip on or off.
- Static Color Selection: Press any of the color buttons (e.g., R, G, B, W, or other color squares) to select a static color. There are 16 static colors available.
- Brightness Adjustment: Use the Up Arrow and Down Arrow buttons (below the color selection) to increase or decrease the brightness of the selected color or dynamic mode.
- Dynamic Modes:
- QUICK / SLOW: Adjusts the speed of dynamic modes.
- AUTO: Cycles through all dynamic modes automatically.
- FLASH: Activates a flashing mode.
- JUMP3 / JUMP7: Activates 3-color or 7-color jump modes.
- FADE3 / FADE7: Activates 3-color or 7-color fade modes (colorful gradients).
- DIY Modes (DIY1-DIY6):
- Select a base color using the R, G, B, or W buttons.
- Use the Up Arrow and Down Arrow buttons (labeled with R, G, B arrows) to fine-tune the intensity of each primary color (Red, Green, Blue) to create your desired custom color.
- Press one of the DIY1-DIY6 buttons to save your custom color. To recall a saved color, simply press the corresponding DIY button.
7. Maintenance
- Cleaning: Gently wipe the controller and remote control with a dry, soft cloth. Do not use abrasive cleaners or solvents.
- Remote Battery Replacement: When the remote control's range decreases or it stops responding, replace the CR2025 battery. Ensure correct polarity when inserting the new battery.
- Storage: If not in use for an extended period, disconnect the power supply and store the controller and remote in a cool, dry place.
8. Troubleshooting
| Problem | Possible Cause | Solution |
|---|---|---|
| LED strip does not light up. |
|
|
| Remote control not responding. |
|
|
| Colors are incorrect or inconsistent. |
|
|
9. Specifications
| Model | 28-Key RF Controller (36A) |
| Input/Output Voltage | DC 12-24V |
| Total Output Current | 36A (12A x 3 Channels) |
| Connection Method | Common Anode (+) |
| Operating Temperature | -20°C to 60°C (-4°F to 140°F) |
| Remote Control Type | 28-Key RF (Radio Frequency) |
| Remote Control Battery | 1 x CR2025 (not included) |
| Supported LED Strips | Up to 30 meters of SMD5050 60 LED/meter strips (or equivalent load) |
| Dimensions (Controller) | Approx. 3 x 2 x 1 cm (Package dimensions: 3 x 2 x 1 cm) |
| Weight (Controller) | Approx. 50 grams |
10. Warranty and Support
SunnyGator products are manufactured to high-quality standards. For warranty information or technical support, please refer to the seller's policy or contact the point of purchase. Please retain your proof of purchase for any warranty claims.
For further assistance, please contact your retailer or visit the official SunnyGator website (if available).