
1. Safety Information
Please read all safety instructions carefully before operating the Thereye Countertop RO Water Filter System.
- Hot Water Caution: The system features an instant heating function. Dispensed hot water can reach up to 208°F (98°C). Exercise extreme caution to avoid burns. Always use the child lock function when children are present.
- Material Safety: All water-contacting components are made from food-grade, BPA-free plastics to ensure water purity and safety.
- Electrical Safety: Ensure the unit is plugged into a grounded outlet. Do not immerse the unit in water or other liquids. Unplug the unit before cleaning or maintenance.
- Intended Use: This appliance is designed for filtering tap water for drinking and cooking purposes. Do not use it for any other liquids.
- Placement: Place the unit on a stable, flat, and dry surface. Keep away from direct sunlight and heat sources.
2. Product Overview
The Thereye Countertop RO Water Filter System provides purified, great-tasting water with the convenience of instant heating. It features a 7-stage filtration process and requires no complex installation.
Key Features:
- Advanced 7-Stage RO Filtration: Combines PAC pre-filter, RO membrane, and CF post-filter with built-in PP sediment filter, activated carbon blocks, and a 0.0001-micron RO membrane to remove over 99% of impurities.
- On-Demand Instant Heating: Dispenses water at temperatures from 113°F to 208°F (45°C to 98°C) instantly.
- Zero Installation: Ready to use out of the box with no plumbing required.
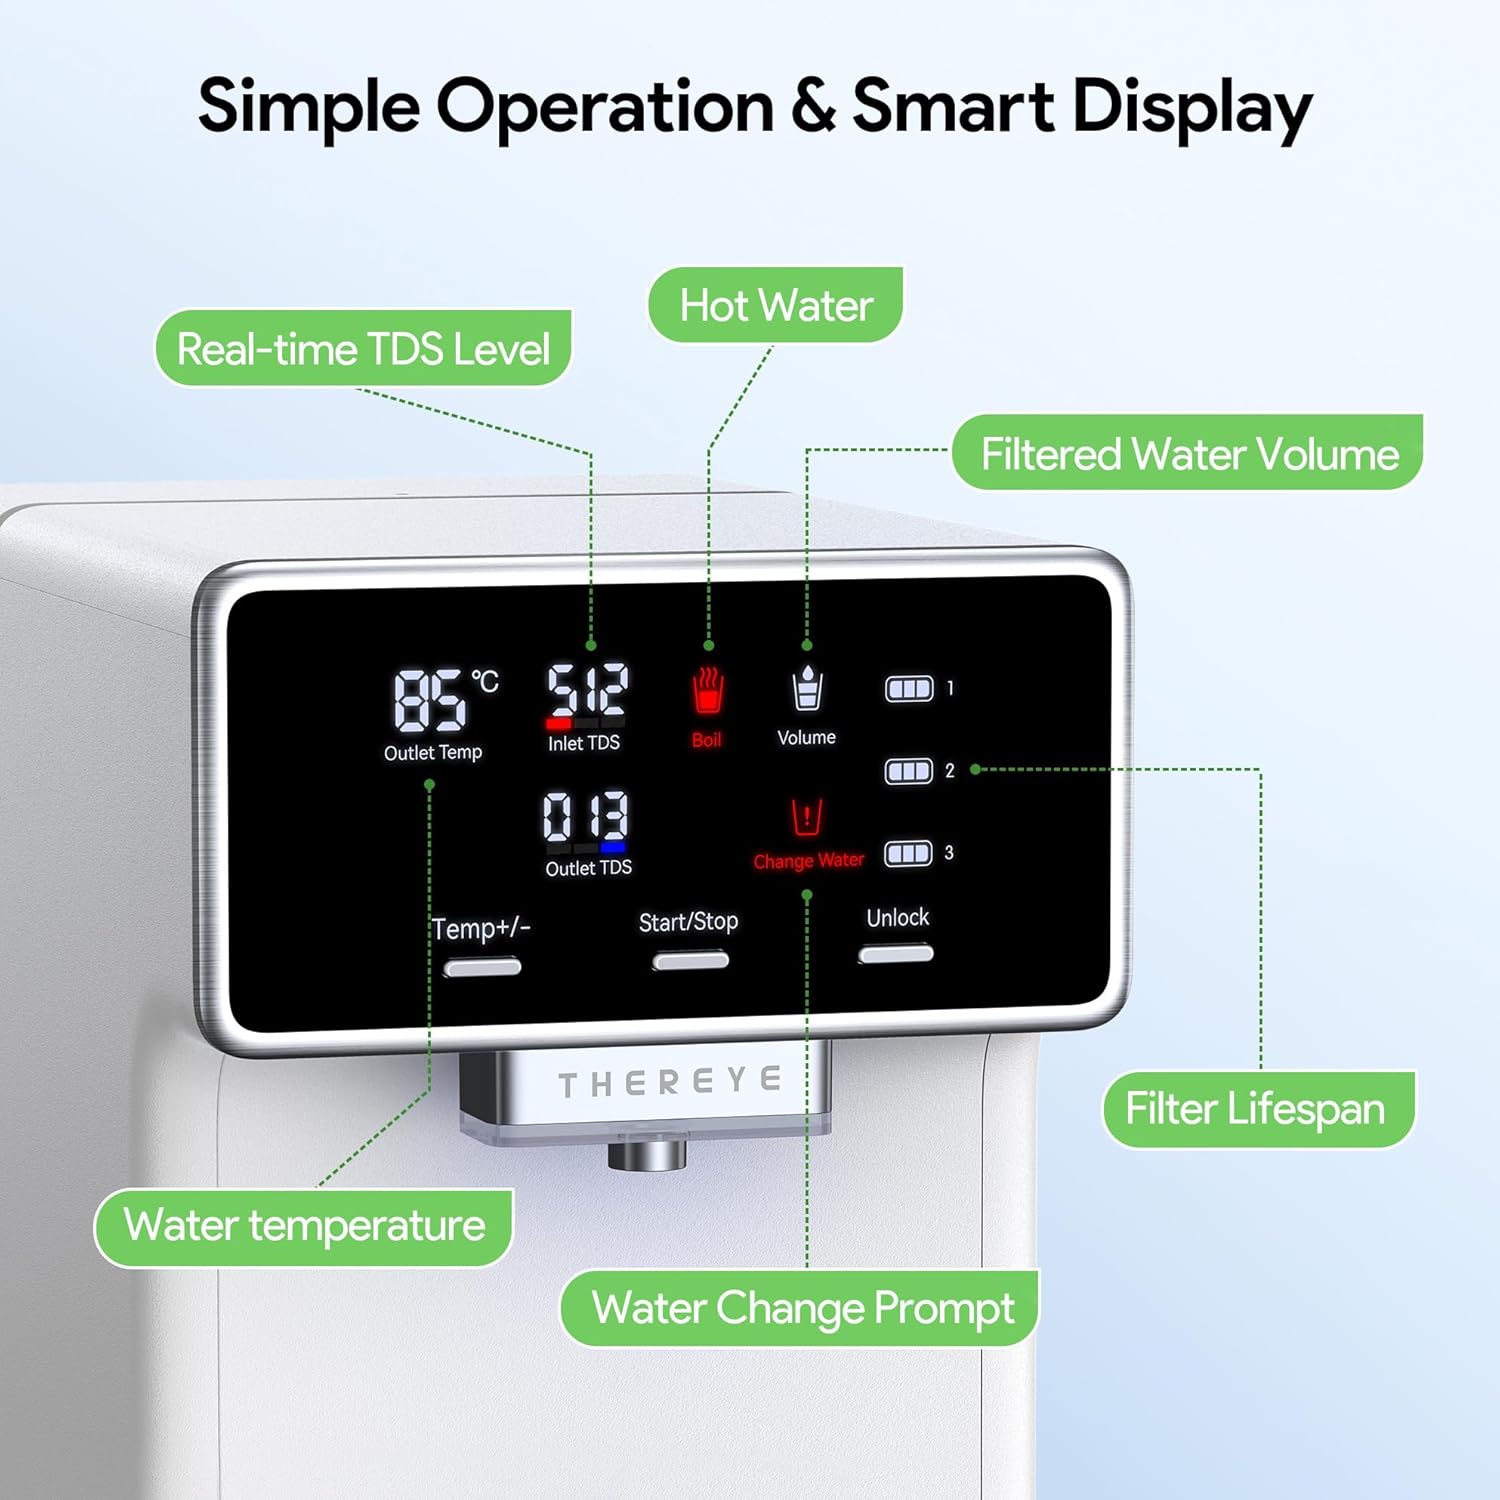
- Smart LED Display: Provides real-time water quality (TDS), filter life, and purified water volume. Features an auto-dimming screen.
- Eco-Smart Design: 2:1 pure to drain ratio, allowing wastewater to be recycled for non-potable uses.
- Certified Safety: FCC and ETL certified, ensuring compliance with strict U.S. safety standards.
Components:
- Main Water Filter Unit (Model ER-WP02)
- Raw Water Tank (159 oz capacity)
- Purified Water Pitcher (40 oz capacity)
- PAC Pre-Filter
- RO Membrane Filter
- CF Post-Filter
- Drip Tray
- Power Cord


3. Setup
The Thereye Countertop RO Water Filter System is designed for quick and easy setup without the need for plumbing installation.
- Unpack the Unit: Carefully remove all components from the packaging.
- Place the Unit: Position the water filter unit on a stable, flat, and dry countertop.
- Install Filters:
- Open the filter compartment cover.
- Insert the PAC, RO, and CF filters into their designated slots. Ensure they are securely twisted into place according to the labels.
- Fill the Raw Water Tank: Remove the raw water tank from the back of the unit. Fill it with tap water up to the MAX line. Reinsert the tank securely.
- Plug In: Connect the power cord to the unit and then to a grounded electrical outlet.
- Initial Flush: Before first use, it is recommended to run 2-3 full cycles of water through the system to flush out any manufacturing residue and ensure optimal filter performance. Discard the water from these initial cycles.


4. Operating Instructions
The system features an intuitive LED display and touch controls for easy operation.
- Power On: Press the power button to turn on the unit. The Smart LED Display will illuminate.
- Monitor Display: The LED screen shows real-time information including:
- Input and Output Water TDS (Total Dissolved Solids)
- Current Water Temperature
- Filtered Water Volume
- Filter Lifespan Indicators
- Water Change Prompt (when the raw water tank needs refilling or wastewater needs emptying)
- Select Water Temperature: Use the "Temp+/-" buttons to select your desired water temperature (from 113°F to 208°F / 45°C to 98°C).
- Dispense Water: Place a cup or the purified water pitcher under the dispenser nozzle. Press the "Start/Stop" button to begin dispensing. Press again to stop.
- Child Lock: To activate or deactivate the child lock for hot water dispensing, refer to the specific instructions on the unit's display or in the full user manual.

5. Maintenance
Regular maintenance ensures optimal performance and longevity of your water filter system.
Filter Replacement:
The system uses three easy-swap filters: PAC (Pre-Activated Carbon), RO (Reverse Osmosis), and CF (Carbon Fiber). The Smart LED Display will indicate when each filter needs replacement.
- Identify Filter: Check the LED display for which filter needs replacement.
- Power Off: Unplug the unit from the power outlet.
- Remove Old Filter: Open the filter compartment cover. Gently twist the old filter counter-clockwise and pull it out.
- Install New Filter: Insert the new filter into the corresponding slot. Twist clockwise until it clicks into place.
- Reset Filter Life: After replacing, plug the unit back in and follow the on-screen instructions to reset the filter life indicator for the replaced filter.
Cleaning:
- Drip Tray: Regularly empty and clean the magnetic drip tray to prevent water overflow and maintain hygiene.
- Water Tanks: Periodically clean the raw water tank and the purified water pitcher with mild soap and water. Rinse thoroughly.
- Exterior: Wipe the exterior of the unit with a soft, damp cloth. Do not use abrasive cleaners.
6. Troubleshooting
If you encounter any issues with your Thereye water filter system, please refer to the following general advice:
- No Power: Ensure the power cord is securely plugged into both the unit and a working electrical outlet.
- No Water Dispensing: Check if the raw water tank is properly seated and filled. Ensure filters are correctly installed.
- Slow Dispensing: This can be normal for RO systems. If excessively slow, check filter life indicators for potential clogs or expired filters.
- Unusual Taste/Odor: Perform an initial flush cycle if not already done. Check filter life indicators and replace any expired filters.
- Error Codes: If an error code appears on the LED display, consult the full user manual for specific meanings and solutions.
For persistent issues or further assistance, please contact Thereye customer support.
7. Specifications
| Brand | Thereye |
| Model Name | ER-WP02 |
| Product Dimensions (L x W x H) | 13.39" x 8.66" x 14.17" |
| Item Weight | 17.6 Pounds |
| Installation Type | Countertop (No Installation Needed) |
| Filtration Stages | 7-Stage Reverse Osmosis |
| Water Temperature Range | 113°F to 208°F (45°C to 98°C) |
| Raw Water Tank Capacity | 159 oz (approx. 4.7 Liters) |
| Purified Water Pitcher Capacity | 40 oz (approx. 1.2 Liters) |
| Pure to Drain Ratio | 2:1 |
| Noise Level | Under 46dB |
| Material Type | Food Grade Plastics (BPA Free) |
| Certifications | FCC, ETL |
8. Warranty & Support
The Thereye Countertop RO Water Filter System comes with a 1-year warranty and a 30-day satisfaction guarantee.
For any product inquiries, technical support, or warranty claims, please contact Thereye customer service through their official channels or refer to the contact information provided in the original packaging.


