1. Introduction
This manual provides detailed instructions for the setup, operation, and maintenance of your MANBASNAKE Attack Shark X3 Pro 4K/8K Hz Gaming Mouse. Please read this manual thoroughly to ensure optimal performance and longevity of your device.

Image: The MANBASNAKE Attack Shark X3 Pro gaming mouse, shown in red, alongside its wireless USB receiver.
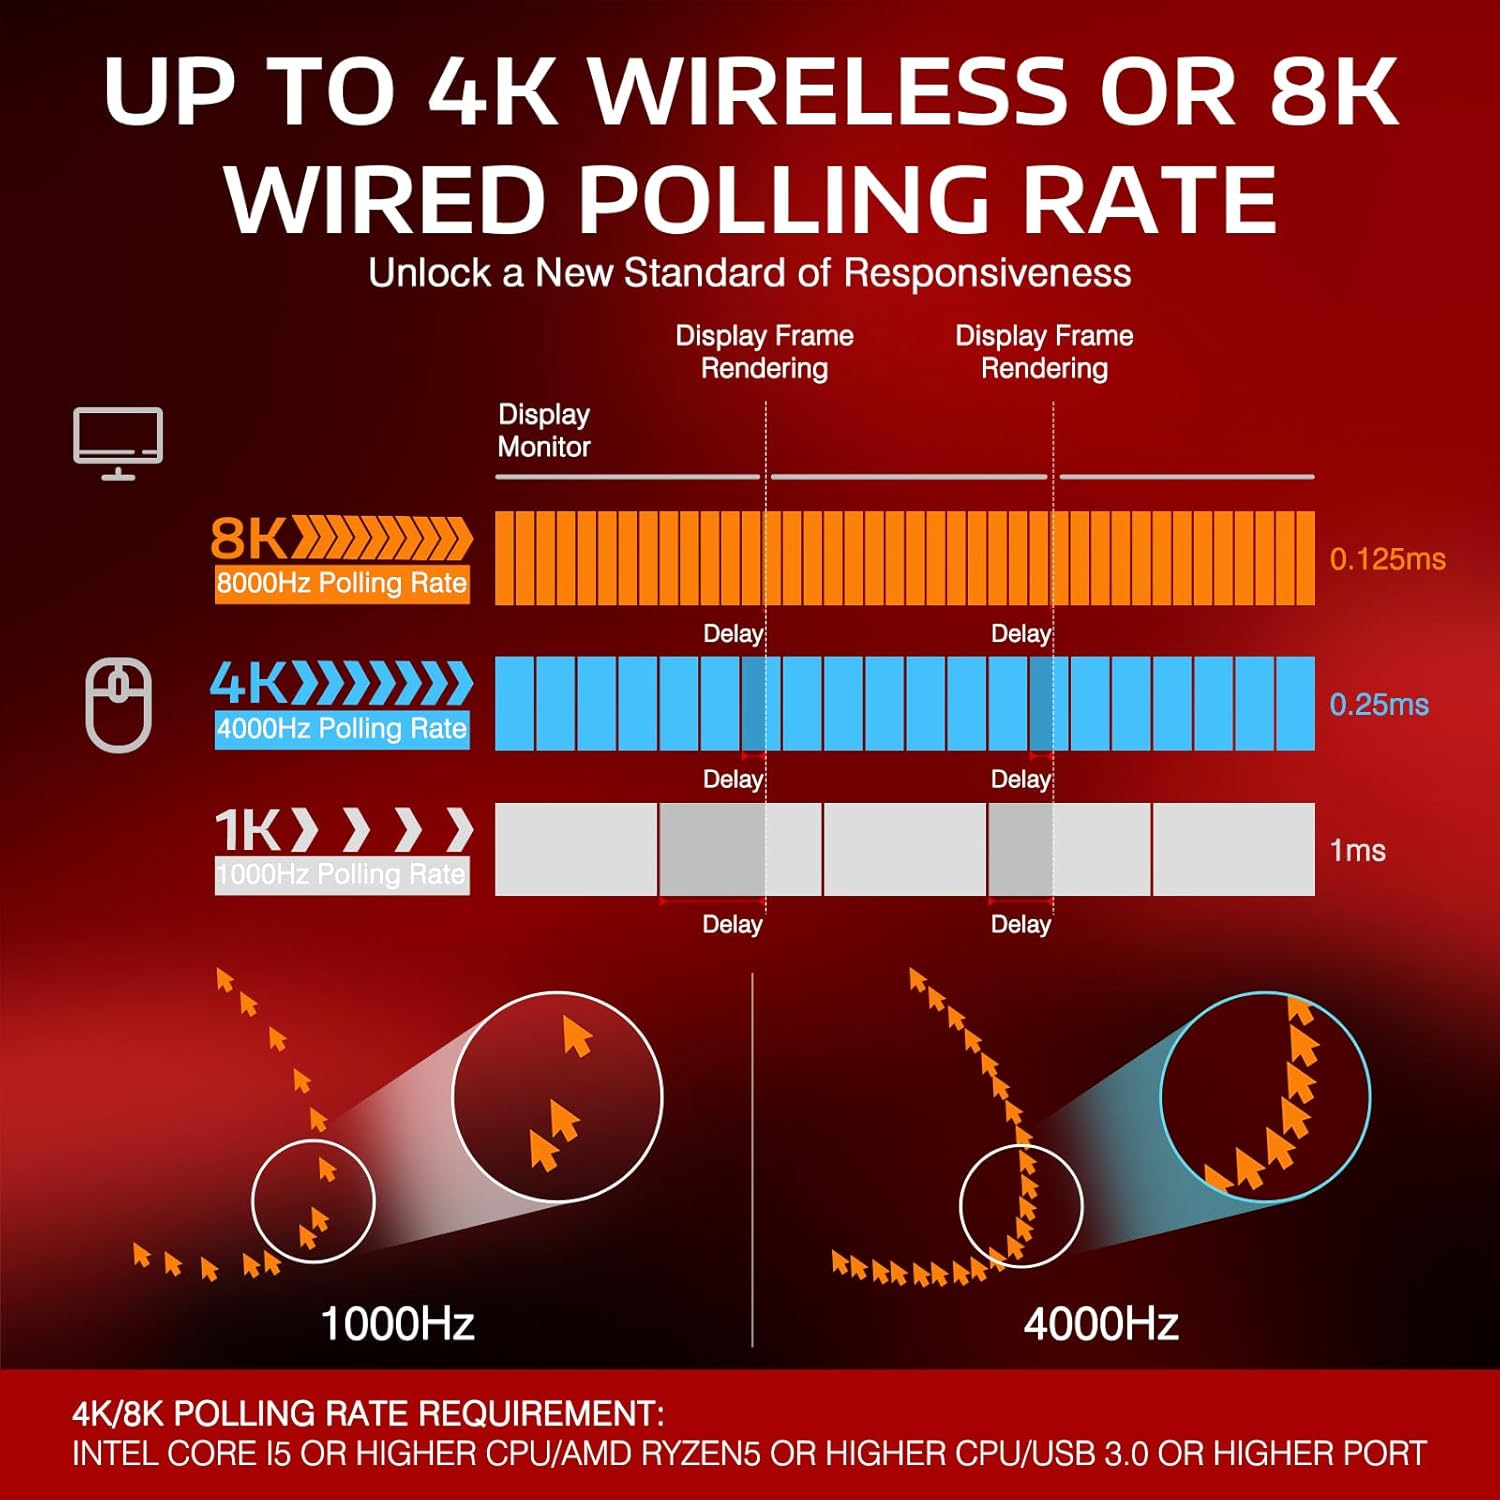
Image: An overview of the X3 Pro mouse highlighting its key features: ultra-light design, tri-mode connectivity, PixArt PAW3395 sensor, 4K/8K polling rate, and up to 26,000 DPI.
2. Package Contents
Verify that all items are present in your package:
- MANBASNAKE Attack Shark X3 Pro Gaming Mouse
- Wireless USB Receiver (Nano Dongle)
- Ultra-flexible charging cable (USB-C to USB-A)
- Type-C to USB-A Adapter
- User Manual (this document)
3. Product Overview
Familiarize yourself with the components of your X3 Pro gaming mouse.

Image: An exploded diagram highlighting key components of the X3 Pro mouse, including the DPI button, mode switch, USB receiver, and charging cable.
- Left Click Button: Primary mouse button.
- Right Click Button: Secondary mouse button.
- Scroll Wheel: For scrolling and middle-click function.
- DPI Button: Adjusts mouse sensitivity (DPI).
- Forward Button: Programmable side button.
- Backward Button: Programmable side button.
- Mode Switch: Toggles between 2.4G, OFF, and Bluetooth modes.
- Mode Indicator Light: Displays current connection mode and battery status.
- USB-C Port: For wired connection and charging.
- USB Receiver Compartment: Stores the wireless USB receiver.
- PTFE Feet: Low-friction pads for smooth gliding.

Image: An internal view of the mouse showcasing the Kailh GM 8.0 switches and TTC scroll wheel encoder, designed for durability and precise feedback.

Image: A graphic detailing the PixArt PAW3395 sensor's specifications, including 50G acceleration, 26,000 DPI, and 650 IPS.

Image: The underside of the mouse, highlighting the 100% Virgin Grade PTFE feet for smooth gliding.
4. Setup
4.1 Charging the Mouse
Before first use, it is recommended to fully charge the mouse. Connect the provided USB-C cable to the mouse's front port and the USB-A end to a power source (e.g., computer USB port, USB wall adapter). The mode indicator light will show charging status.
4.2 Connecting the Mouse
The X3 Pro offers three connectivity options: 2.4G Wireless, Bluetooth, and Wired.

Image: The bottom of the X3 Pro mouse, illustrating the 2.4G/OFF/BT mode switch and the compartment for the USB receiver.
4.2.1 2.4G Wireless Mode
- Locate the USB receiver stored in the compartment on the underside of the mouse.
- Insert the USB receiver into an available USB-A port on your computer.
- Slide the mode switch on the mouse to the "2.4G" position.
- The mouse should connect automatically. The mode indicator light will confirm connection.
4.2.2 Bluetooth Mode
- Slide the mode switch on the mouse to the "BT" position.
- The mode indicator light will begin to blink, indicating pairing mode.
- On your device (computer, tablet, phone), open Bluetooth settings and search for new devices.
- Select "X3 Pro" from the list of available devices to pair.
- The mode indicator light will become solid when connected.
4.2.3 Wired Mode
- Connect the provided USB-C cable to the mouse's front port.
- Connect the USB-A end of the cable to your computer's USB port.
- The mouse will function in wired mode and charge simultaneously.
5. Operation
5.1 Adjusting DPI (Sensitivity)
Press the DPI Button (located on the underside or top, refer to Product Overview diagram) to cycle through different DPI settings. Each press will change the sensitivity, indicated by the DPI indicator light. The mouse supports up to 26,000 DPI, configurable via software.
5.2 Polling Rate
The X3 Pro supports high polling rates for enhanced responsiveness:
- Wireless Mode (2.4G): Up to 4000Hz polling rate.
- Wired Mode: Up to 8000Hz polling rate.
Higher polling rates reduce input lag, providing more precise and immediate cursor movements. Configuration of polling rate typically requires the dedicated driver software.

Image: A graphical representation comparing the response times and cursor tracking at 1000Hz, 4000Hz, and 8000Hz polling rates, illustrating the benefit of higher rates.
Note: Achieving 4K/8K Hz polling rates may require a compatible system (e.g., Intel Core i5 or higher CPU, AMD Ryzen 5 or higher CPU, USB 3.0 or higher port).
5.3 Programmable Buttons
The X3 Pro features programmable buttons. To customize button functions, DPI settings, polling rate, lift-off distance, and create macros, download and install the official driver software from the MANBASNAKE website. Settings can be saved to the mouse's onboard memory.
5.4 Power Management
The mouse is equipped with smart auto-sleep functionality to conserve battery life. After 10 minutes of inactivity, the X3 Pro will enter sleep mode. Move the mouse or click a button to wake it up.
6. Maintenance
- Cleaning: Use a soft, dry cloth to clean the mouse surface. For stubborn dirt, a slightly damp cloth can be used, ensuring no moisture enters the device.
- Sensor Care: Keep the optical sensor on the underside of the mouse clean and free from dust or debris for optimal tracking performance.
- Battery Care: Avoid fully discharging the battery frequently. For long-term storage, charge the mouse to approximately 50% and store it in a cool, dry place.
- Storage: When not in use, especially during travel, store the USB receiver in its designated compartment to prevent loss.
7. Troubleshooting
7.1 Mouse Not Responding
- Ensure the mouse is powered on and the mode switch is set correctly (2.4G, BT, or Wired).
- Check battery level. If low, connect the charging cable.
- For 2.4G wireless, ensure the USB receiver is securely plugged into a working USB port. Try a different USB port.
- For Bluetooth, ensure Bluetooth is enabled on your device and the mouse is paired. Try re-pairing.
- In wired mode, ensure the cable is securely connected to both the mouse and the computer.
7.2 Intermittent Connection or Lag
- Move the mouse closer to the USB receiver (for 2.4G) or your Bluetooth device.
- Avoid sources of interference (e.g., other wireless devices, large metal objects).
- Ensure your computer's USB ports are functioning correctly.
- Update mouse drivers and your operating system.
- If using high polling rates (4K/8K Hz), ensure your system meets the hardware requirements (CPU, USB port version).
7.3 Mouse Enters Sleep Mode Too Quickly
- The mouse is designed to enter sleep mode after 10 minutes of inactivity to save battery. This is normal operation.
- To wake the mouse, simply move it or click any button.
- If you find this disruptive during specific tasks, ensure the mouse is in an active state or consider using wired mode.
7.4 Buttons or Scroll Wheel Not Functioning
- Ensure the mouse is properly connected and powered.
- Check for any physical obstructions or debris around the buttons or scroll wheel.
- If using custom button assignments, verify settings in the driver software.
8. Specifications
| Feature | Detail |
|---|---|
| Model | X3 Pro |
| Brand | MANBASNAKE |
| Connectivity | 2.4G Wireless, Bluetooth 5.2, Wired (USB-C) |
| Sensor | PixArt PAW3395 Optical Sensor |
| DPI Range | Up to 26,000 (Programmable) |
| Polling Rate | Up to 4000Hz (Wireless), Up to 8000Hz (Wired) |
| Acceleration | 50G |
| Tracking Speed | 650 IPS |
| Switches | Kailh GM 8.0 (80 million clicks) |
| Encoder | TTC Scroll Wheel Encoder |
| Weight | Approximately 59g (2.08 ounces) |
| Dimensions | 118.5 x 39.7 x 61 mm (4.67 x 2.4 x 0.04 inches) |
| Battery Life | Up to 200 hours (depending on usage) |
| Feet Material | 100% Virgin Grade PTFE |
9. Warranty and Support
MANBASNAKE products are designed and manufactured to the highest quality standards. For detailed warranty information, please refer to the warranty card included with your product or visit the official MANBASNAKE website.
For technical support, troubleshooting assistance, or to download the latest driver software, please visit the official MANBASNAKE support page or contact customer service through the contact information provided on their website.


