
1. Introduction
This manual provides essential information for the safe and efficient operation of your ZTE Cymbal 2 flip phone. Please read it thoroughly before using the device.
1.1 Package Contents
- ZTE Cymbal 2 Flip Phone
- Power Adapter
- Battery (Lithium Ion)
- 64GB SD Card (if included in package)
- Quick Start Guide (not included in this digital manual)
2. Product Overview
Familiarize yourself with the physical features of your ZTE Cymbal 2 phone.
2.1 Device Layout

Image 1: ZTE Cymbal 2 Flip Phone in closed position, showing the external display and camera.

Image 2: Various views of the ZTE Cymbal 2, including closed, open, side profiles, and rear. This illustrates the phone's compact design when closed and its full keypad when open.
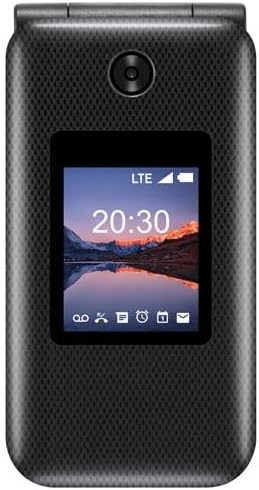
Image 3: Close-up view of the ZTE Cymbal 2's external display, showing time, date, signal strength, and notification icons.
2.2 Buttons and Ports
- External Display: Shows time, date, battery status, and notifications when the phone is closed.
- Camera: Located on the front (when closed) for capturing photos and videos.
- Volume Buttons: Located on the side, typically for adjusting call volume or media playback.
- Power/End Call Button: Used to power the phone on/off and end calls.
- Call/Send Button: Used to initiate calls.
- Navigation Key: Central button for menu navigation, with directional pads.
- Keypad: Standard numeric and function keys for dialing and text input.
- Charging Port: For connecting the power adapter.
- Headphone Jack: For connecting wired headphones (if applicable).
3. Setup
3.1 Battery Installation
- Remove the back cover of the phone.
- Align the battery contacts with the terminals inside the phone.
- Gently press the battery into place until it clicks.
- Replace the back cover.
3.2 SIM Card and SD Card Installation
- With the back cover and battery removed, locate the SIM card slot(s).
- Insert your SIM card(s) into the designated slot(s) with the gold contacts facing down.
- Locate the microSD card slot.
- Insert the 64GB SD card (or your own microSD card) into the slot until it locks into place.
- Reinstall the battery and back cover.
3.3 Initial Power On and Charging
- Press and hold the Power/End Call button until the phone vibrates and the screen lights up.
- Follow the on-screen prompts to complete the initial setup (language, time zone, etc.).
- Connect the power adapter to the charging port and plug it into a wall outlet to fully charge the battery before first use.
4. Operating Your Phone
4.1 Making and Receiving Calls
- Making a Call: Open the phone, dial the number using the keypad, and press the Call/Send button.
- Receiving a Call: When the phone rings, press the Call/Send button to answer. To end a call, press the Power/End Call button.
4.2 Sending and Receiving Messages
- Navigate to the "Messages" or "SMS" application from the main menu.
- Select "New Message" or "Create Message".
- Enter the recipient's number and type your message using the keypad.
- Press the "Send" option.
4.3 Camera Functions
- Access the camera application from the main menu.
- Frame your shot using the screen as a viewfinder.
- Press the designated camera button or the center navigation key to capture a photo.
- Options for video recording may also be available within the camera app.
4.4 Basic Settings
- Sound: Adjust ringtones, notification sounds, and volume levels.
- Display: Configure brightness, wallpaper, and screen timeout.
- Network: Manage cellular network settings, including data roaming and preferred network type (LTE/4G).
- Bluetooth: Pair with compatible Bluetooth devices.
5. Maintenance
5.1 Cleaning Your Device
- Use a soft, lint-free cloth to wipe the screen and body of the phone.
- Avoid using harsh chemicals, cleaning sprays, or abrasive materials.
- Ensure no moisture enters ports or openings.
5.2 Battery Care
- Charge the battery regularly, avoiding complete discharge.
- Use only the provided power adapter or a compatible charger.
- Avoid exposing the phone to extreme temperatures.
6. Troubleshooting
Refer to the table below for common issues and their solutions.
| Problem | Possible Cause | Solution |
|---|---|---|
| Phone does not power on. | Battery is drained or not properly installed. | Charge the battery. Ensure the battery is correctly inserted. |
| Cannot make or receive calls. | No network signal; SIM card issue; account problem. | Check signal strength. Reinsert SIM card. Contact your service provider. |
| Poor call quality. | Weak signal; interference. | Move to an area with better signal. Avoid obstructions. |
| Battery drains quickly. | Excessive usage; background apps; old battery. | Reduce screen brightness. Close unused applications. Consider battery replacement if old. |
| Phone freezes or is unresponsive. | Software glitch; too many applications running. | Remove and reinsert the battery to force a restart. |
7. Specifications
| Feature | Detail |
|---|---|
| Model Name | ZTE CYMBAL 2 Z2335ca |
| Operating System | FunTouch OS 10 |
| Processor | Qualcomm Snapdragon, 1.8 GHz |
| RAM | 1 GB |
| Internal Storage | 4 GB (expandable with SD card) |
| External Storage | Supports up to 64GB SD Card (included in some packages) |
| Display (Internal) | 2.8 Inches, LCD, 1080 x 1920 Resolution |
| Camera | Front-facing camera, Video capture: 1080p or 720p |
| Battery | 1600 mAh Lithium Ion (included) |
| Connectivity | LTE 4G, Bluetooth, Wi-Fi |
| Form Factor | Flip Phone |
| Dimensions (Parcel) | 17.27 x 10.92 x 6.6 cm |
| Weight (Parcel) | 353.8 g |
8. Warranty and Support
This ZTE Cymbal 2 device is covered by a standard manufacturer's warranty. For specific warranty terms and conditions, please refer to the documentation provided with your purchase or visit the official ZTE website.
For technical support, troubleshooting assistance beyond this manual, or warranty claims, please contact ZTE customer service or your point of purchase. Keep your proof of purchase for warranty validation.
Note: As this is a renewed product, warranty terms may differ from new products. Please verify with the seller or Amazon Renewed for specific details.


