1. Introduction
This manual provides detailed instructions for the installation, operation, and maintenance of your HG Power Metal Dryer Duct Lint Trap. This kit is designed to effectively capture lint, dust, and pet hair, ensuring a healthier indoor environment and reducing the risk of fire hazards associated with dryer lint buildup. Please read this manual thoroughly before installation and use.
2. Key Features
- High-Quality Metal Construction: The lint trap is constructed from sturdy metal, offering high resistance to temperature and reducing fire risks.
- Efficient Double Filtration: Equipped with two stainless steel filters; one for large debris and another for fine dust particles, ensuring comprehensive lint capture.
- Safety and Cost-Effectiveness: Features two air outlets, allowing connection to both the dryer and an outdoor vent for exhausting hot, humid air, which can be beneficial in warmer climates.
- Easy Maintenance: Designed with a double filter system and an accessible door lock for convenient cleaning and filter replacement.
- Complete Installation Kit: Includes a 4-inch diameter, 8-foot long dryer hose, two stainless steel filters, two clamps, and installation screws.
3. Included Components
The HG Power Indoor Dryer Vent Kit includes the following items:
- 1 x Dryer Duct Lint Trap (Metal Box)
- 1 x 4-inch Diameter, 8-foot Long Dryer Vent Hose
- 2 x Stainless Steel Lint Screens (one large, one small)
- 2 x Hose Clamps
- Installation Screws
- Instruction Manual (this document)

Figure 3.1: All components included in the HG Power Indoor Dryer Vent Kit.
4. Setup and Installation
Follow these steps to properly install your dryer lint trap:
- Choose Mounting Location: Select a suitable location on a wall near your electric dryer. Ensure there is enough space for the lint trap and the flexible hose connections. The unit can be mounted vertically or horizontally.
- Attach Lint Trap to Wall: Using the provided installation screws, securely attach the dryer duct lint trap to the wall. Ensure it is level and stable.
- Insert Filters: Open the front door of the lint trap. Insert the large metal filter diagonally into the lower slot, and then place the small metal filter into the upper slot. Close the door securely.
- Connect Dryer Hose: Connect one end of the provided 4-inch dryer vent hose to the exhaust port of your electric dryer. Secure it with one of the hose clamps.
- Connect to Lint Trap: Connect the other end of the dryer vent hose to the lower inlet of the lint trap. Secure it with the second hose clamp.
- Connect to Outdoor Vent (Optional): The lint trap has two ends for air outlet. One end is connected to the dryer. The other end can be connected to an outdoor dryer vent if you wish to exhaust hot and humid air outdoors, especially during summer months.

Figure 4.1: Two mounting options: Vertical and Horizontal installation.
Video 4.1: Official HG Power video demonstrating the upgraded dryer lint trap and its features.
5. Operation
Once installed, the HG Power Dryer Duct Lint Trap operates automatically with your electric dryer. As air from the dryer passes through the trap, lint and other particles are captured by the double filtration system. The transparent viewing window allows you to monitor the lint accumulation without opening the unit.

Figure 5.1: The lint trap integrated into a dryer ventilation system.
6. Maintenance
Regular maintenance is crucial to ensure the effectiveness and safety of your lint trap. Please clean the filters and dryer vent regularly, typically every two to three uses, or when visible lint accumulation is observed through the viewing window.
- Open the Lint Trap: Unlatch the door lock on the front of the lint trap and open the door.
- Remove Filters: Carefully remove both the large and small metal lint screens from their slots.
- Clean Filters: Remove accumulated lint, dust, and pet hair from both filters. You can use a brush, vacuum, or rinse them with water if necessary (ensure they are completely dry before reinstallation).
- Clean Interior: Wipe down the interior of the lint trap box to remove any residual lint.
- Reinstall Filters: Place the filters back into their respective slots, ensuring the large filter is diagonal and the small filter is at the top.
- Close Door: Close the front door and secure the latch.

Figure 6.1: The door lock design allows for easy access to filters for cleaning.

Figure 6.2: The double filtration system effectively captures lint.
7. Troubleshooting
If you encounter issues with your HG Power Dryer Duct Lint Trap, refer to the following common problems and solutions:
| Problem | Possible Cause | Solution |
|---|---|---|
| Reduced Dryer Efficiency / Long Drying Times | Clogged lint filters or dryer vent hose. | Clean the lint trap filters as described in the Maintenance section. Check the dryer vent hose for any blockages and clear them. |
| Lint Escaping the Trap | Filters not properly installed or damaged. Loose hose connections. | Ensure both filters are correctly seated. Inspect filters for damage and replace if necessary. Tighten all hose clamps to ensure a secure seal. |
| Unusual Noises from Trap | Loose components or debris inside the trap. | Open the trap and inspect for any loose parts or foreign objects. Remove any debris. Ensure filters are properly seated. |
| Excessive Heat/Humidity in Laundry Area | Outdoor vent connection not utilized or blocked. | If using the indoor setup, some heat/humidity is normal. For reduced heat/humidity, connect the second outlet to an outdoor vent. Ensure outdoor vent is not blocked. |
8. Specifications
| Attribute | Detail |
|---|---|
| Manufacturer | HG Power |
| Model Number | ZH211 |
| Item Weight | 3.17 pounds |
| Product Dimensions | 5.97 x 5.99 x 3 inches |
| Country of Origin | China |
| Color | White |
| Hose Diameter | 4 inches |
| Hose Length | 8 feet |
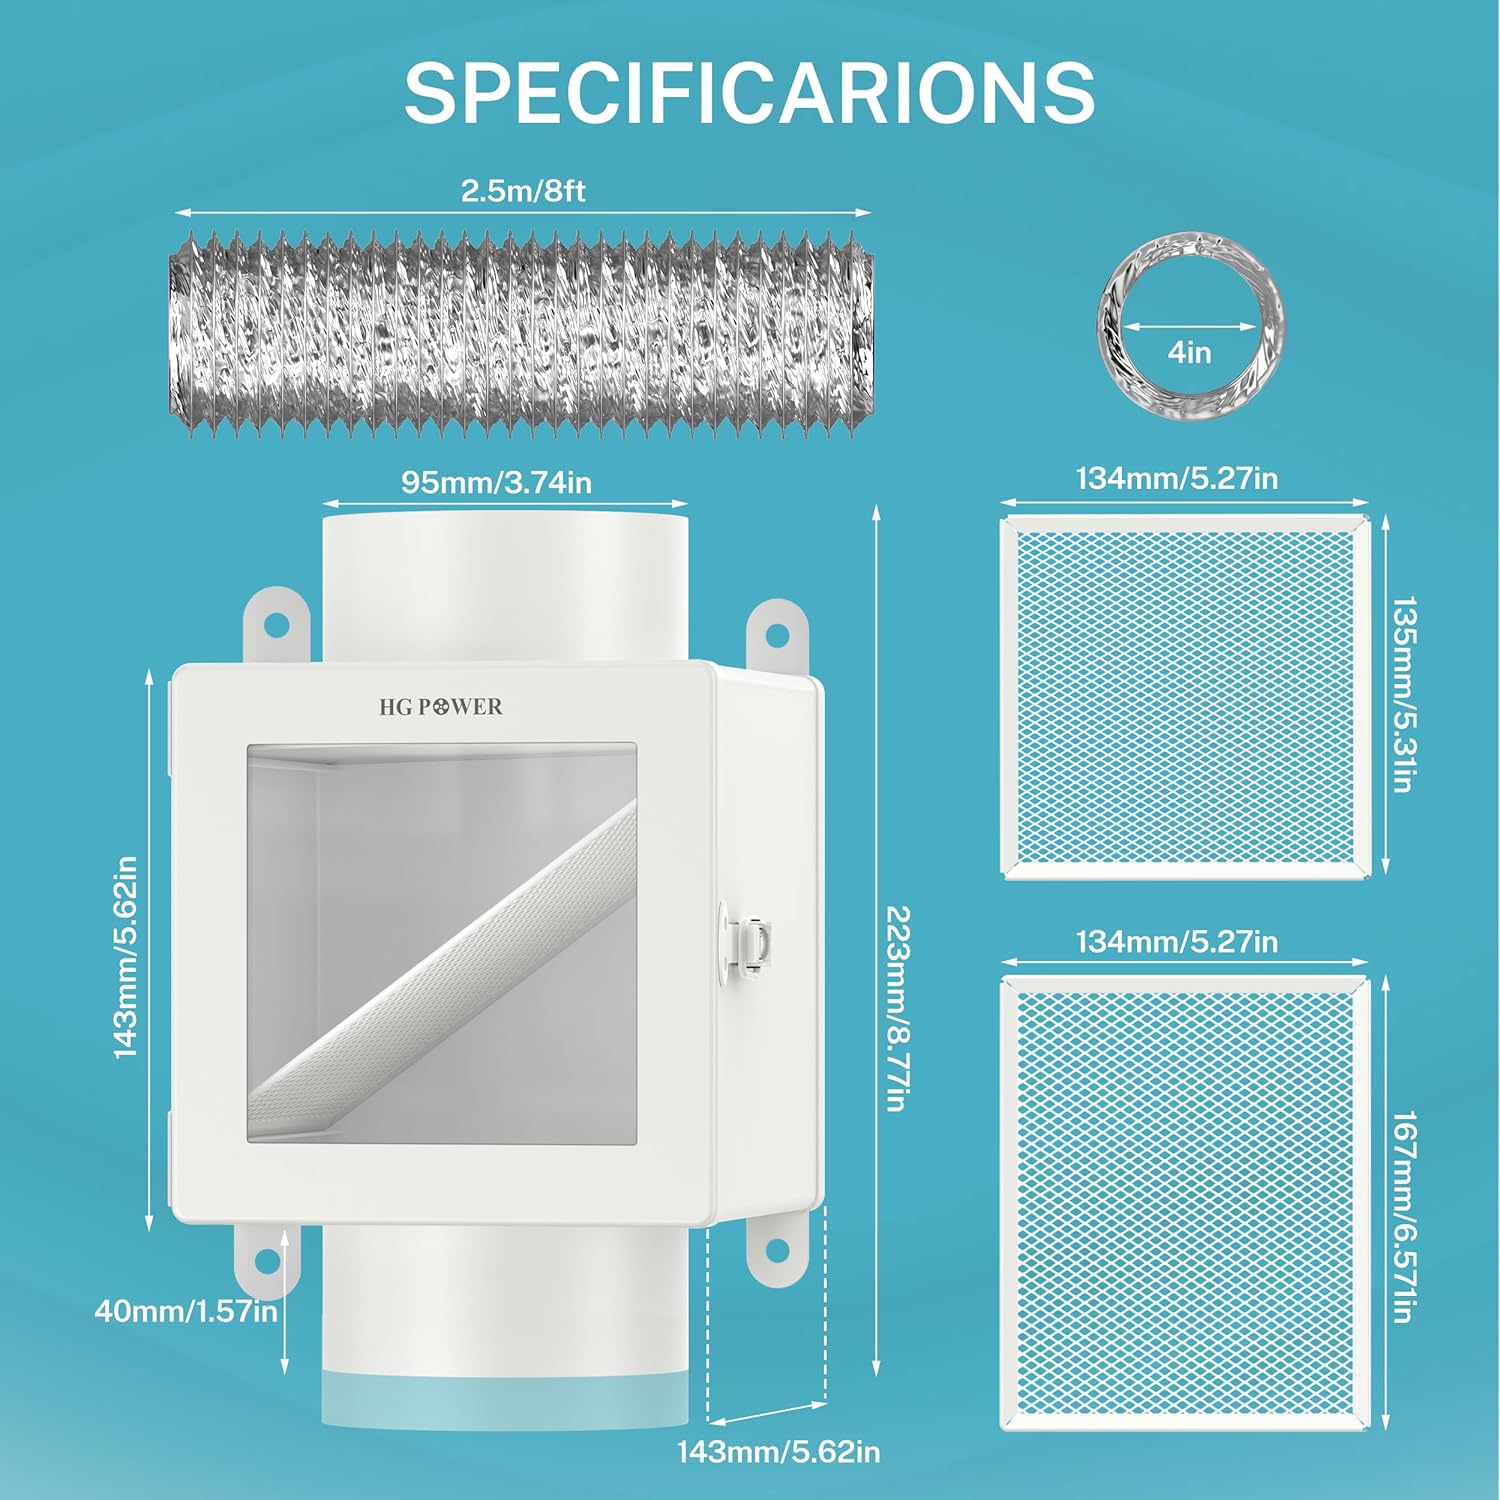
Figure 8.1: Detailed product specifications and dimensions.
9. Warranty and Support
The HG Power Dryer Duct Lint Trap comes with a 1-year warranty from the date of purchase. This warranty covers manufacturing defects and material flaws under normal use conditions.
For warranty claims, technical support, or any questions regarding your product, please contact HG Power customer service through the retailer where the product was purchased or visit the official HG Power store online.
Return Policy: This product is subject to a 30-day refund/replacement policy from the date of purchase, as per the retailer's terms.


