1. Introduction
This manual provides detailed instructions for the setup, operation, and maintenance of your KTC 32-Inch 2K QHD IPS Monitor, model H32T13. Please read this manual thoroughly before using the monitor to ensure proper functionality and to prevent damage.
The KTC H32T13 monitor features a 32-inch IPS panel with 2K QHD (2560x1440) resolution, a 100Hz refresh rate, and support for FreeSync/G-Sync technologies. It is designed for both office productivity and gaming, offering vibrant colors, wide viewing angles, and eye-care features.
2. What's in the Box
Verify that all components are present in the package:
- KTC 32-Inch 2K QHD IPS Monitor (H32T13)
- Monitor Stand (Base and Neck)
- HDMI Cable
- Power Cord
- Power Adapter
- Screwdriver
- User Manual (this document)

Image: Contents of the KTC H32T13 monitor package.
3. Product Overview
The KTC H32T13 monitor is designed for a superior visual experience. Key features include:
- 32-inch QHD (2560x1440) IPS Panel: Delivers crisp, detailed images with accurate colors and wide viewing angles.
- 100Hz Refresh Rate: Provides smoother motion for gaming and fast-paced content.
- FreeSync/G-Sync Compatibility: Reduces screen tearing and stuttering for a fluid gaming experience.
- HDR Support: Enhances contrast and color for more realistic visuals.
- Eye Care Technology: Features Flicker-Free and Low Blue Light modes to reduce eye strain during prolonged use.
- Versatile Connectivity: Equipped with multiple HDMI 2.0 and DisplayPort 1.4 inputs.
- Ergonomic Design: Offers tilt adjustment and VESA mount compatibility for flexible positioning.

Image: KTC H32T13 monitor showcasing its key display technologies.

Image: The 32-inch screen size of the KTC H32T13 monitor.
4. Setup
4.1 Assembling the Stand
- Carefully remove the monitor and stand components from the packaging.
- Attach the stand neck to the monitor panel using the provided screws and screwdriver.
- Secure the stand base to the stand neck.
- Place the assembled monitor on a stable, flat surface.
4.2 VESA Mounting (Optional)
The monitor supports VESA 100mm x 100mm mounting. If you wish to use a VESA-compatible arm or wall mount (not included), remove the stand and attach the VESA mount according to its instructions.

Image: Rear view of the monitor with VESA 100x100mm mounting points.
4.3 Connecting to a Computer
- Ensure both the monitor and your computer are powered off.
- Connect one end of the provided HDMI cable to an HDMI port on your computer's graphics card.
- Connect the other end of the HDMI cable to one of the HDMI 2.0 ports on the monitor. Alternatively, use a DisplayPort cable to connect to a DP 1.4 port for higher refresh rates and FreeSync/G-Sync functionality.
- Connect the power adapter to the monitor's DC input and then plug the power cord into a power outlet.
- Power on your computer, then power on the monitor.

Image: Monitor connectivity ports (DC, HDMI 1, HDMI 2, DP 1).
5. Operating Instructions
5.1 Power On/Off
Press the power button located on the monitor to turn it on or off. The power indicator light will illuminate when the monitor is on.
5.2 Input Source Selection
Use the OSD (On-Screen Display) menu buttons to navigate and select your desired input source (HDMI 1, HDMI 2, or DisplayPort).
5.3 Adjusting Display Settings (OSD Menu)
The OSD menu allows you to customize various display settings. Typically, buttons are located on the back or bottom of the monitor. Refer to the quick start guide for specific button functions.
- Brightness/Contrast: Adjust the overall luminance and contrast ratio.
- Color Settings: Modify color temperature, gamma, and individual RGB levels. The monitor supports 1.07 billion colors and 103% sRGB.
- Picture Mode: Select from preset modes optimized for different content (e.g., Standard, Game, Movie, Text).
- Refresh Rate: The monitor supports up to 100Hz. Ensure your graphics card settings are configured to match.
- FreeSync/G-Sync: Enable this feature in the OSD menu and your graphics card control panel for adaptive synchronization.
- Eye Care Modes: Activate Flicker-Free and Low Blue Light modes to reduce eye strain.
- HDR: Enable HDR for compatible content and devices.

Image: Monitor displaying enhanced colors and brightness with HDR enabled.

Image: Visual comparison of FreeSync/G-Sync enabled and disabled, demonstrating smoother gameplay.

Image: IPS panel advantages in brightness and color over VA panels.
5.4 Physical Adjustments
The monitor stand allows for tilt adjustment from -5° to 15° to optimize your viewing angle.

Image: Monitor tilt adjustment range and eye care features.
Video: Overview of the KTC 2K IPS Office Monitor, highlighting its features and suitability for office use. This video demonstrates the monitor's visual quality and design.
6. Maintenance
6.1 Cleaning the Monitor
- Always power off the monitor and unplug the power cord before cleaning.
- Use a soft, lint-free cloth lightly dampened with water or a mild, non-abrasive screen cleaner.
- Wipe the screen gently to remove dust and smudges. Avoid applying direct pressure to the screen.
- Do not use alcohol, ammonia-based cleaners, or abrasive materials, as these can damage the screen surface.
- Clean the monitor casing with a soft, dry cloth.
6.2 Storage
If storing the monitor for an extended period, ensure it is powered off, unplugged, and stored in a cool, dry place away from direct sunlight and extreme temperatures. Use the original packaging if available for best protection.
7. Troubleshooting
| Problem | Possible Cause | Solution |
|---|---|---|
| No image on screen | Monitor not powered on; Incorrect input source; Loose video cable; Computer in sleep mode. | Ensure power is connected and monitor is on. Select correct input source. Check video cable connections. Wake up computer. |
| Image is blurry or distorted | Incorrect resolution; Faulty video cable; Graphics driver issues. | Set display resolution to 2560x1440. Try a different video cable. Update graphics drivers. |
| Screen flickering or tearing | Refresh rate mismatch; FreeSync/G-Sync not enabled or incompatible. | Ensure refresh rate is set to 100Hz. Enable FreeSync/G-Sync in monitor OSD and graphics card settings. Use DisplayPort for FreeSync/G-Sync. |
| No sound from headphones | Headphones not connected properly; Audio output not set to monitor. | Check headphone connection. Set monitor as default audio output in your computer's sound settings. |
| Buttons not responding | OSD lock enabled; Temporary software glitch. | Check if OSD lock is active (refer to quick start guide). Power cycle the monitor. |
8. Specifications
| Feature | Detail |
|---|---|
| Model Number | H32T13 |
| Screen Size | 32 Inches |
| Panel Type | IPS |
| Resolution | 2560 x 1440 (QHD Wide 1440p) |
| Aspect Ratio | 16:9 |
| Refresh Rate | 100Hz |
| Brightness | 350 Candela (typ.) |
| Color Gamut | 103% sRGB |
| Color Depth | 1.07 Billion Colors |
| HDR Support | Yes |
| Adaptive Sync | FreeSync/G-Sync Compatible |
| Connectivity | 2x HDMI 2.0, 1x DisplayPort 1.4 |
| Tilt Adjustment | -5° to 15° |
| VESA Mount | 100mm x 100mm |
| Eye Care Features | Flicker-Free, Eye Protection Mode (Low Blue Light) |
| Product Dimensions | 5.31 x 32.48 x 21.2 inches |
| Item Weight | 18.81 pounds |
9. Warranty and Support
9.1 Warranty Information
KTC products are covered by a limited warranty. Please refer to the warranty card included in your product packaging or visit the official KTC website for detailed warranty terms and conditions. Keep your proof of purchase for warranty claims.
9.2 Customer Support
For technical assistance, troubleshooting not covered in this manual, or warranty inquiries, please contact KTC customer support through the following channels:
- Online Support: Visit the KTC official website for FAQs, driver downloads, and support contact forms.
- Email Support: Refer to your warranty card or the KTC website for the appropriate support email address.
- Amazon Support: If purchased via Amazon, you can contact the seller directly through your Amazon order history for assistance.
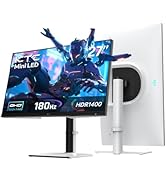
Image: Steps to contact KTC customer support via Amazon.


