
1. Introduction
Thank you for choosing the Nasitip 24V Kids Ride-On Electric Car. This manual provides essential information for the safe assembly, operation, and maintenance of your new electric car. Please read this manual thoroughly before use and retain it for future reference.
This electric car is designed for children aged 3-8 years, with a maximum load capacity of 106 lbs (48 kg). It features a two-seat design, 2x120W motors, 15.5-inch wheels, LED headlights, front storage, a bottle holder, FM radio, Bluetooth, and both manual and parental remote control options.

The Nasitip 24V Kids Ride-On Electric Car, showcasing its robust design and features.
2. Important Safety Information
WARNING: Adult assembly required. Adult supervision is always required during operation.
- Always ensure children wear safety belts when operating the vehicle.
- Do not operate the vehicle near streets, cars, steep inclines, swimming pools, or other bodies of water.
- Ensure the vehicle is used on flat, dry surfaces. Avoid wet conditions to prevent electrical damage.
- Keep hands, hair, and clothing away from moving parts.
- Do not allow children to stand in the vehicle while it is in motion.
- Only use the charger and battery provided by the manufacturer.
- Regularly inspect the vehicle for damage, loose parts, or worn components before each use.
- The parental remote control should be used by an adult to ensure safety, especially for younger children or in crowded areas.
3. What's in the Box
Upon opening your package, please verify that all components are present:
- Kids ride on car (main body)
- Remote control
- Wheels and accessories
- User manual
- Charger
Note: Due to logistics restrictions, the truck is delivered in two packages. Please be patient and wait for both to arrive before beginning assembly.

Important notes regarding package delivery and initial battery charging.
4. Assembly Instructions
Follow these steps carefully for proper assembly. Refer to the provided video for visual guidance.
Video 1: Installation Guide for Nasitip 2-Seat Truck. This video demonstrates the complete assembly process for the ride-on car.
4.1. Unpacking and Initial Setup
- Open Box A (Car Body) and Box B (Wheels & Accessories).
- Carefully remove all packaging materials and components.
- Place the car body upside down on a stable surface to begin assembly.
4.2. Install Rear Suspension
- Attach the rear suspension components to the designated slots on the car body.
- Secure the suspension with self-tapping screws using a screwdriver.
- Connect the female and male nails, then tighten with an Allen wrench.
4.3. Install Rear Axle and Motors
- Insert the real axle through the rear suspension. Ensure both sides have the same length.
- Attach the right motor and left motor to their respective sides of the axle.
- Slide the wheels onto the axle. Secure each wheel with an M8 nut, tightening with an M8 spanner. Do not overtighten; ensure wheels can rotate freely.
- Attach the wheel covers to each wheel.
4.4. Install Front Axle and Steering
- Install the steering axle into its designated position.
- Assemble the front axle and square tube using washers and M8 nuts. Tighten with an M8 spanner.
- Attach the assembled front axle to the car body, securing it with self-tapping screws.
4.5. Install Welcome Pedal
- Position the welcome pedal onto the side of the car body.
- Secure it with six self-tapping screws using a screwdriver.
4.6. Connect Motor Terminals
- Locate the controller terminals and motor terminals inside the car body.
- Carefully connect the motor terminals to the controller terminals.
4.7. Install Seat and Backrest
- Place the seat into the car body.
- Secure the seat with self-tapping screws using a screwdriver.
- Install the backrest and attach the safety belts.
4.8. Install Side Tail Frame & Rear Lamp
- Attach the left-side tail frame and right-side tail frame to the rear of the car.
- Install the rear lamps onto the tail frame lamp holder.
4.9. Install Steering Wheel
- Carefully install the steering wheel onto the steering column. Ensure correct orientation.
- Secure the steering wheel with a screw bolt using a screwdriver.
- Install two 2AA batteries (not included) into the steering wheel for horn and music functions.
4.10. Install Wind Deflector
- Attach the wind deflector to the front top of the car body.
4.11. Install Rearview Mirrors and Fenders
- Attach the left rearview mirror holder and rearview mirror to the left side. Repeat for the right side.
- Install the front left fender and front right fender.
- Install the rear left fender and rear right fender.
- Attach the front bumper to the front of the car.

Key features of the Nasitip electric car, including the lockable door, foldable rearview mirror, foot pedal, spring suspension, and wear-resistant tires.

An overview of the car's design, highlighting the lockable front storage, footboard, and rear suspension system.
5. Charging Instructions
STOP! Charge Battery First!
- Before first use, charge the battery for 12 hours.
- Locate the charging port, usually under the seat or in a designated compartment.
- Connect the charger to the charging port and plug it into a standard wall outlet.
- Charge the battery once per month if not in use for a long time to maintain battery health.
- Always disconnect the battery power if the vehicle will not be used for an extended period.
6. Operating Instructions
6.1. Manual Operation
- Power On/Off: Use the main power button on the dashboard.
- Acceleration: Press the foot pedal to move forward. Release to brake.
- Steering: Turn the steering wheel left or right to change direction.
- Music/FM/Bluetooth: Use the control panel on the dashboard to access FM radio, MP3 music via USB, or connect via Bluetooth.
- Horn: Press the horn buttons on the steering wheel for sound.
- LED Headlights: Activate the bright LED headlights via the dashboard controls.
6.2. Parental Remote Control Operation
The remote control allows parents to safely guide the vehicle, especially for younger children.
- Pairing: Follow instructions in the remote control's specific manual for pairing.
- Forward/Reverse: Use the directional buttons to move the car forward or backward.
- Turn Left/Right: Use the directional buttons to steer the car.
- Speed Selection: Select from 3 speeds (Low, Medium, High) using the speed button on the remote.
- Emergency Brake: Press the emergency brake button on the remote to stop the vehicle immediately.
Note: The remote control requires two AAA 1.5V dry batteries (not included).
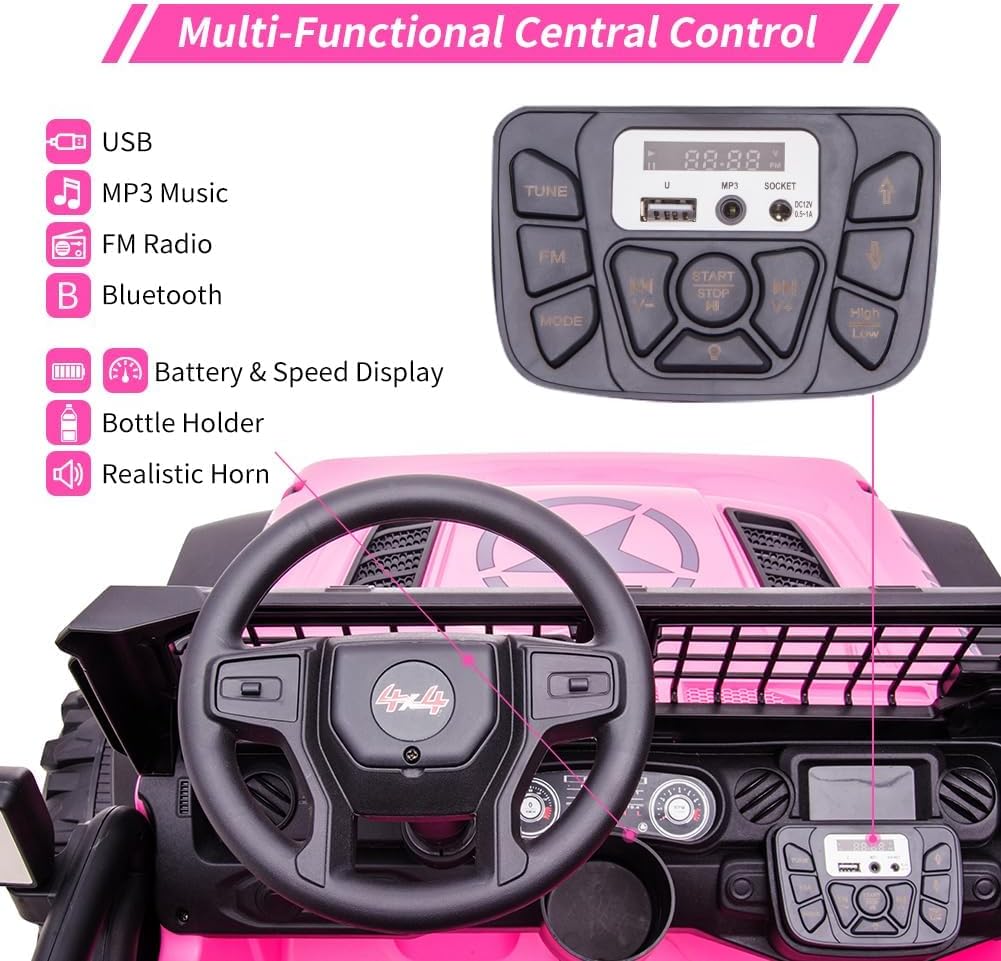
The multi-functional central control panel, offering various entertainment and operational features.

The two-seat configuration with safety belts and an illustration of the remote control's functions.
Video 2: Honest review of kids 24V ride-on jeep. This video from a seller demonstrates the vehicle's features, including the horn, radio, and speed controls.
Video 3: Mama review and approved! Parent remote and speed up to 4.5. This video from a seller highlights the remote control functionality and speed settings.
7. Maintenance
- Cleaning: Wipe the vehicle with a soft, damp cloth. Do not use abrasive cleaners or solvents. Avoid getting water into electrical components.
- Battery Care:
- Charge the battery fully after each use.
- If storing for extended periods, charge the battery once a month.
- Do not overcharge the battery.
- Storage: Store the vehicle in a dry, cool place away from direct sunlight and moisture.
- Inspection: Periodically check all screws, nuts, and connections to ensure they are tight and secure. Inspect tires for wear and tear.
8. Troubleshooting
| Problem | Possible Cause | Solution |
|---|---|---|
| Vehicle does not move. | Battery is low or not connected. Loose wiring. | Charge the battery. Check battery connections. Ensure all wires are securely connected. |
| Vehicle moves slowly. | Low battery. Overloaded vehicle. Rough terrain. | Charge the battery. Reduce load. Use on smoother surfaces. |
| Remote control not working. | Batteries in remote are dead or incorrectly installed. Remote not paired. | Replace remote batteries. Check battery polarity. Re-pair the remote control. |
| Loud grinding noise from wheels. | Wheels not properly installed or overtightened. | Check wheel installation and ensure they rotate freely. |
9. Specifications
- Product Dimensions: 49.6 x 38.6 x 34.6 inches
- Item Weight: 80 pounds
- Item Model Number: Nastip-0935Pink-YC18
- Manufacturer Recommended Age: 3 - 8 years
- Max Load: 106 lbs (48 kg)
- Battery: 24V 9Ah
- Motors: 2 x 120W
- Max Speed: 4.5 MPH
- Features: MP3, USB port, FM radio, LED headlights, Horn, Bluetooth, Bottle Holder, Front Storage, 20" Extra Large Seats, 15.5" XL Wheels, Spring Suspension, Lockable Doors, Foot Pedal, Manual & Parental Control.

Dimensions of the electric car and examples of suitable terrains for operation.

Overview of the electric car's key specifications and features.
10. Warranty and Support
For any questions, concerns, or technical support regarding your Nasitip 24V Kids Ride-On Electric Car, please contact our customer service team.
Email: support@nasitip.com
Please have your model number (Nastip-0935Pink-YC18) and purchase information ready when contacting support.

