
1. Product Overview
The Arvitek 4K HDMI Matrix Switcher 8x8 is designed to route 8 HDMI input sources to 8 HDMI output displays. This device allows for flexible signal distribution, enabling you to mirror the same signal to all outputs or independently direct individual input signals to each display. It supports resolutions up to 3840x2160@30Hz and includes a 3.5mm audio output for dedicated audio extraction from output 8. The switcher is built with 3.4G bandwidth and 8KV ESD protection, suitable for standard 1U 19-inch cabinet/rack installations.
Control options include front panel buttons, an IR remote, RS232, LAN, and a Web GUI, offering versatile management for various setups.

2. Package Contents
Please verify that all items listed below are included in your package. If any items are missing or damaged, please contact customer support.
- 1 x Arvitek 4K HDMI Matrix Switcher 8x8
- 1 x RS232 Cable
- 1 x IR Remote Control
- 1 x Rack Ears & Screws (for rack mounting)
- 1 x Power Cable & Adapter
- QR code for User Manual and Software (digital access)

Video 2.1: An unboxing video demonstrating the contents of the Arvitek HDMI Matrix Switch package and a brief overview of the device's ports.
3. Setup
3.1 Physical Installation
- Placement: Place the matrix switcher on a stable, flat surface or install it into a standard 1U 19-inch rack using the provided rack ears and screws. Ensure adequate ventilation around the unit.
- Power Off: Ensure all devices (source players, displays, and the matrix switcher) are powered off before making any connections.
3.2 Connecting Devices
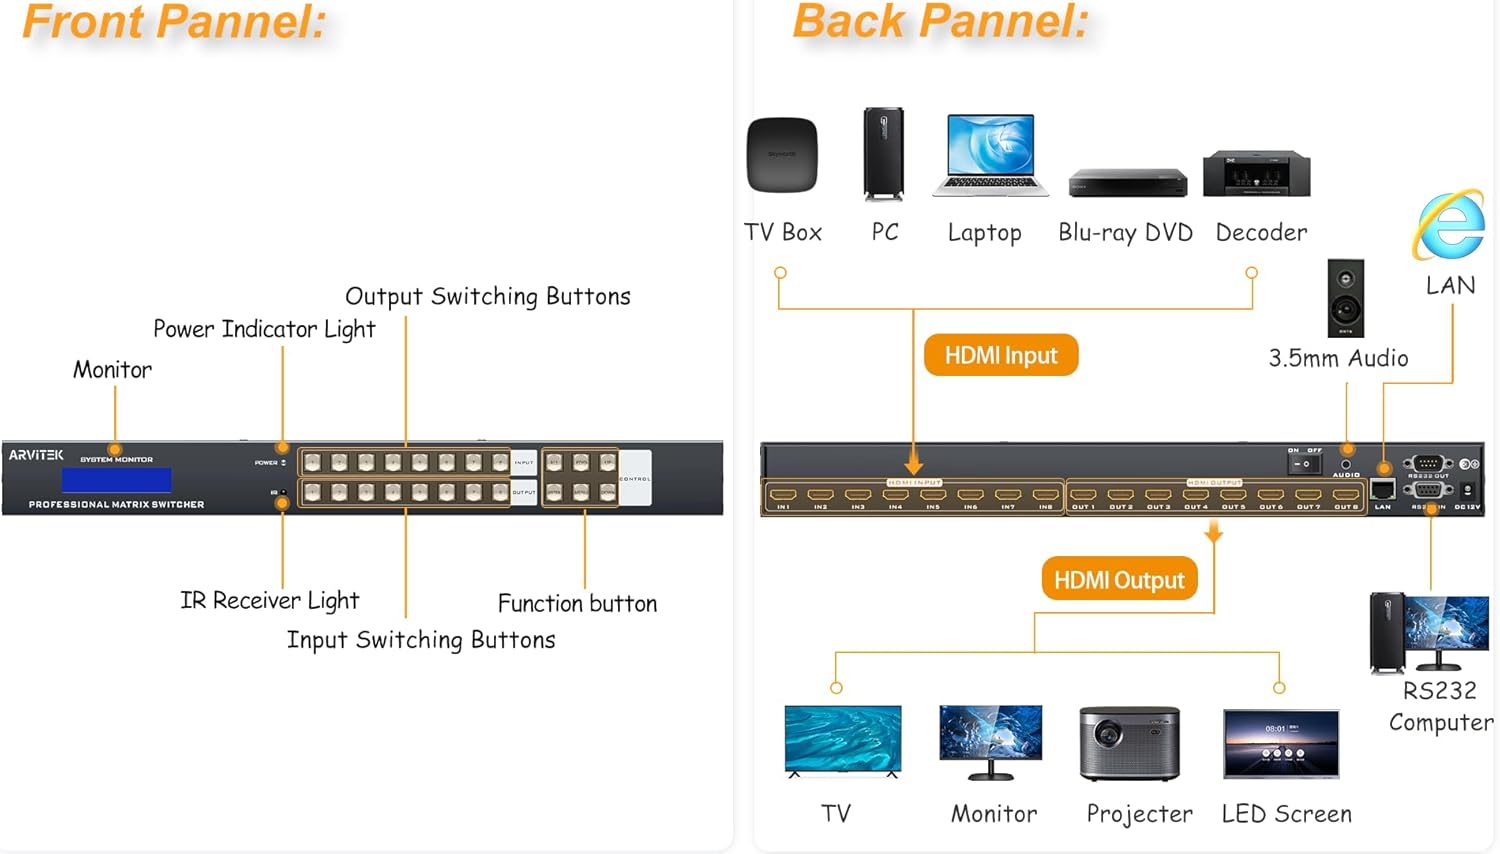
- HDMI Input: Connect your 8 HDMI source devices (e.g., Blu-ray players, gaming consoles, PCs, TV boxes) to the HDMI INPUT 1-8 ports on the rear panel of the switcher using high-quality HDMI cables.
- HDMI Output: Connect your 8 HDMI display devices (e.g., TVs, monitors, projectors) to the HDMI OUTPUT 1-8 ports on the rear panel.
- 3.5mm Audio Output: If desired, connect external audio systems to the 3.5mm AUDIO OUT port. This port provides audio extraction specifically from HDMI Output 8.
- LAN Connection: For network control (Web GUI or APP), connect an Ethernet cable from your network router/switch to the LAN port on the rear panel.
- RS232 Connection: For RS232 control, connect an RS232 cable from your control system to the RS232 IN port.
- Power: Connect the provided power adapter to the DC 12V port on the rear panel, then plug the adapter into a power outlet.
3.3 Power On
After all connections are secure, power on your display devices first, then your HDMI source devices, and finally the Arvitek HDMI Matrix Switcher using the ON/OFF switch on the rear panel. The front panel display will illuminate, indicating the unit is operational.
4. Operating Instructions
4.1 Basic Switching (Front Panel)
The front panel features input and output switching buttons. To route an input to an output:
- Press the desired INPUT button (1-8) to select the source.
- Press the desired OUTPUT button (1-8) to select the display.
- Press ENTER to confirm the switch.
4.2 Control Methods

- IR Remote Control: Use the included IR remote to switch inputs and outputs. Point the remote towards the IR receiver on the front panel.
- RS232 Control: Connect to a PC or control system via the RS232 port. Use appropriate RS232 control software (refer to the digital user manual for commands).
- LAN Control (Web GUI): Connect the switcher to your network. Access the Web GUI by entering the switcher's IP address into a web browser on a connected PC. The default IP address and login credentials can be found in the digital user manual.
- APP Control: Download the dedicated control application (available for Android, refer to the QR code for download links) to control the switcher from your mobile device when connected to the same network.
4.3 Operating Modes
The switcher supports various operating modes to suit different display requirements:
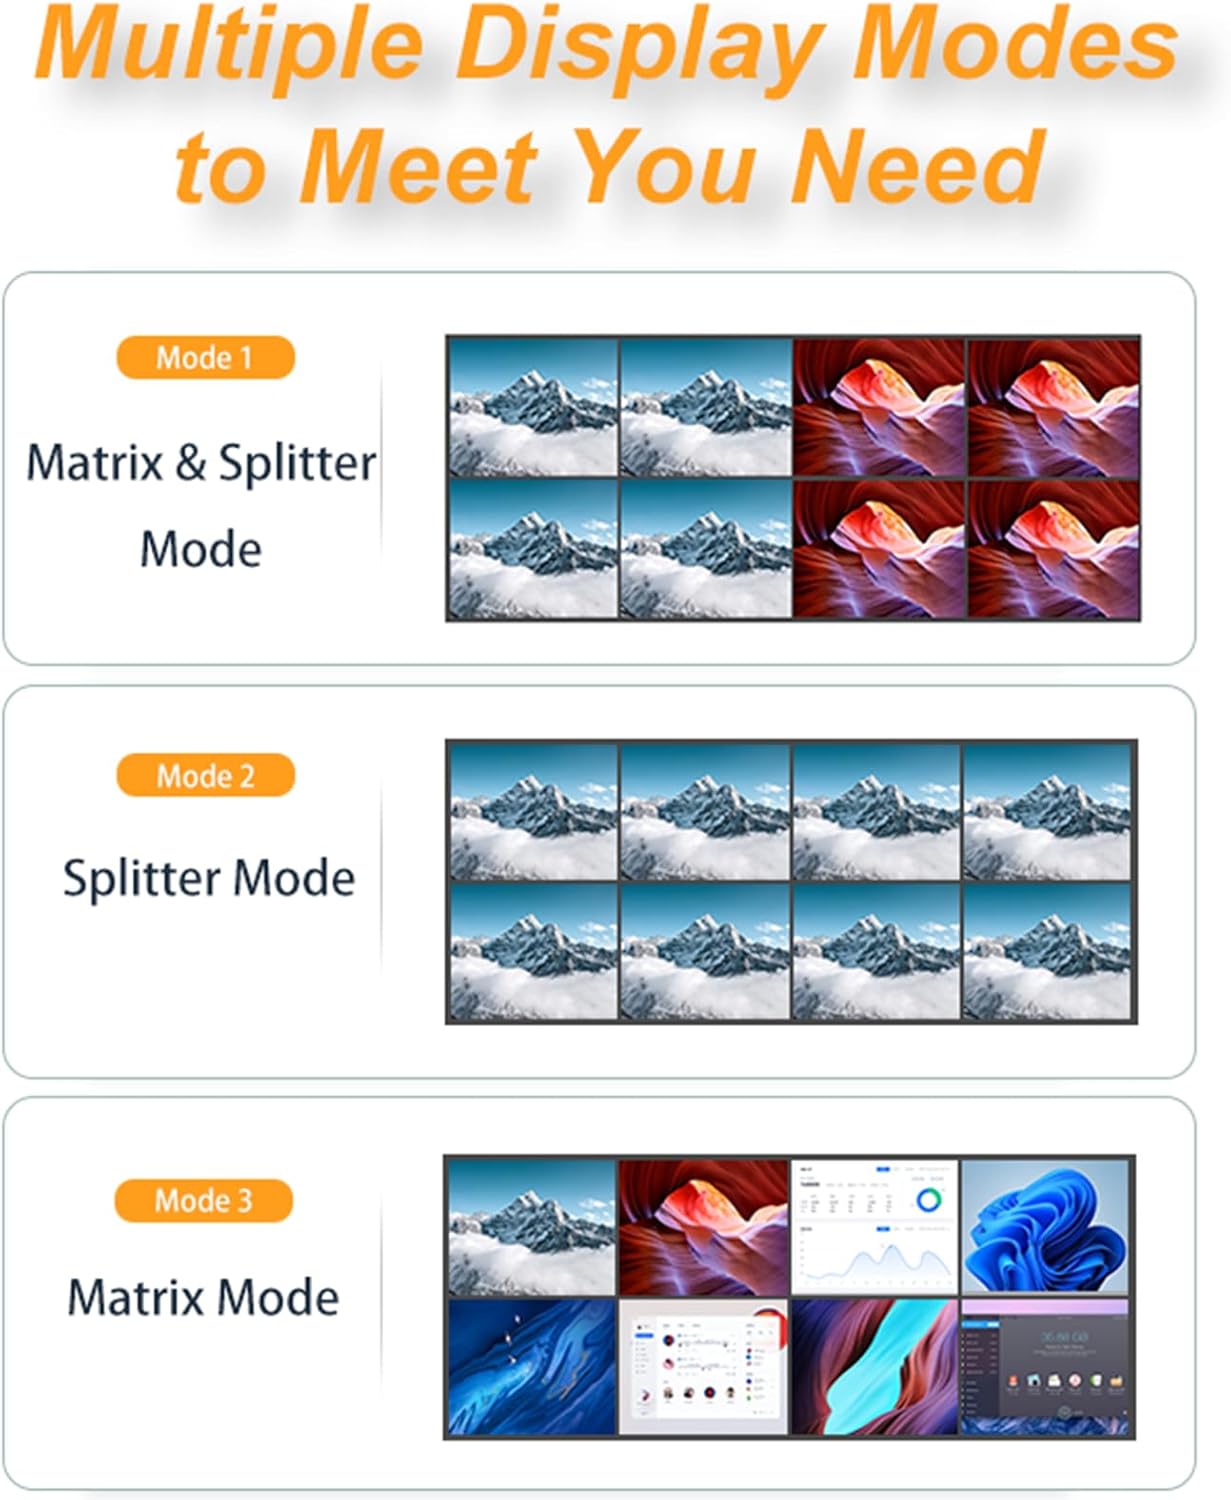
- Matrix Mode: Each output can display a different input source independently. For example, Input 1 to Output 1, Input 2 to Output 2, etc.
- Splitter Mode: A single input source can be sent to multiple output displays simultaneously. For example, Input 1 to Output 1, Output 2, and Output 3.
- Combined Mode: A combination of matrix and splitter functionalities, allowing for complex signal distribution scenarios.
Specific instructions for configuring these modes are available in the digital user manual accessible via the provided QR code.
5. Maintenance
- Cleaning: Use a soft, dry cloth to clean the exterior of the unit. Avoid liquid cleaners or abrasive materials.
- Ventilation: Ensure the ventilation openings are not blocked to prevent overheating.
- Cable Management: Periodically check all cable connections to ensure they are secure and free from damage.
- Firmware Updates: Check the manufacturer's website for any available firmware updates to ensure optimal performance and compatibility.
6. Troubleshooting
If you encounter issues, please refer to the following common troubleshooting steps:
| Problem | Possible Cause | Solution |
|---|---|---|
| No video output | Loose HDMI cables, incorrect input/output selection, incompatible resolution, power issue | Check all HDMI cable connections. Ensure the correct input is routed to the desired output. Verify display supports the source resolution. Confirm power adapter is connected and unit is on. Try a different HDMI cable. |
| Poor video quality (flickering, distortion) | Low quality/damaged HDMI cables, cable length too long, EDID issues | Use certified high-speed HDMI cables. Ensure cable lengths are within recommended limits. Refer to the digital manual for EDID management instructions. |
| No audio output | Incorrect audio settings on source/display, 3.5mm audio not connected/configured, incompatible audio format | Check audio settings on source and display. Ensure 3.5mm audio cable is correctly connected if using external speakers. Verify audio format compatibility (PCM, Dolby AC3, DTS5.1, DTS7.1, DSD are supported). |
| Remote control not working | Dead batteries, IR sensor blocked, remote out of range | Replace remote batteries. Ensure no obstructions between remote and switcher's IR sensor. Operate within effective range. |
| LAN/Web GUI/APP control issues | Network connectivity problems, incorrect IP address, software not installed/configured | Verify network cable connection. Ensure switcher and control device are on the same network. Check IP address settings. Reinstall control software/app if necessary. |
7. Specifications
| Feature | Detail |
|---|---|
| Model Number | 8x8 Matrix |
| Brand | Arvitek |
| HDMI Inputs | 8 |
| HDMI Outputs | 8 |
| Max Resolution | 3840x2160@30Hz |
| Bandwidth | 3.4G |
| ESD Protection | 8KV |
| Audio Output | 3.5mm (from Output 8) |
| Supported Audio Formats | PCM, Dolby AC3, DTS5.1, DTS7.1, DSD |
| Control Methods | Front Panel Buttons, IR Remote, RS232, LAN, Web GUI, APP |
| Compatible Systems | Windows, Linux (for control software) |
| Dimensions | 19.5 x 7.5 x 4 inches (Package) |
| Item Weight | 5.49 pounds |
| Rack Mountable | Yes, 1U 19-inch standard |
8. Warranty and Support
For warranty information and technical support, please refer to the documentation provided with your purchase or visit the official Arvitek website. You may also contact the seller directly for assistance.