
1. Introduction
The GOLDEN BLUE HT61 is a portable, pen-type combustible gas leak detector designed for quick and accurate detection of various flammable gases. This device features both audible and visual alarms, adjustable sensitivity, and an LCD display for clear readings. This manual provides essential information for the safe and effective use, setup, operation, and maintenance of your HT61 gas leak detector.
2. Product Features
- Precision Gas Detection: Reliably detects combustible and flammable gases, providing accurate measurements.
- Portable and Mini Design: Compact and lightweight for easy carrying and use in various environments.
- PPM Meter Capability: Measures gas concentration levels in Parts Per Million (PPM) for thorough monitoring.
- Audible and Visual Alarm: Alerts users with both sound and screen indications upon gas detection.
- Adjustable Sensitivity: Switchable high and low sensitivity modes for different detection scenarios.
- LCD Display with Backlight: Ensures clear visibility of readings even in low-light conditions.
- Auto Power Off: Automatically shuts down after approximately 10 minutes of inactivity to conserve battery life.
- Battery Powered: Operates on 2x 1.5V AAA batteries (not included).
3. Safety Information
Please read and understand all safety instructions before operating the device. Failure to follow these instructions may result in injury or damage to the device.
- This device is designed to detect combustible gases. It is not a substitute for professional safety equipment or procedures.
- Do not expose the device to extreme temperatures, humidity, or corrosive environments.
- Ensure proper ventilation when testing for gas leaks.
- Do not attempt to repair or modify the device. Refer all servicing to qualified personnel.
- Replace batteries promptly when the low voltage indicator appears to ensure accurate readings.
- Keep the sensor head clean and free from obstructions.
4. Product Components
Familiarize yourself with the different parts of your HT61 gas leak detector:

Image 1: HT61 Gas Leak Detector with labeled components. This image highlights the battery cover, LCD display screen, On/Off button, Low sensitivity alarm button, High sensitivity alarm button, and the sensor head with gas sensor.
- Battery Cover: Located at the top, protects the battery compartment.
- LCD Display Screen: Shows gas concentration, sensitivity mode, and battery status.
- On / Off Button: Powers the device on or off.
- Low Sensitivity Alarm Button (Lo): Toggles to low sensitivity mode.
- High Sensitivity Alarm Button (Hi): Toggles to high sensitivity mode.
- Sensor Head with Gas Sensor: The detection point for combustible gases.
5. Setup
5.1 Battery Installation
The HT61 requires two 1.5V AAA batteries (not included) for operation.
- Locate the battery cover at the top of the device (refer to Image 1).
- Twist the battery cover counter-clockwise to remove it.
- Insert two 1.5V AAA batteries, ensuring correct polarity (+/-).
- Replace the battery cover by twisting it clockwise until secure.

Image 2: Overall view of the HT61 Gas Leak Detector. The top red cap is the battery cover.
6. Operation
6.1 Power On/Off
- To power on the device, press and hold the On/Off button (labeled with a power symbol) until the LCD screen illuminates. The device will undergo a brief warm-up period (approximately 30 seconds).
- To power off the device, press and hold the On/Off button again until the screen turns off.
6.2 Sensitivity Adjustment
The HT61 offers two sensitivity modes: High (Hi) and Low (Lo).
- Press the "Hi" button to activate high sensitivity mode. The display screen will show "Hi". This mode is suitable for detecting small leaks or in areas where gas concentration is expected to be low.
- Press the "Lo" button to activate low sensitivity mode. The display screen will show "Lo". This mode is useful for larger leaks or in environments where a higher threshold for detection is desired.
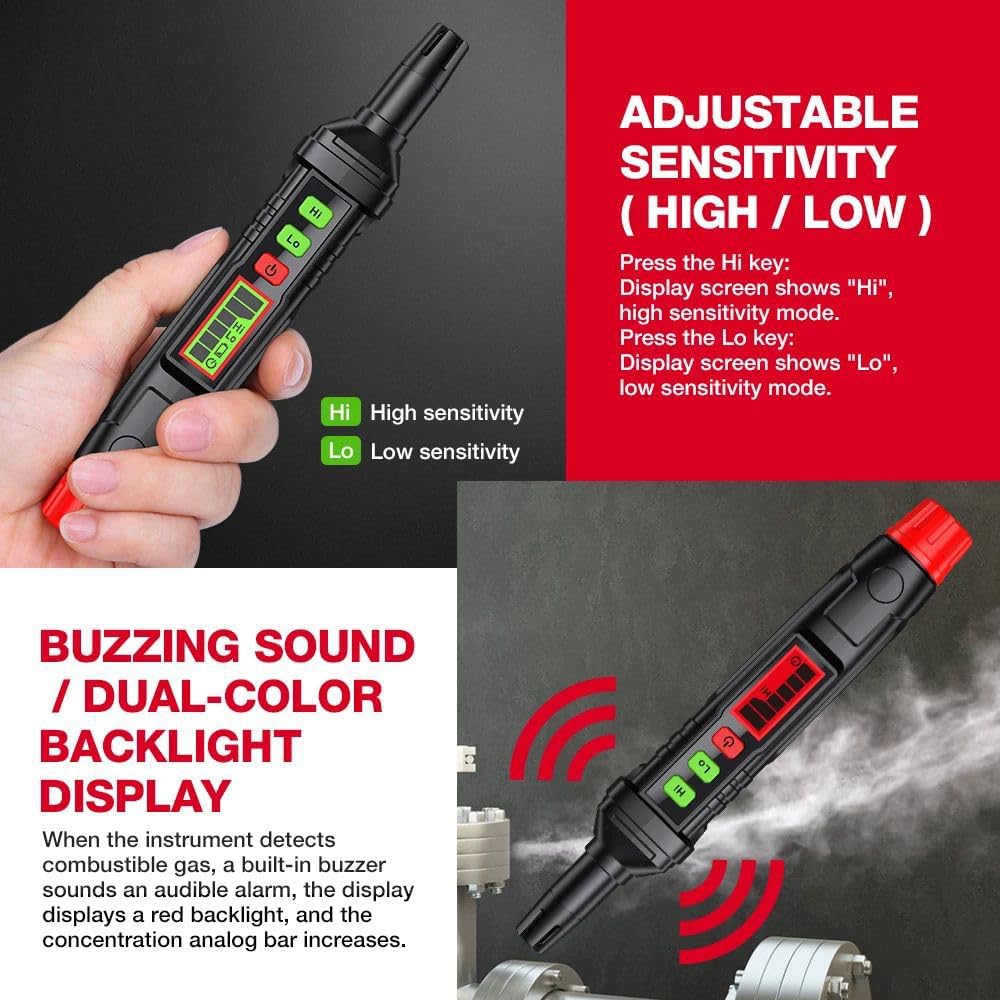
Image 3: The HT61 detector displaying "Hi" for high sensitivity and "Lo" for low sensitivity, with corresponding buttons.
6.3 Gas Detection
Once powered on and warmed up, move the sensor head slowly around the area where a gas leak is suspected. The device will provide both audible and visual alerts upon detection.
- Audible Alarm: A buzzing sound will activate when gas is detected. The frequency of the buzz may increase with higher gas concentrations.
- Visual Alarm: The LCD display will show a red backlight, and the concentration analog bar will increase, indicating the relative gas level.

Image 4: The HT61 detector indicating a gas presence with a buzzing sound icon and a red backlight on the display, showing the concentration bar increasing.
6.4 Low Voltage Prompt
When the battery voltage drops below the operating threshold, the display screen will show a low battery icon (typically a flashing battery symbol). Replace the batteries promptly to ensure continued accurate operation.

Image 5: The HT61 detector showing a low battery icon on its LCD screen, indicating that battery replacement is needed.
6.5 Auto Power Off
The device is equipped with an auto power-off function. If there is no operation or measurement signal for approximately 10 minutes, the device will automatically shut down to conserve battery life.
7. Maintenance
7.1 Cleaning
- Wipe the exterior of the device with a soft, damp cloth. Do not use abrasive cleaners or solvents.
- Ensure the sensor head is kept clean and free from dust or debris. Do not insert any objects into the sensor opening.
7.2 Storage
- Store the device in a cool, dry place, away from direct sunlight and extreme temperatures.
- If storing for an extended period, remove the batteries to prevent leakage.
7.3 Battery Replacement
Replace the batteries as described in Section 5.1 when the low voltage prompt appears on the display.
8. Troubleshooting
| Problem | Possible Cause | Solution |
|---|---|---|
| Device does not power on. | Batteries are dead or incorrectly installed. | Check battery polarity and replace with new AAA batteries. |
| No gas detection or inconsistent readings. | Sensor head is dirty or obstructed; device is in low sensitivity mode; gas concentration is too low. | Clean the sensor head. Switch to high sensitivity mode. Ensure gas is present. |
| False alarms or continuous alarm. | Interference from other gases or substances; high ambient gas concentration. | Move to a fresh air environment to reset. Ensure no other interfering substances are present. Switch to low sensitivity mode if appropriate. |
| LCD display is dim or unreadable. | Low battery power. | Replace batteries. |
9. Specifications

Image 6: A detailed table outlining the product parameters and specifications for the HT61 Combustible Gas Leak Detector.
| Parameter | Value |
|---|---|
| Model | HT61 |
| Manufacturer Part Number | 20230116004 |
| Detecting Gas | Combustible Gas |
| Range | 50 ~ 1000ppm |
| Accuracy | ≤10% FS (methane) |
| Sensitivity | <50ppm (methane) |
| Response Time | <2 seconds |
| Warm-Up Time | Approx. 30 seconds |
| Display | LCD |
| Alarm Mode | Visible, Audible |
| Auto Zero | Yes |
| Auto Power Off | Yes (after approx. 10 minutes) |
| Low Battery Indication | Yes |
| Power Supply | 2x 1.5V AAA Alkaline Batteries (not included) |
| Product Weight | Approx. 46g / 1.69oz |
| Product Size | 180 x 32 x 31mm / 7.08 x 1.26 x 1.22 inches |
| Safety Rating | EN61326-1 |
| Material | ABS |
| Color | Black and Red |
10. Warranty and Support
Specific warranty information for the GOLDEN BLUE HT61 Gas Leak Detector is not provided in the product details. For warranty claims or technical support, please refer to the retailer or manufacturer's official contact channels where the product was purchased.
Always retain your proof of purchase for any warranty-related inquiries.