
1. Introduction
Thank you for choosing the Gasbye Dual Hose Portable Air Conditioner. This manual provides essential information for the safe and efficient operation of your new appliance. Please read it thoroughly before installation and use, and keep it for future reference.
This 2025 upgraded model features a full DC Inverter Compressor, offering energy-saving performance with a 13.6 CEER rating and low noise levels (approximately 45dB). Designed to cool rooms up to 500 sq. ft., it includes a backlit remote control for convenient operation.

Figure 1.1: Gasbye CoolPrime 10000 Portable Air Conditioner and Remote Control.
The Gasbye CoolPrime 10000 unit is shown in black, with its main air outlet at the top. A white remote control with a digital display and various function buttons is positioned to the left of the unit. A white exhaust hose is visible extending from the back of the unit towards a window.
2. Safety Information
Always follow basic safety precautions when using electrical appliances to reduce the risk of fire, electric shock, or injury.
- Ensure the power supply matches the voltage specified on the unit's rating label.
- Do not operate the unit with a damaged cord or plug.
- Keep the unit away from flammable materials and open flames.
- Do not block air inlets or outlets.
- Unplug the unit before cleaning or servicing.
- This appliance is not intended for use by persons (including children) with reduced physical, sensory or mental capabilities, or lack of experience and knowledge, unless they have been given supervision or instruction concerning use of the appliance by a person responsible for their safety.
3. Product Overview
3.1 Key Components
- Main Unit (Portable Air Conditioner)
- Air Exhaust Hose Assembly (2 hoses, 5.9" diameter, 59" length)
- Window Vent Kits (two 20-inch brackets, one 10-inch bracket)
- Backlit Remote Control
- Drainage Hose (for manual drainage, if needed)
3.2 Control Panel and Display
The unit features an intuitive control panel on the top surface. The digital display shows the current room temperature or set temperature. Indicator lights show the selected mode, fan speed, and other functions.
3.3 Remote Control
The included remote control allows for convenient operation from a distance. It features a backlit display for easy use in low-light conditions.

Figure 3.1: Backlit Remote Control.
A hand holds the white backlit remote control, pointing it towards the Gasbye portable air conditioner in a bedroom setting. The remote's screen is illuminated, showing temperature settings, making it easy to operate in the dark.
4. Setup and Installation
Proper installation is crucial for optimal performance. This unit is designed for use with sliding windows (vertical & horizontal) and is not suitable for outward-opening windows.
4.1 Window Kit Installation
- Assemble the window vent kits according to your window size. The package includes two 20-inch and one 10-inch bracket. Additional brackets can be requested for free if your window is larger.
- Securely install the window kit in your window opening, ensuring a tight seal to prevent air leakage.

Figure 4.1: Window Installation Examples.
Two images show the Gasbye portable AC unit successfully installed with its dual hoses in both a vertical sliding window and a horizontal sliding window, demonstrating its adaptability to different window types.
4.2 Hose Connection
The Gasbye CoolPrime 10000 utilizes a dual-hose system for enhanced cooling efficiency. Both intake and exhaust hoses are 5.9 inches in diameter and 59 inches in length.
- Connect the intake hose to the designated inlet on the unit and the window kit.
- Connect the exhaust hose to the designated outlet on the unit and the window kit.
- Ensure both hoses are securely attached and free from kinks or obstructions.
Important Note: We do not recommend using extension hoses, as they can increase resistance to heat dissipation and reduce the unit's cooling performance. If your window is higher than the hose length allows, consider placing the AC unit on a small, sturdy table or stand to raise its height.

Figure 4.2: Dual Hose vs. Single Hose Design.
This image illustrates the difference between a dual-hose portable AC and a single-hose portable AC. The dual-hose system (Gasbye) uses outdoor air to cool the compressor, preserving indoor cool air and maintaining balanced indoor pressure. The single-hose system uses indoor air, which can cause negative pressure and draw in hot outdoor air, making it less efficient.
5. Operating Instructions
Your Gasbye portable AC offers various modes and settings for optimal comfort.
5.1 Power On/Off
Press the Power button on the control panel or remote control to turn the unit on or off. When powered off, the top vent will close to prevent dust accumulation.
5.2 Mode Selection
Press the Mode button to cycle through available modes:
- Cool Mode: Provides powerful cooling.
- Dehumidifier Mode: Removes excess moisture from the air.
- Fan Mode: Circulates air without cooling.
- Inverter Mode: Reduces compressor frequency to 50% load for quiet operation (approx. 45dB), ideal for nighttime.
- Turbo Mode: Provides maximum cooling power for rapid temperature reduction, suitable for daytime use.
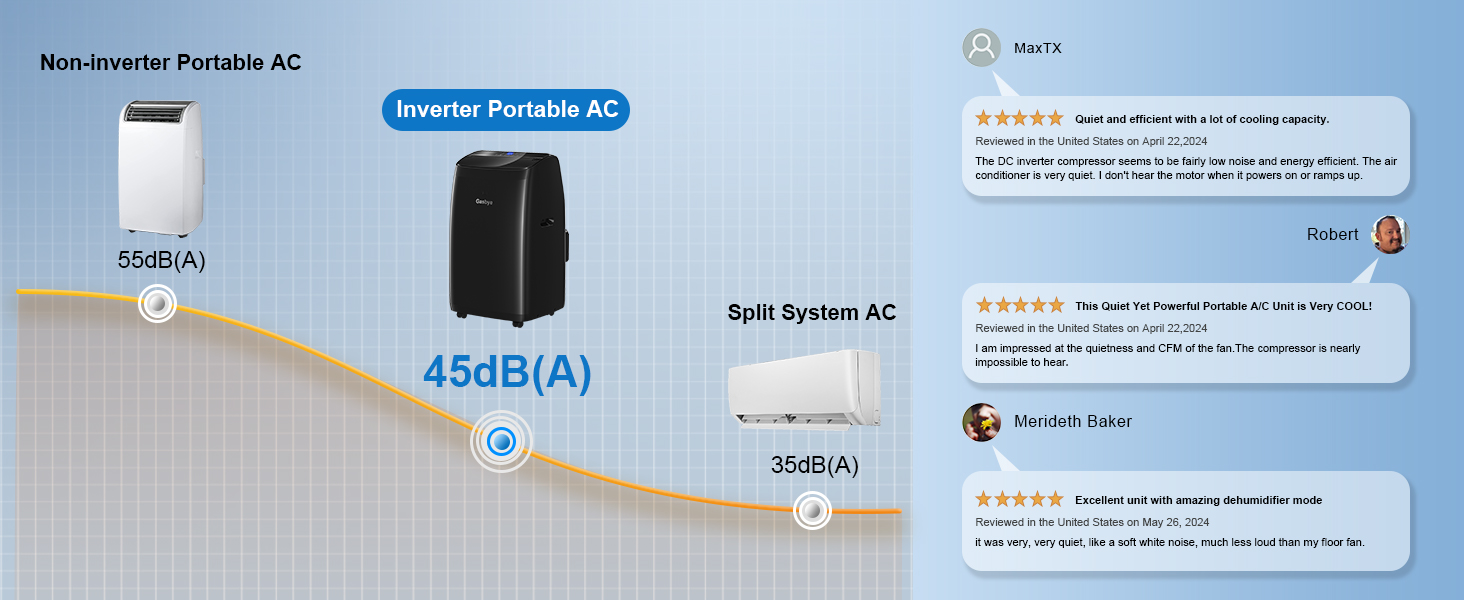
Figure 5.1: Inverter Mode vs. Turbo Mode.
This image visually compares the Inverter Mode, which downshifts to 50% capacity for silent 45dB nights, with the Turbo Mode, which upscales to 100% capacity for intense daytime cooling. This illustrates the unit's adaptive cooling capabilities.
5.3 Temperature Setting
Use the Up and Down arrows on the control panel or remote to set your desired temperature (range: 60°F - 90°F).
5.4 Fan Speed Adjustment
Press the Fan Speed button to select between High, Mid, Low, or Auto fan speeds.
5.5 Timer Function
Set a timer for automatic power on or off using the Timer button on the remote control.
5.6 Sleep Mode
Activate Sleep Mode for quiet operation during the night, which automatically adjusts settings for comfortable sleep.
6. Maintenance
Regular maintenance ensures the longevity and efficiency of your air conditioner.
6.1 Filter Cleaning
Clean the air filter every two weeks or more frequently depending on usage and air quality. A dirty filter can reduce cooling efficiency.
- Unplug the unit from the power outlet.
- Remove the air filter from the back of the unit.
- Wash the filter with warm, soapy water. Rinse thoroughly.
- Allow the filter to air dry completely before reinstalling.
6.2 Drainage
In most cases, the portable AC unit features auto-evaporation, meaning manual drainage is not required. However, if humidity exceeds 85% RH and the room is not sealed, continuous moisture from outside may exceed the unit's capacity, requiring manual drainage.
The unit includes an additional drainage outlet positioned higher on the back for easier access compared to bottom outlets found on many portable ACs.
- Unplug the unit.
- Place a shallow pan or container under the drainage outlet.
- Remove the drain plug to allow water to flow out.
- Once drained, replace the drain plug securely.
7. Troubleshooting
Before contacting customer support, please refer to the following common issues and solutions:
| Problem | Possible Cause | Solution |
|---|---|---|
| Unit does not turn on. | No power, power cord unplugged, circuit breaker tripped. | Check power connection, reset circuit breaker. |
| Unit does not cool effectively. | Dirty air filter, blocked air inlets/outlets, room too large, windows/doors open, direct sunlight. | Clean filter, clear obstructions, ensure room is sealed, close blinds/curtains. |
| Unit is noisy. | Unit not level, fan speed too high. | Place on a flat, stable surface. Select a lower fan speed or Inverter Mode. |
| Water leakage. | Drain plug not secure, high humidity exceeding auto-evaporation. | Ensure drain plug is tight. Perform manual drainage if necessary. |
8. Specifications
| Feature | Detail |
|---|---|
| Brand | Gasbye |
| Model Number | CoolPrime 10000 |
| Cooling Capacity (ASHRAE) | 14,000 BTU |
| Cooling Capacity (SACC) | 10,500 BTU |
| CEER Rating | 13.6 |
| Noise Level | 45 dB |
| Coverage Area | Up to 500 Sq.Ft. |
| Product Dimensions (D x W x H) | 15.5" x 17.7" x 29.3" |
| Item Weight | 65 pounds |
| Voltage | 115 Volts |
| Wattage | 1290 watts |
| Hose Diameter | 5.9 inches |
| Hose Length | 59 inches |
| Included Components | Window Vent Kits, Air Exhaust and Intake Hose Assembly, Backlit Remote Control |
9. Warranty and Support
9.1 Warranty Coverage
Gasbye offers a 3-Year Quality Coverage for this portable air conditioner. If the product does not meet your expectations based on the listing statement after use, you may contact Gasbye Support for a full refund or a free replacement. All replacement units provided are brand new, not refurbished.
For detailed warranty terms and conditions, please refer to the official Warranty PDF.
9.2 Customer Support
For any questions, technical assistance, or warranty claims, please contact Gasbye Customer Support. We are committed to providing excellent service and stand behind our products with confidence.
You can find more information and contact details by visiting the Gasbye Store on Amazon.
