1. Introduction
Thank you for choosing the MayBest 64GB Magnetic Digital Voice Recorder. This compact and versatile device is designed for high-quality audio recording in various environments, from lectures and meetings to personal notes. Featuring smart voice activation, advanced noise reduction, and a strong magnetic absorption, it offers convenience and clarity. This manual provides detailed instructions to help you get the most out of your new voice recorder.
2. Safety Information
- Do not expose the device to extreme temperatures, direct sunlight, or high humidity.
- Avoid dropping or subjecting the device to strong impacts.
- Keep the device away from water and other liquids.
- Do not attempt to disassemble or repair the device yourself. This will void the warranty.
- Use only the provided USB cable for charging and data transfer.
- Store the device in a clean, dry place when not in use.
3. Package Contents
Please check the package for the following items:
- 1 x MayBest Digital Voice Recorder (64GB)
- 1 x Headphones
- 1 x USB Cable (Type-C)
- 1 x Charging Cable
- 1 x User Manual
4. Product Overview
Familiarize yourself with the components of your MayBest Digital Voice Recorder:

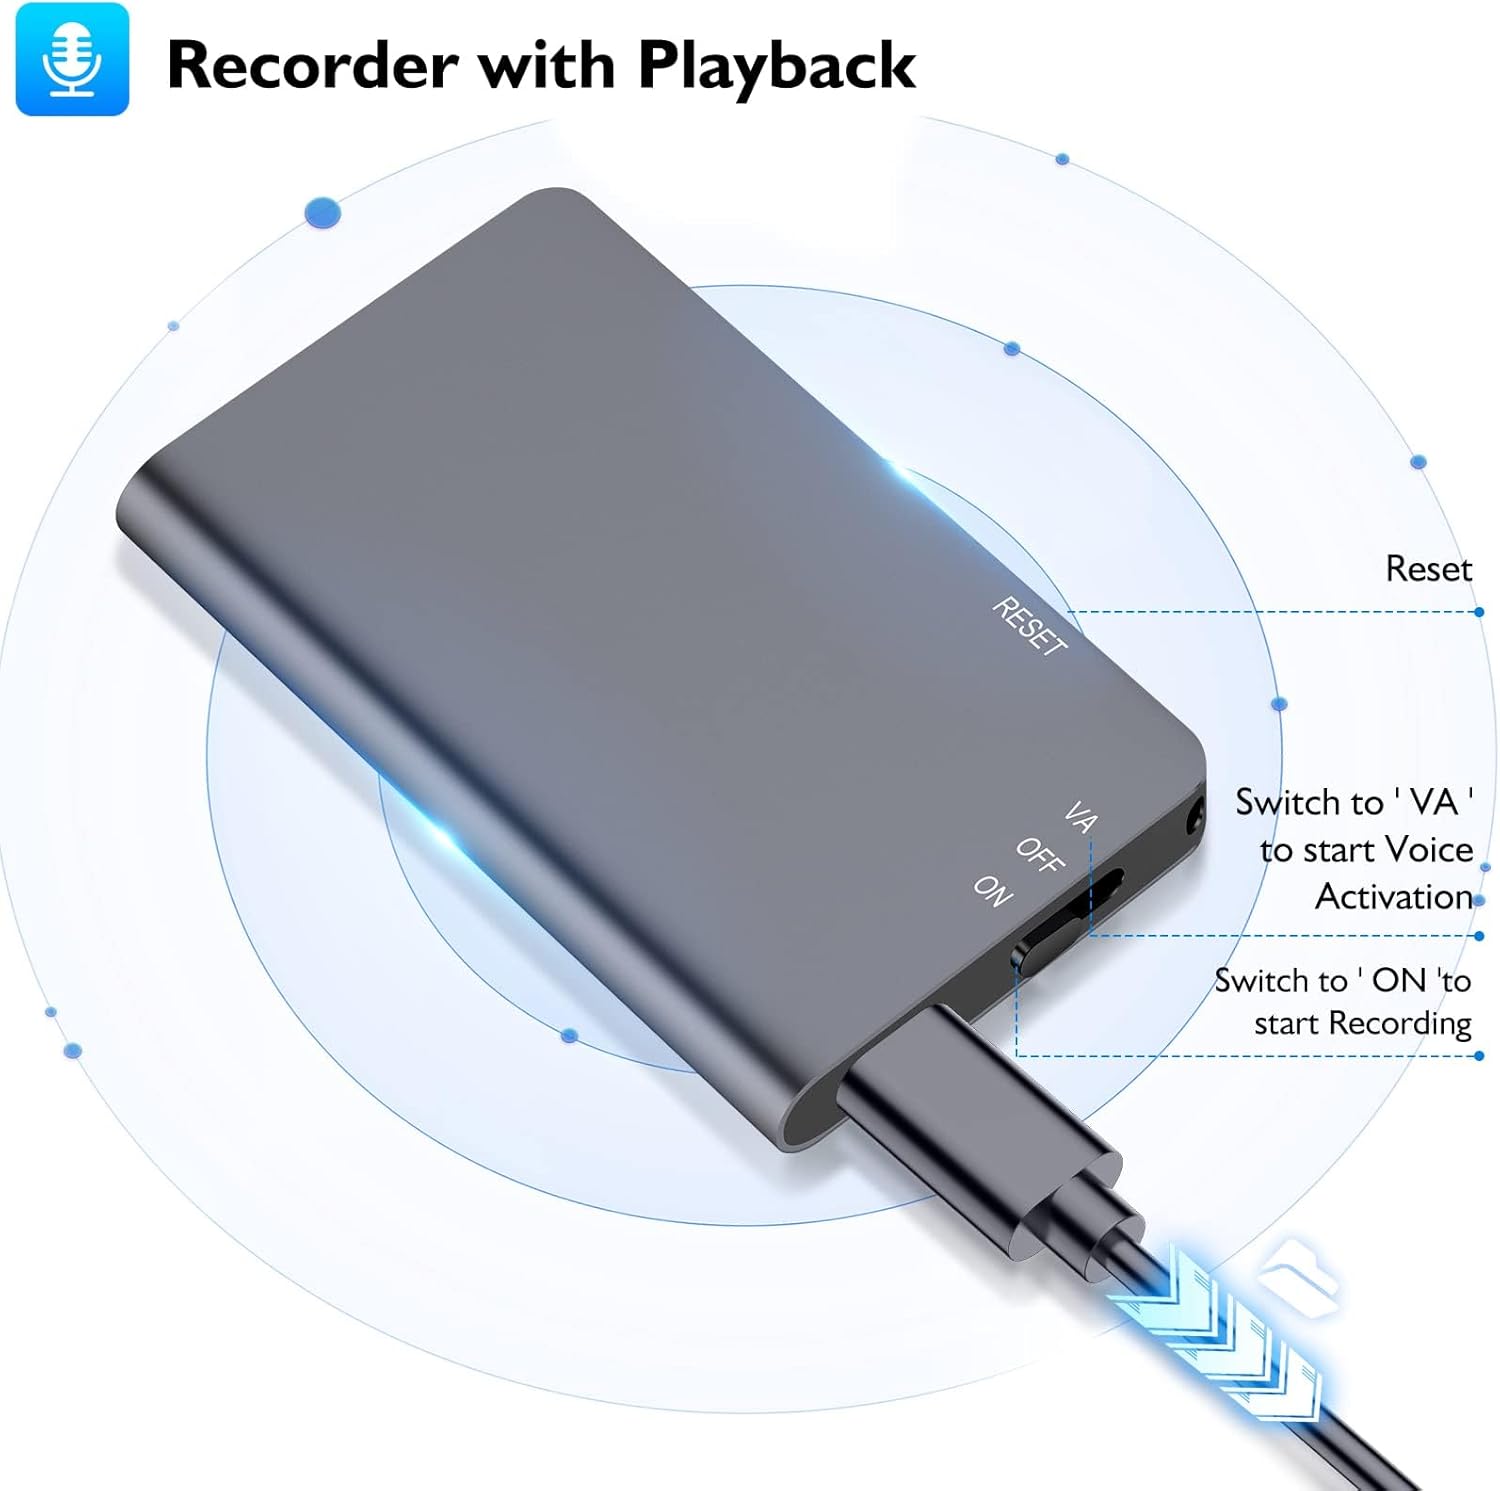
- ON/OFF/VA Switch: Controls power and recording mode.
- RESET Button: Used to reset the device if it becomes unresponsive.
- USB-C Port: For charging the device and connecting to a computer or mobile phone for file transfer.
- Headphone Jack: For connecting headphones to listen to recordings.
- Built-in Microphone: Captures audio.
- Magnetic Back: Allows the recorder to be attached to metal surfaces.
5. Setup
5.1 Charging the Device
Before first use, fully charge the voice recorder. A full charge takes approximately 2 hours and provides up to 40 hours of continuous recording or 15 hours of playback.
- Connect the provided charging cable to the USB-C port on the recorder.
- Plug the other end of the cable into a USB power adapter (not included) or a computer's USB port.
- The indicator light will show charging status (refer to device specific light behavior, typically solid while charging, off when full).

5.2 Connecting to Computer/Phone
The recorder can be connected to a computer or compatible mobile phone (with OTG function) to manage recorded files.

- Ensure the recorder is powered off.
- Connect the recorder to your computer or phone using the provided USB-C cable.
- The device will appear as a removable disk drive. You can then access and manage your recording files (WAV format).
6. Operating Instructions
6.1 Basic Recording
To start a continuous recording:
- Slide the ON/OFF/VA switch to the "ON" position.
- The device will begin recording immediately.
- To stop and save the recording, slide the switch to the "OFF" position.
6.2 Voice Activated Recording (VAR)
The voice-activated recording feature saves storage space by only recording when sound is detected (above 50dbs).


- Slide the ON/OFF/VA switch to the "VA" position.
- The device will enter voice-activated recording mode. It will automatically start recording when sound is detected and pause/save when there is silence.
- To stop and save the recording, slide the switch to the "OFF" position.

6.3 Playback
To listen to your recordings:

- Connect the provided headphones to the headphone jack on the recorder.
- Slide the ON/OFF/VA switch to the "ON" position. The device will automatically begin playing the most recent recording.
- To navigate between files or control playback, refer to the detailed instructions in the full user manual (PDF link provided in product listing).
6.4 File Management
All recording files are named with a timestamp (e.g., RYYYY-MM-DD-HH-MM-SS.WAV), making it easy to locate and manage them on your computer or mobile device.

7. Maintenance
- Clean the device with a soft, dry cloth. Do not use liquid cleaners or aerosols.
- Avoid blocking the microphone opening during use.
- Regularly back up your important recordings to a computer or cloud storage.
- If the device will not be used for an extended period, charge it periodically to maintain battery health.
8. Troubleshooting
| Problem | Possible Cause | Solution |
|---|---|---|
| Device does not turn on. | Low battery; device frozen. | Charge the device. Press the RESET button with a thin object. |
| Cannot record. | Memory full; switch in wrong position. | Delete old files to free space. Ensure switch is on "ON" or "VA". |
| Poor recording quality. | Microphone obstructed; excessive background noise; too far from sound source. | Ensure microphone is clear. Reduce background noise. Place recorder closer to sound source. |
| Cannot connect to computer. | Faulty cable; incorrect port; driver issue. | Try a different USB port or cable. Ensure device is powered off before connecting. |
| Voice Activated Recording not working as expected. | Sound level too low; switch not in VA position. | Ensure ambient sound is above 50dbs. Verify switch is in "VA" position. |
9. Specifications
- Model: L810
- Storage Capacity: 64GB (up to 768 hours of recording)
- Battery: Built-in 400mAh rechargeable Lithium Ion battery
- Battery Life: Up to 40 hours recording, 15 hours playback
- Charging Time: Approximately 2 hours
- Recording Format: WAV
- Dimensions: 2.16 x 1.37 x 0.39 inches (5.49 x 3.48 x 0.99 cm)
- Weight: 0.5 oz (14.17 grams)
- Connectivity: USB 3.0 Type-C
- Features: Voice Activated Recording, Noise Reduction, Magnetic Absorption, Playback, MP3 Player function, U disk storage

10. Warranty and Support
MayBest products come with a standard manufacturer's warranty. For specific warranty details, please refer to the warranty card included in your package or contact MayBest customer service.
If you encounter any issues or have questions about your MayBest Digital Voice Recorder, please contact our customer support team via Amazon's messaging system. We are committed to providing excellent customer service and will address your concerns promptly.
Note: Please retain your purchase receipt for warranty claims.


