
MHPRO MLUK-DZL00030
MHPRO Cordless Drill Set 21V User Manual
Model: MLUK-DZL00030
1. Product Overview
The MHPRO 21V Cordless Drill Set is a versatile power tool designed for various DIY and professional tasks. It features a powerful motor, long-lasting lithium-ion batteries, and multiple operating modes to handle drilling, screwing, and hammer drilling applications across different materials.

Figure 1.1: MHPRO 21V Cordless Drill Set and included accessories.
2. Safety Instructions
Always observe basic safety precautions when using electrical tools to reduce the risk of fire, electric shock, and personal injury.
- Work Area Safety: Keep your work area clean and well-lit. Cluttered or dark areas invite accidents. Do not operate power tools in explosive atmospheres, such as in the presence of flammable liquids, gases, or dust.
- Electrical Safety: Avoid body contact with earthed or grounded surfaces (e.g., pipes, radiators, ranges, refrigerators). Do not expose power tools to rain or wet conditions.
- Personal Safety: Always wear eye protection and appropriate safety gear. Use hearing protection when operating the drill for extended periods. Dress properly; avoid loose clothing or jewelry.
- Tool Use and Care: Do not force the power tool. Use the correct power tool for your application. Disconnect the battery pack from the power tool before making any adjustments, changing accessories, or storing power tools.
- Battery Pack Use and Care: Recharge only with the charger specified by the manufacturer. Do not disassemble the battery pack. Do not short-circuit the battery pack.
3. Package Contents
Verify that all items listed below are included in your package:
- 1 x Cordless Drill
- 2 x 2.0Ah Li-ion Batteries
- 1 x Charger
- 1 x Carry Case
- 1 x User Manual
- 5 x Brad Point Drill Bits (Ø5/6/10/12/14mm)
- 2 x Twist Drill Bits (Ø5/6mm)
- 2 x Impact Drill Bits (Ø5/6mm)
- 3 x 5cm Screwdriver Bits (Ø6.3mm)
- 1 x Flexible Drill Shaft
- 1 x Hex Screwdriver Holder
- 1 x Belt Clip
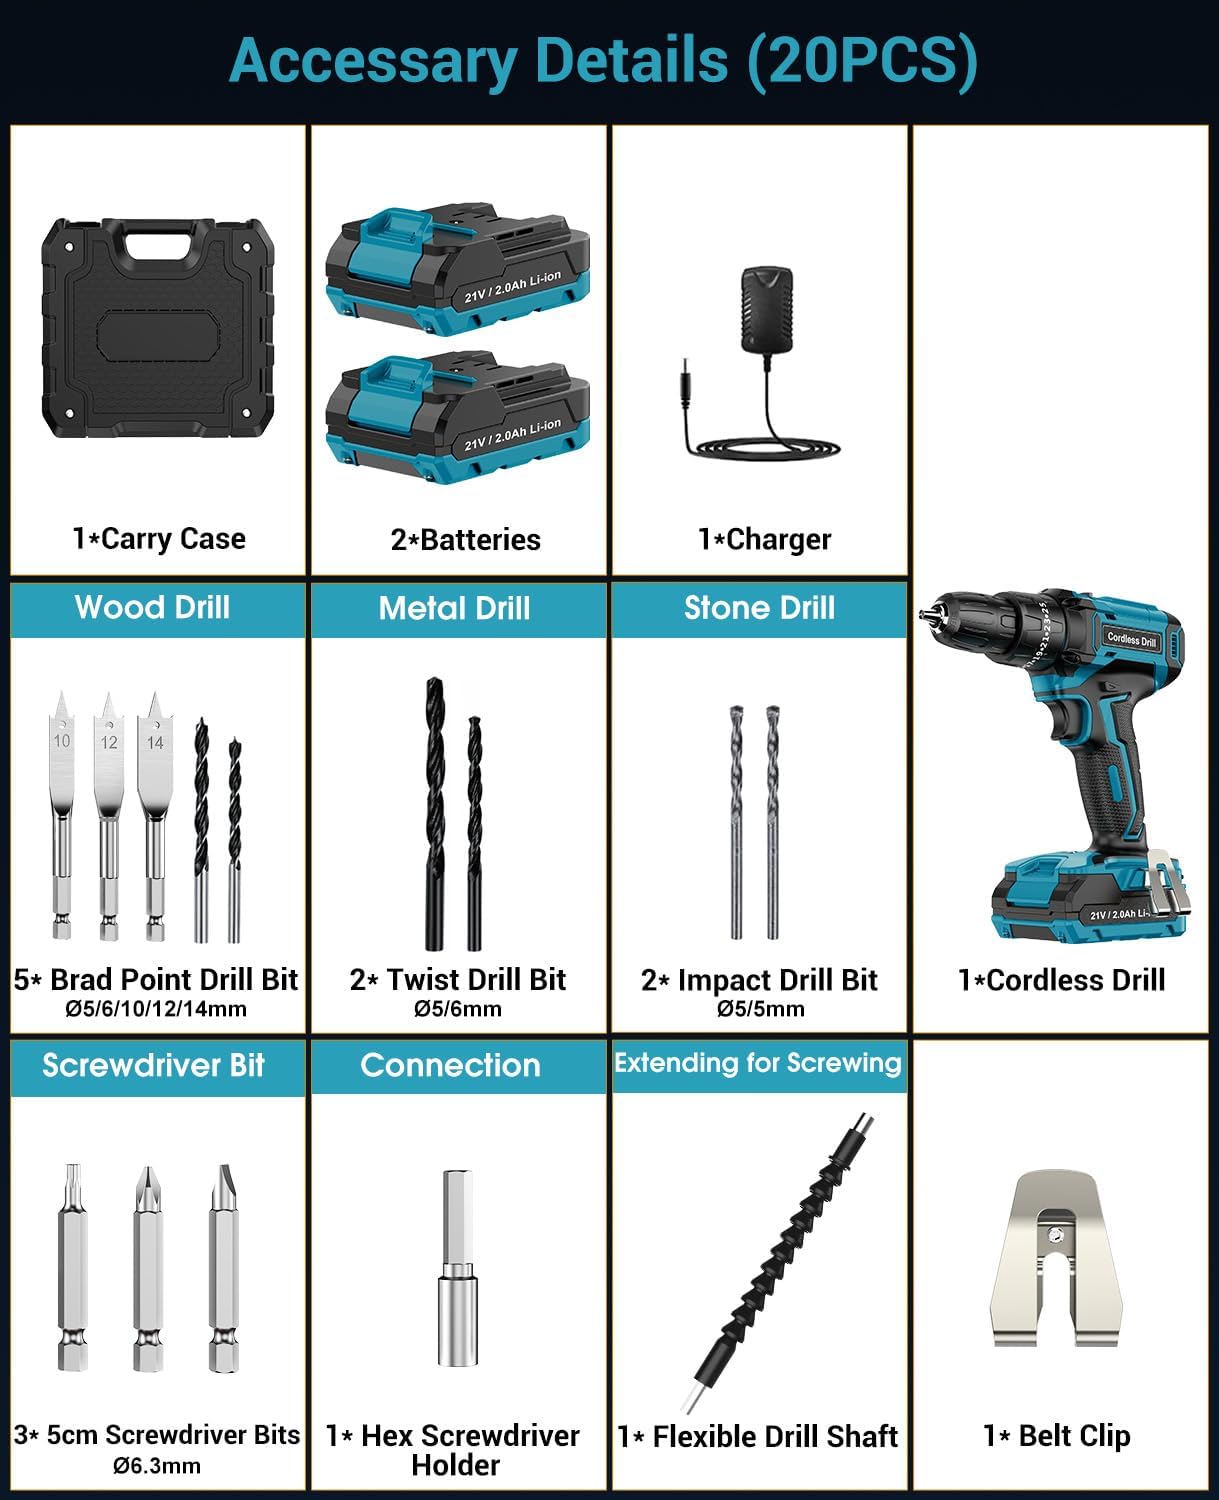
Figure 3.1: Visual representation of all components included in the MHPRO Cordless Drill Set package.
4. Product Features
4.1. 3-in-1 System & Torque Control
The MHPRO cordless drill driver offers three distinct working modes: screwing, drilling, and hammer drilling. With a maximum torque of 42N.m and 25+3 torque positions, it provides precise control for various materials including wood, metal, plastic, and masonry.

Figure 4.1.1: Mode selector for screwing, drilling, and hammer drilling functions.

Figure 4.1.2: The drill's capability to easily penetrate various materials.
4.2. Dual 2.0Ah Li-ion Batteries & Indicator
Equipped with two 2.0Ah large capacity Li-ion batteries, ensuring extended operation time. Each battery fully charges in approximately 90 minutes. A built-in power indicator light displays the current battery status.

Figure 4.2.1: The drill set includes two batteries and a fast charger.
4.3. 2-Speed Gearbox & Chuck
The drill features two speed ranges: 0-550 RPM for screw driving and 0-1850 RPM for drilling, allowing optimal performance for different tasks. The 3/8" (10mm) auto-lock chuck facilitates quick and easy bit changes.

Figure 4.3.1: Illustration of the two-speed gearbox for varied applications.
4.4. Ergonomic Design & LED Light
Designed with a shock absorber and soft rubber over-mold handle for maximum user comfort and reduced vibration. A built-in LED light illuminates the work area, improving visibility in dark environments. The lightweight design and included belt clip enhance portability and ease of use.

Figure 4.4.1: The integrated LED light provides illumination for working in low-light conditions.

Figure 4.4.2: The compact and lightweight design allows for use in confined areas.
5. Setup
5.1. Charging the Battery
- Connect the charger to a standard power outlet.
- Insert the battery pack into the charger. Ensure it clicks into place.
- The charging indicator light on the battery or charger will show the charging status. A full charge typically takes 90 minutes.
- Once fully charged, remove the battery from the charger.
5.2. Installing/Removing the Battery
- To Install: Align the battery pack with the slot in the base of the drill handle. Slide the battery into the handle until it locks securely into place with a click.
- To Remove: Press the battery release button (usually located on the front or sides of the battery pack) and slide the battery out of the handle.
5.3. Installing/Removing Drill Bits
- To Install: Rotate the chuck counter-clockwise to open the jaws. Insert the desired drill bit or screwdriver bit into the chuck. Rotate the chuck clockwise to tighten the jaws securely around the bit. Ensure the bit is centered and firmly held.
- To Remove: Rotate the chuck counter-clockwise to loosen the jaws and pull the bit out.
6. Operation
6.1. Selecting Operating Mode
Rotate the mode selector ring, located behind the chuck, to choose one of the three modes:
- Screwing Mode (Screw icon): For driving or removing screws.
- Drilling Mode (Drill bit icon): For drilling holes in wood, metal, and plastic.
- Hammer Drilling Mode (Hammer icon): For drilling into masonry and concrete.
6.2. Adjusting Torque Settings
In screwing mode, rotate the torque adjustment ring (numbered 1-25) to select the desired torque level. Lower numbers are for smaller screws or softer materials, higher numbers for larger screws or harder materials. The "Drill" setting bypasses the clutch for maximum torque in drilling applications.
6.3. Selecting Speed
Use the speed selector switch on top of the drill to choose between two speed ranges:
- Low Speed (0-550 RPM): Ideal for screw driving and applications requiring high torque.
- High Speed (0-1850 RPM): Suitable for drilling and applications requiring faster rotation.
6.4. Forward/Reverse Rotation
The forward/reverse button, located above the trigger, controls the direction of rotation. Push it to the left for forward (clockwise) rotation and to the right for reverse (counter-clockwise) rotation. Center position locks the trigger for safety.
6.5. Operating the Trigger and LED Light
Squeeze the variable speed trigger to start the drill. The speed increases as you press the trigger further. The built-in LED light automatically illuminates the work area when the trigger is pressed.

Figure 6.5.1: Key operational controls of the MHPRO Cordless Drill.
7. Maintenance
- Cleaning: Regularly clean the ventilation slots of the drill to prevent overheating. Use a soft, damp cloth to wipe down the exterior. Do not use harsh chemicals or abrasive cleaners.
- Battery Care: Store batteries in a cool, dry place away from direct sunlight. Do not store fully discharged batteries for extended periods. Charge them periodically if not in use.
- Bit Maintenance: Keep drill bits clean and sharp for optimal performance. Replace worn or damaged bits promptly.
- Storage: When not in use, store the drill and its accessories in the provided carry case, in a dry, secure location out of reach of children.
8. Troubleshooting
| Problem | Possible Cause | Solution |
|---|---|---|
| Drill does not start. | Battery not charged or not properly installed. Trigger lock engaged. | Charge battery fully and ensure it is securely installed. Disengage the forward/reverse switch from the center (locked) position. |
| Loss of power during operation. | Battery charge is low. Overload protection activated. | Recharge the battery. Reduce pressure on the drill or use a sharper bit. Allow the tool to cool down if it feels hot. |
| Bit wobbles or falls out. | Chuck not tightened sufficiently. Bit shank is dirty or damaged. | Ensure the chuck is tightened firmly. Clean the bit shank or replace the bit if damaged. |
| Drill overheats. | Continuous heavy use. Blocked ventilation slots. | Allow the drill to cool down. Clean any debris from the ventilation slots. Avoid prolonged heavy-duty use. |
9. Specifications
| Attribute | Value |
|---|---|
| Model Number | MLUK-DZL00030 |
| Voltage | 21 Volts |
| Battery Capacity | 2000 mAh (2.0Ah) |
| Battery Type | Lithium Ion |
| Max Torque | 42 N.m |
| Torque Settings | 25 + 3 (Drill, Screw, Hammer) |
| No-Load Speed (Low) | 0-550 RPM |
| No-Load Speed (High) | 0-1850 RPM |
| Chuck Size | 3/8" (10mm) Keyless Chuck |
| Product Dimensions | 29 x 27 x 12.5 cm |
| Item Weight | 1.3 kg |
| Power Source | Battery Powered |
| Special Features | Reverse Rotation, Variable Speed, Cordless, Rechargeable, Keyless Chuck, LED Light |
10. Warranty and Support
MHPRO provides a 24-month after-sale service for this product. If you encounter any issues or have questions regarding your MHPRO Cordless Drill Set, please do not hesitate to contact our customer support. Please refer to your purchase documentation for specific contact details or visit the official MHPRO website for support information.

Figure 10.1: MHPRO customer support is available to assist with product inquiries.
Ask a question about this manual
Ask about setup, troubleshooting, compatibility, parts, safety, or missing instructions. Manuals+ will review the question and use this page’s manual context to help answer it.