
1. Introduction
This manual provides essential instructions for the safe and effective operation, setup, and maintenance of your Genmitsu 1HP 65mm Palm Trimmer Router and the accompanying 1/4 inch CNC Spoilboard Surfacing Router Bit. Please read this manual thoroughly before using the product to ensure proper function and to prevent injury.
The Genmitsu Palm Trimmer Router is a versatile woodworking tool designed for various applications such as trimming, grooving, chamfering, and more. The included 1/4 inch CNC Spoilboard Surfacing Router Bit is specifically designed for flattening and surfacing large areas with precision.

Figure 1: Genmitsu 1HP Palm Trimmer Router and 1/4 inch CNC Spoilboard Surfacing Router Bit. This image displays the Genmitsu 1HP Palm Trimmer Router alongside the included 1/4 inch CNC Spoilboard Surfacing Router Bit, showcasing the complete package.
2. Safety Instructions
Always follow basic safety precautions when using electrical tools to reduce the risk of fire, electric shock, and personal injury.
- Read All Instructions: Familiarize yourself with the tool's operation and safety guidelines.
- Wear Eye Protection: Always wear safety goggles to protect against flying debris.
- Secure Workpiece: Ensure your workpiece is clamped or otherwise secured to prevent movement during operation.
- Maintain a Clean Work Area: Cluttered areas invite accidents.
- Avoid Dangerous Environments: Do not use power tools in damp or wet locations, or expose them to rain.
- Keep Children Away: All visitors should be kept at a safe distance from the work area.
- Dress Properly: Do not wear loose clothing or jewelry. Contain long hair.
- Use the Right Tool: Do not force a small tool or attachment to do the job of a heavy-duty tool.
- Disconnect Power: Always disconnect the tool from the power source before making adjustments, changing accessories, or storing.
- Inspect for Damage: Before each use, check for damaged parts. Do not use if any part is compromised.
- Overheat Protection: The router is equipped with overheat protection. If the motor shuts off automatically, allow it to cool down before resuming operation.
3. Product Overview
Understand the main components of your Genmitsu Palm Trimmer Router for effective and safe use.

Figure 2: Labeled components of the Genmitsu Palm Trimmer Router. A detailed view of the Genmitsu router highlighting key components: the ON/OFF switch, cam lock for base adjustment, fine gear adjustment for depth, and the transparent fixed base.
- Switch ON/OFF: Controls the power to the motor.
- Cam Lock: Secures the router base at the desired depth setting.
- Fine Gear Adjustment: Allows for precise depth adjustments for accurate routing.
- Transparent Fixed Base: Provides a clear view of the workpiece and router bit during operation.
4. Setup
4.1 Unpacking and Contents
Carefully unpack all components and verify that all items are present:
- Genmitsu 1HP Palm Trimmer Router
- 1/4 inch CNC Spoilboard Surfacing Router Bit
- 1/4 inch Collet (pre-installed or included separately)
- Straight Guide
- Trimmer Guide
- Wrenches for bit installation
- User Manual
4.2 Installing the Router Bit
Follow these steps to safely install the router bit:
- Ensure the router is unplugged from the power source.
- Use the provided wrenches to loosen the chuck nut.
- Insert the router bit into the collet, ensuring it is seated firmly but not bottomed out.
- Tighten the chuck nut securely with the wrenches. Do not overtighten.

Figure 3: Step-by-step guide for installing a router bit. A visual guide detailing the three steps for installing a router bit: loosening the chuck with wrenches, inserting the bit, and tightening the chuck securely.
4.3 Attaching Guides
The router comes with a straight guide and a trimmer guide for various applications.
- Straight Guide: Used for routing along a straight edge. Attach it to the router base using the provided screws and adjust its position as needed.
- Trimmer Guide: Ideal for following curved edges or templates. Secure it to the router base and adjust the roller position to match your workpiece.

Figure 4: Genmitsu router with straight guide and trimmer guide attachments. This image shows the Genmitsu router equipped with both the straight guide and the trimmer guide, demonstrating how these accessories are used for various routing tasks.
5. Operating Instructions
5.1 Basic Operation
- Set Depth: Loosen the cam lock, adjust the router bit to the desired depth using the fine gear adjustment, and then secure the cam lock.
- Power On: Plug the router into a suitable power outlet. Hold the router firmly and press the ON/OFF switch to start the motor.
- Routing: Guide the router smoothly along your workpiece. Always move the router against the direction of bit rotation for optimal control and cut quality.
- Power Off: Release the ON/OFF switch to stop the motor. Wait for the bit to come to a complete stop before setting the tool down.
5.2 Applications
The Genmitsu Palm Trimmer Router is suitable for a wide range of woodworking tasks:
- Wood Trimming: For precise edge finishing.
- Furniture Production: Creating joints, decorative edges, and more.
- DIY Projects: General woodworking tasks for hobbyists.
- CNC Milling: Can be integrated into a CNC machine (requires a 65mm spindle holder).
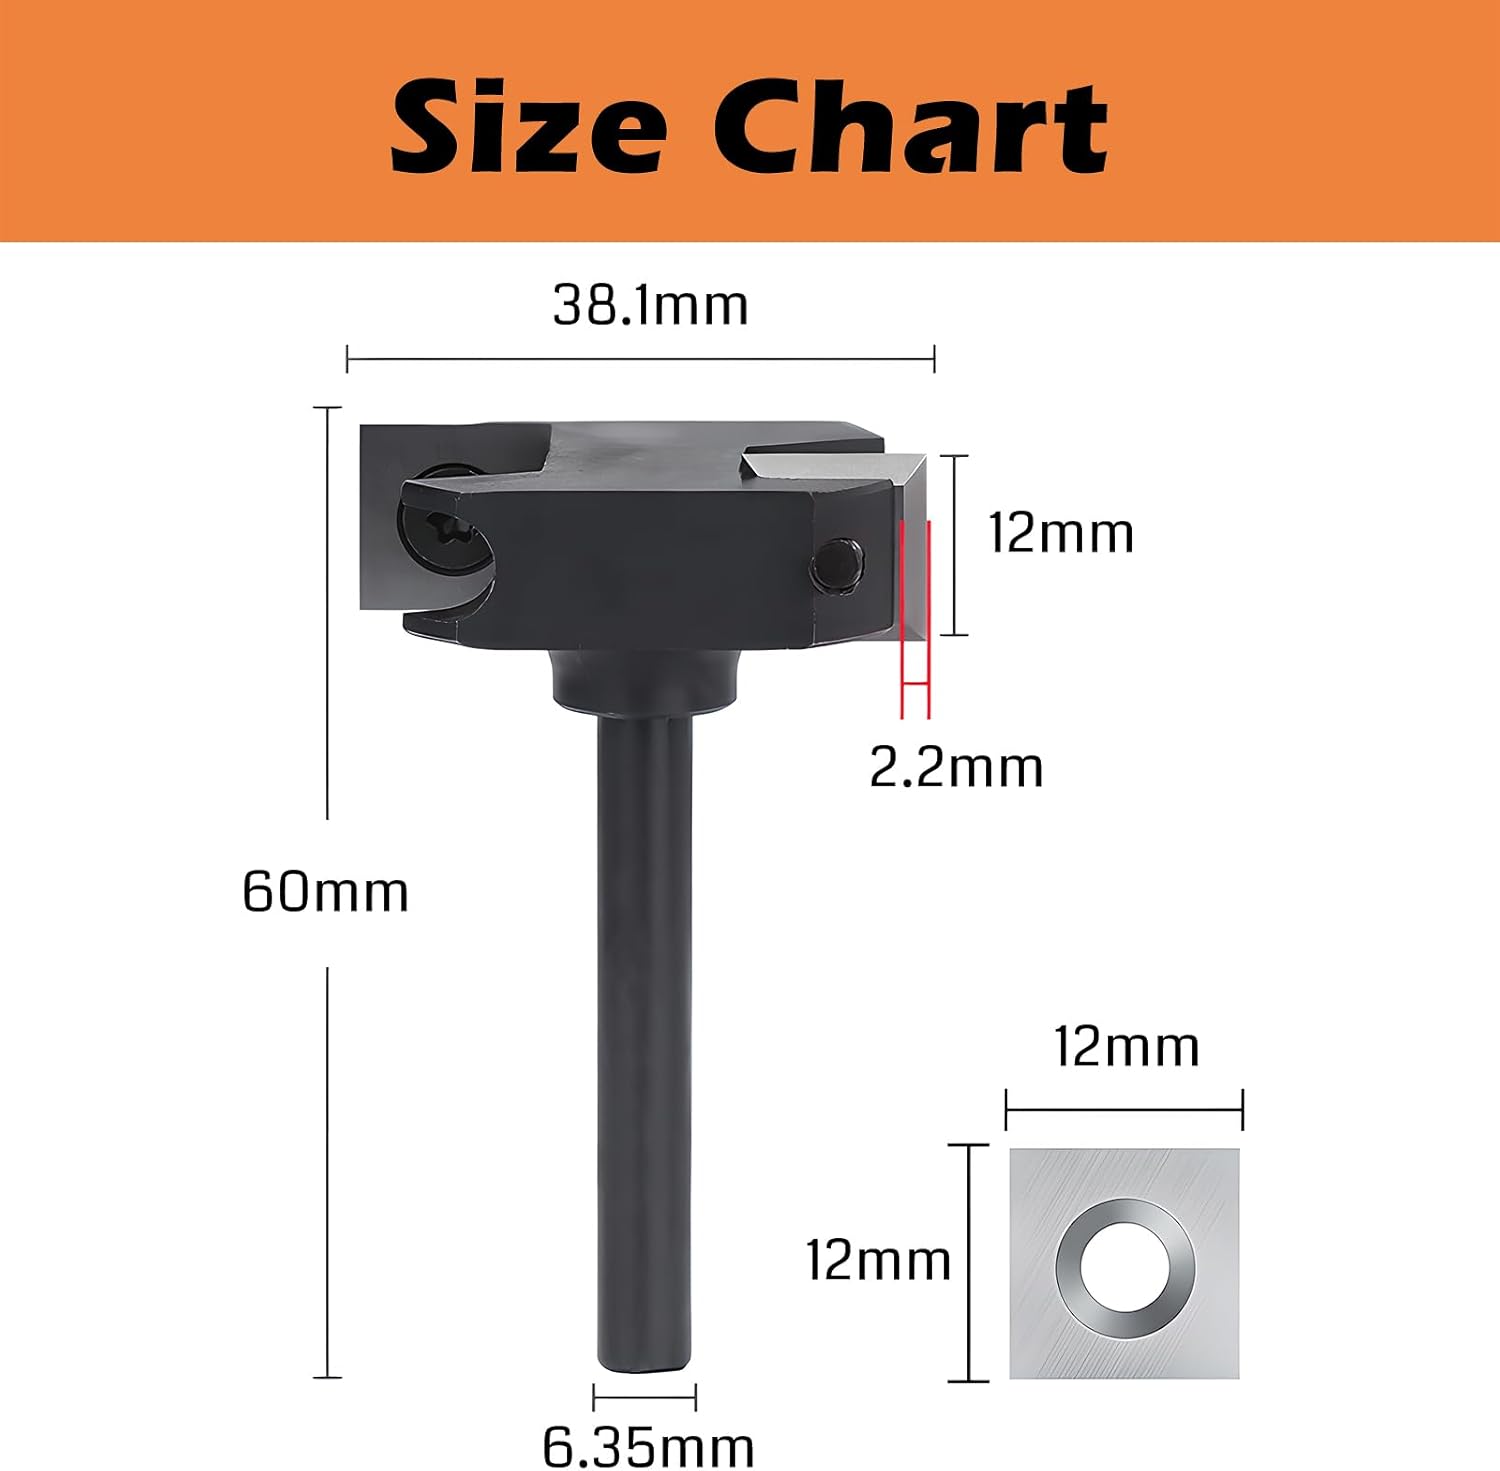
Figure 5: Various applications of the Genmitsu Palm Trimmer Router. This collage showcases the versatility of the Genmitsu router in different woodworking scenarios, including wood trimming, furniture production, general DIY projects, and CNC milling.
5.3 Using the 1/4 inch CNC Spoilboard Surfacing Router Bit
This specific bit is designed for flattening and surfacing operations, particularly on CNC machines or with a router sled.
- Ensure the bit is securely installed and the router is firmly mounted (if using with a CNC).
- Set a shallow depth of cut for each pass to avoid overloading the motor and ensure a smooth finish.
- Overlap passes slightly to ensure complete surface coverage.
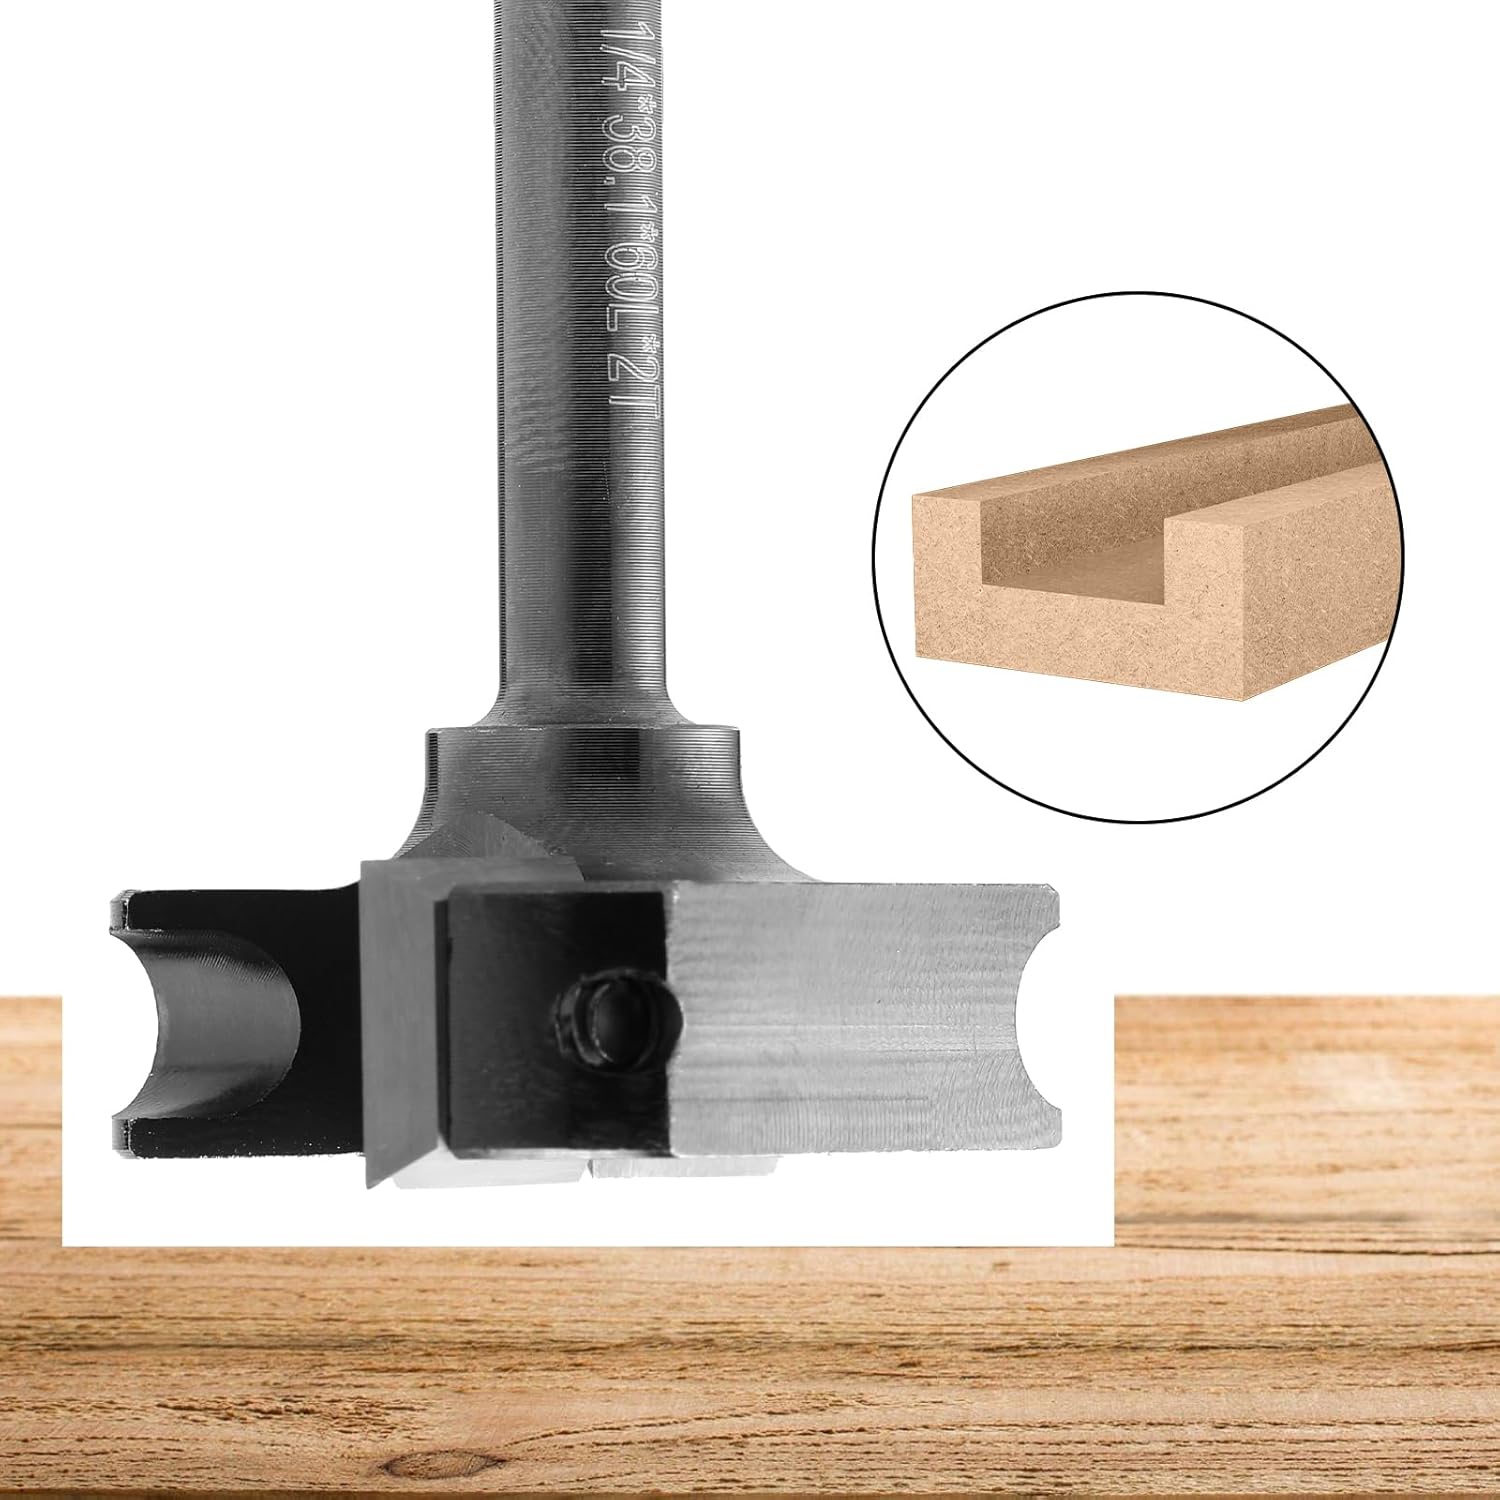
Figure 6: Genmitsu 1/4 inch CNC Spoilboard Surfacing Router Bit in use. A close-up view of the spoilboard surfacing router bit effectively flattening a wooden surface, demonstrating its primary function.
6. Maintenance
6.1 Cleaning
Regular cleaning extends the life of your tool.
- Always unplug the router before cleaning.
- Use a brush or compressed air to remove sawdust and debris from the motor vents and base.
- Wipe down the exterior with a clean, damp cloth. Do not use harsh chemicals.
6.2 Router Bit Maintenance
The 1/4 inch CNC Spoilboard Surfacing Router Bit features replaceable knife inserts.
- When the cutting edges become dull, replace the carbide inserts.
- Use the provided T15 wrench to loosen the screws holding the inserts, replace them with new ones, and tighten securely.

Figure 7: Replaceable knife inserts for the Genmitsu Spoilboard Surfacing Router Bit. This image displays the spoilboard surfacing bit along with its replaceable carbide inserts and the T15 wrench used for changing them, highlighting the ease of maintenance.
7. Troubleshooting
Refer to this section for common issues and their solutions.
| Problem | Possible Cause | Solution |
|---|---|---|
| Router does not start | No power, faulty switch, motor overheat protection activated | Check power connection. Ensure switch is fully engaged. Allow motor to cool down if it recently shut off. |
| Poor cut quality / Rough finish | Dull bit, incorrect feed rate, excessive depth of cut | Replace bit inserts. Reduce feed rate. Decrease depth of cut per pass. |
| Excessive vibration | Loose bit, bent bit, damaged collet | Ensure bit is securely tightened. Inspect bit for damage and replace if necessary. Check collet for wear. |
| Motor overheats frequently | Overloading, blocked ventilation, continuous heavy use | Reduce load/depth of cut. Clear ventilation openings. Allow for cooling periods during extended use. |
8. Specifications
Technical details for the Genmitsu 1HP 65mm Palm Trimmer Router and 1/4 inch CNC Spoilboard Surfacing Router Bit.
8.1 Router Specifications
- Power: 1 HP
- Maximum Rotational Speed: 30,000 RPM
- Collet Diameter: 1/4 inch (included), compatible with 6/25 inch (order separately)
- Base Type: Fixed, Transparent Plastic
- Material: Aluminum, Plastic
- Power Source: Corded Electric
- Overheat Protection: Yes

Figure 8: Dimensions and collet compatibility of the Genmitsu Palm Trimmer Router. The image illustrates the physical dimensions of the Genmitsu Palm Trimmer Router and indicates its compatibility with a 1/4 inch collet (included) and optional 6/25 inch collet.
8.2 Spoilboard Surfacing Router Bit Specifications
- Shank Diameter: 1/4 inch (6.35mm)
- Cut Diameter: 1 inch (25.4mm)
- Maximum RPM: 12,000
- Blade Material: Carbide (replaceable inserts)

Figure 9: Dimensions of the Genmitsu 1/4 inch CNC Spoilboard Surfacing Router Bit. This diagram provides precise measurements for the 1/4 inch CNC Spoilboard Surfacing Router Bit, including shank diameter, cutting diameter, and overall length.
9. Warranty and Support
9.1 Warranty Information
Warranty details for your Genmitsu product are typically provided with the product packaging or can be found on the official Genmitsu website. Please retain your proof of purchase for warranty claims.
9.2 Customer Support
For technical assistance, troubleshooting, or spare parts, please visit the official Genmitsu website or contact their customer support directly. Refer to the product packaging or the Genmitsu website for the most current contact information.