1. Introduction
Thank you for choosing the johgee HCT-378 3-Outlet Watering Computer. This device is designed to automate your garden irrigation, providing flexible and efficient watering for various zones. Please read this manual carefully before installation and operation to ensure proper use and longevity of the product.
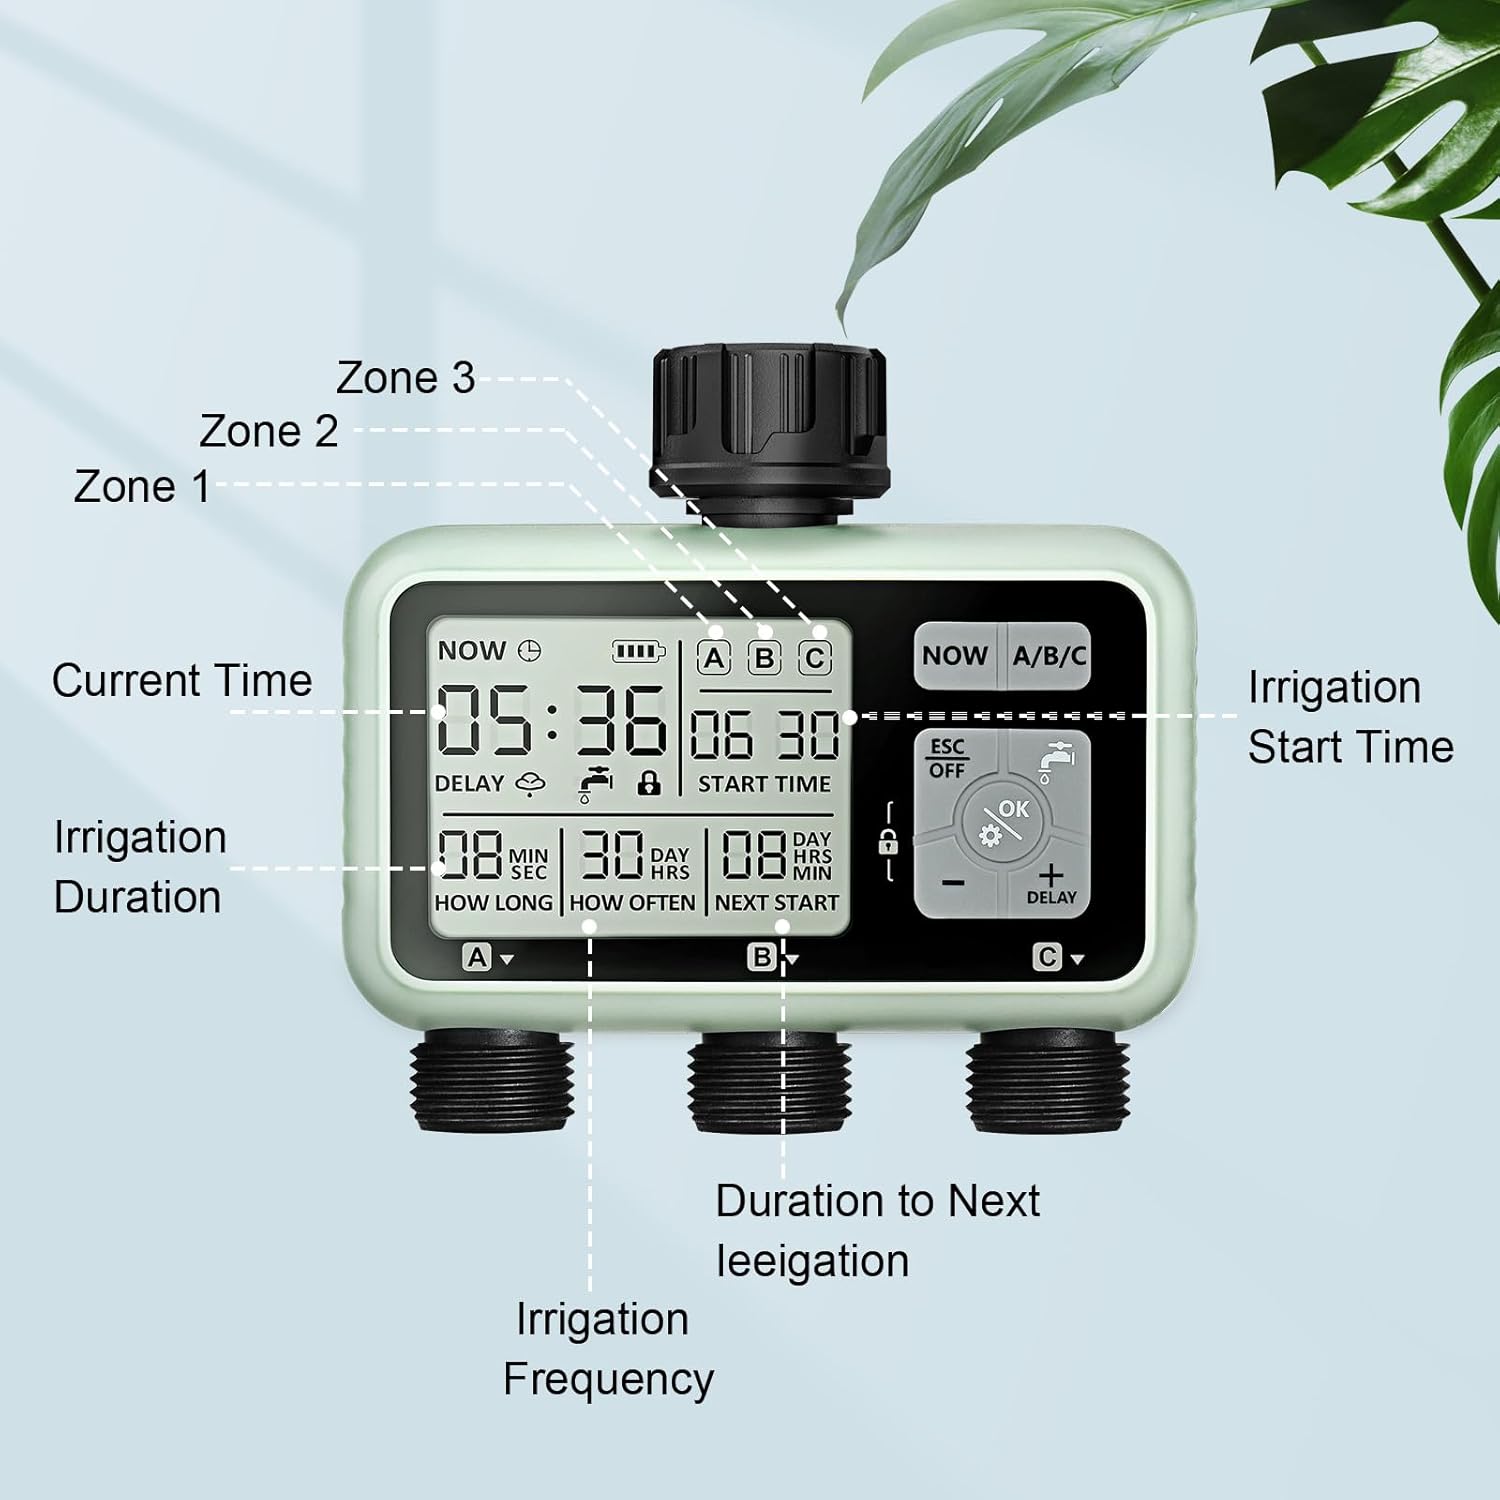
Image 1.1: Overview of the johgee HCT-378 3-Outlet Watering Computer, highlighting its LCD display and three independent watering zones (A, B, C).
2. Product Features
The johgee HCT-378 watering computer offers advanced features for precise and convenient irrigation:
- Flexible Watering Configuration: Features three independently controlled valve outlets (A, B, C). Each outlet's start time, duration (1 second to 360 minutes), and frequency (1 hour to 23 hours, or 1 day to 15 days) can be customized to meet diverse watering needs.
- Smart Watering System: Includes a manual watering mode for immediate irrigation without interrupting scheduled programs. A rain delay function allows you to pause your watering plan for 3 seconds to save water on rainy days.
- Easy Setup and Readability: Equipped with a high-resolution LCD screen for clear visibility. The screen automatically enters an inactive state after 30 seconds of disuse to conserve battery power.
- IPX5 Waterproof and Leak-Free Design: The main connection is reinforced with nylon fiber for enhanced durability compared to plastic or ABS materials. An upgraded aluminum alloy filter effectively prevents valve plug leaks.
- Child Protection and Battery Operation: Features a child lock function to prevent unintended operation by children or pets. Powered by two 1.5V AA batteries (not included), providing over 6 months of operation.

Image 2.1: Visual representation of key features including IPX5 waterproofing, rain delay, regular watering, manual control, LCD display, and child lock.
3. Package Contents
Please check the package for the following items:
- 1 x johgee HCT-378 3-Outlet Watering Computer
- 3 x 3/4 inch Quick Connectors
- 1 x 1/2 inch Female to 3/4 inch Male Reducer
- 1 x Small Roll of PTFE Tape
- 1 x Spare Gasket
- 1 x Instruction Manual
4. Setup Instructions
Follow these steps to set up your watering computer:
- Install Batteries: Open the battery compartment on the back of the device. Insert two 1.5V AA alkaline batteries, ensuring correct polarity. Close the compartment securely to maintain the waterproof seal.
- Connect to Faucet: Screw the watering computer onto your outdoor faucet. Ensure the connection is tight to prevent leaks. Use the provided PTFE tape on the threads if necessary.
- Connect Hoses: Attach your garden hoses or irrigation lines to the three independent outlets (A, B, C) at the bottom of the device. Use the quick connectors if desired.

Image 4.1: Visual guide for the three-step setup process: battery installation, timer programming, and faucet connection.
5. Operating Instructions
The watering computer features an intuitive interface for programming and control.
5.1. LCD Display Overview
The LCD screen provides all necessary information at a glance:
- Current Time: Displays the current time.
- Battery Indicator: Shows remaining battery life.
- Zone Indicators (A/B/C): Indicates which zone is currently active or being programmed.
- Start Time: The programmed time for watering to begin.
- Irrigation Duration (How Long): The length of time water will flow for a programmed cycle.
- Irrigation Frequency (How Often): The interval between watering cycles.
- Next Start: Shows the time until the next scheduled watering cycle.
- Delay Icon: Appears when rain delay is active.
- Lock Icon: Appears when child lock is active.

Image 5.1: Detailed view of the LCD display and control buttons.
5.2. Setting Current Time
- Press the SET button (often represented by a gear icon).
- Use the + and - buttons to adjust the hour. Press OK to confirm.
- Repeat for minutes.
- Press OK to save the current time.
5.3. Programming Watering Schedules (Zones A, B, C)
Each of the three outlets can be programmed independently.
- Press the NOW A/B/C button to select the zone you wish to program (A, B, or C). The selected zone will be highlighted on the display.
- Press the SET button to enter programming mode for the selected zone.
- Set Start Time: Use + and - to adjust the desired start time (hour and minute). Press OK to confirm each setting.
- Set Watering Duration (How Long): Adjust the watering duration from 1 second to 360 minutes. Press OK.
- Set Watering Frequency (How Often): Choose the frequency from 1 hour to 23 hours, or 1 day to 15 days. Press OK.
- After setting all parameters, press ESC/OFF to exit programming mode, or wait for the display to auto-save and return to the main screen.

Image 5.2: Example of programming different watering schedules for three zones simultaneously.
5.4. Manual Watering
To water immediately without affecting your programmed schedules:
- Press the Manual Watering button (often represented by a faucet icon).
- Use + and - to set the desired manual watering duration.
- Press OK to start manual watering.
- To stop manual watering, press the Manual Watering button again or wait for the set duration to complete.

Image 5.3: Activating manual watering mode.
5.5. Rain Delay Mode
To temporarily pause your watering schedule due to rain:
- Press and hold the DELAY button for 3 seconds.
- Use + and - to select the desired delay duration (e.g., 24 hours, 48 hours, 72 hours).
- Press OK to confirm. The delay icon will appear on the screen, and the next scheduled watering will be updated accordingly.
- To cancel the rain delay, press and hold the DELAY button again for 3 seconds.

Image 5.4: The watering computer in Rain Delay Mode.
5.6. Child Lock Function
To prevent accidental changes to your settings:
- To activate the child lock, press and hold the LOCK button (often represented by a padlock icon) for 3 seconds. A lock icon will appear on the display.
- To deactivate, press and hold the LOCK button again for 3 seconds. The lock icon will disappear.
6. Maintenance
Proper maintenance ensures the longevity and optimal performance of your watering computer.
6.1. Battery Replacement
When the battery indicator on the LCD screen shows low power, replace the batteries promptly to avoid interruption of watering schedules. Use two new 1.5V AA alkaline batteries.
6.2. Cleaning the Filter
The watering computer includes an aluminum alloy filter at the inlet to prevent debris from entering the system. Periodically check and clean this filter to ensure unrestricted water flow and prevent blockages.
6.3. Winter Storage
Before the first frost, disconnect the watering computer from the faucet. Remove the batteries and store the device in a dry, frost-free location. Freezing water can damage the internal components.

Image 6.1: Details of the durable aluminum alloy filter and sealed battery compartment, crucial for maintenance and longevity.
7. Troubleshooting
If you encounter issues with your watering computer, refer to the following common problems and solutions:
| Problem | Possible Cause | Solution |
|---|---|---|
| No water flow from outlets. |
|
|
| Water leakage from connections. |
|
|
| LCD display is blank or dim. |
|
|
| Timer not starting at scheduled time. |
|
|
8. Specifications
Technical details of the johgee HCT-378 3-Outlet Watering Computer:
- Brand: johgee
- Model Number: HCT-378
- Product Dimensions (L x W x H): 7.2 x 13.8 x 12.7 cm
- Item Weight: 670 g
- Material: Plastic (with nylon fiber connection, aluminum alloy filter)
- Waterproof Rating: IPX5
- Power Source: 2 x 1.5V AA Batteries (not included)
- Number of Outlets: 3
- Watering Duration Range: 1 second to 360 minutes
- Watering Frequency Range: 1 hour to 23 hours, or 1 day to 15 days
9. Warranty and Support
For any questions, technical assistance, or warranty claims regarding your johgee HCT-378 3-Outlet Watering Computer, please contact the retailer or johgee customer service. We are committed to providing customer service and technical support to ensure your satisfaction.
Please retain your proof of purchase for warranty purposes. Specific warranty terms may vary by region and retailer.


