1. Introduction
This manual provides detailed instructions for the YIWENG TS-BC670 Silent Vibration LED Digital Alarm Clock. Designed for deep sleepers and travelers, this compact, battery-powered device offers silent vibration alarms, a clear LED display, and multiple convenient features. Please read this manual thoroughly before use to ensure proper operation and maintenance.

Figure 1.1: Front view of the YIWENG TS-BC670 Silent Vibration LED Digital Alarm Clock. The device is purple with a central button featuring a cat design.
2. Package Contents
Upon unpacking, please verify that all items listed below are present and in good condition:
- 1 x YIWENG TS-BC670 Silent Vibration LED Digital Alarm Clock
- 1 x Screwdriver
- 1 x User Manual (English)
Note: 3 x AA batteries are required for operation and are not included in the package.
3. Safety Information
- Do not expose the device to extreme temperatures, direct sunlight, or high humidity.
- Avoid dropping or subjecting the device to strong impacts.
- Keep out of reach of children unless under adult supervision, especially when handling batteries.
- Dispose of used batteries according to local regulations.
- Do not attempt to disassemble or repair the device yourself. Contact customer support for assistance.
4. Product Overview

Figure 4.1: Diagram illustrating the dimensions and button functions of the alarm clock. Labels include "AL" for alarm set, "SET" for time set, "+" for up/12-24 hour/vibration strength, "-" for down/vibration strength, and "SNZ" for backlight/snooze.
The YIWENG TS-BC670 features a compact design with an LED display and intuitive controls. Key components include:
- LED Display: Shows time, alarm status, and other indicators.
- AL Button: Used for setting alarms.
- SET Button: Used for setting the current time.
- '+' Button: Adjusts values up, switches 12/24 hour format, and increases vibration strength.
- '-' Button: Adjusts values down and decreases vibration strength.
- SNZ Button: Activates snooze, backlight, and child lock functions.
- Battery Compartment: Located on the back for 3x AA batteries.
- Hanging Rope: For portability and secure placement.
5. Setup
5.1 Battery Installation
The alarm clock is powered by 3 AA batteries (not included). Follow these steps to install them:
- Locate the battery compartment cover on the back of the alarm clock.
- Use the provided screwdriver to open the battery compartment.
- Insert 3 new AA batteries, ensuring the correct polarity (+/-) as indicated inside the compartment.
- Replace the battery compartment cover and secure it with the screwdriver.
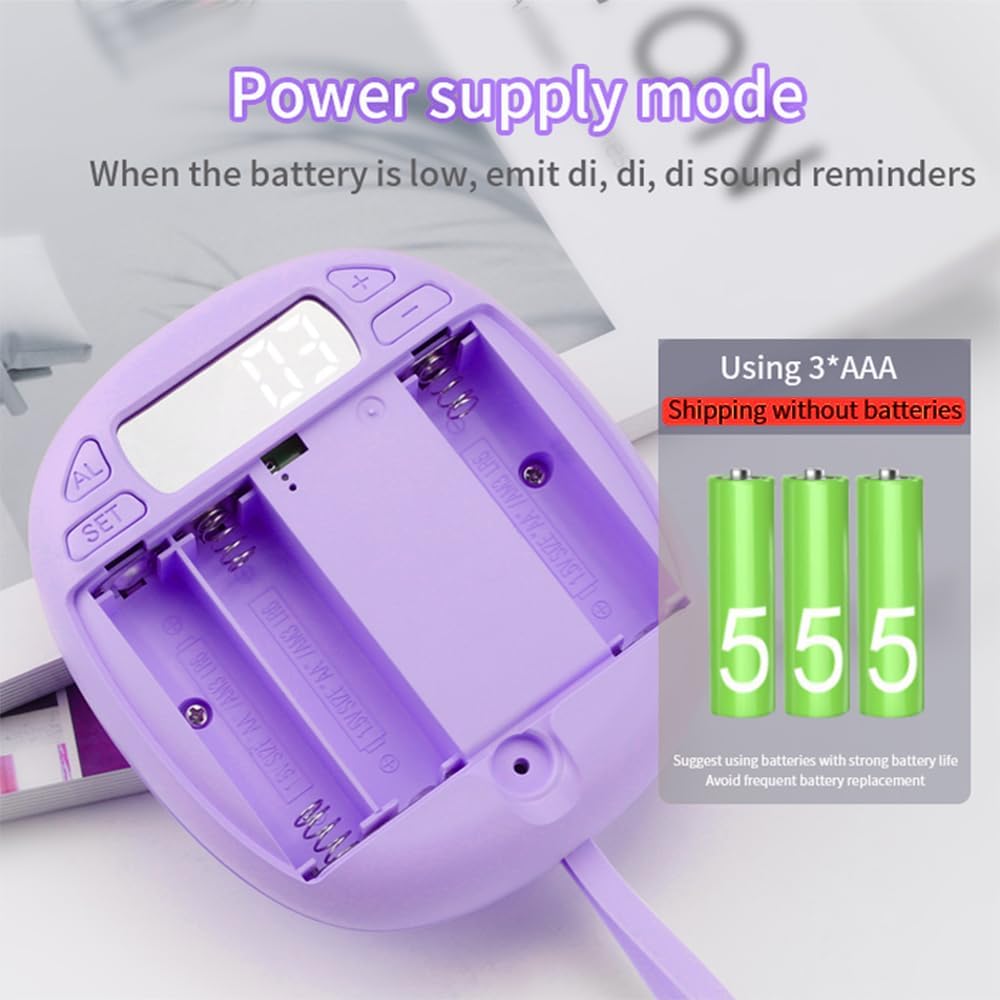
Figure 5.1: Image showing the open battery compartment of the alarm clock, designed for three AA batteries. A reminder indicates that batteries are not included.
Note: When operating on battery power, the display will not remain continuously lit. Short press the "SNZ" button to activate the backlight for 10 seconds. If the battery power is low, the device will emit "di, di, di" sound reminders.
6. Operating Instructions
6.1 Setting the Time
- Press and hold the SET button until the hour digits begin to flash.
- Use the + or - buttons to adjust the hour.
- Press the SET button again to move to the minute digits.
- Use the + or - buttons to adjust the minutes.
- Press the SET button once more to confirm and exit time setting mode.
6.2 12/24 Hour Display Format
In normal time display mode, short press the + button to switch between 12-hour and 24-hour display formats.
6.3 Setting Alarms (Two Groups)
The clock supports two independent alarm settings (Alarm 1 and Alarm 2). Default settings are Alarm 1 at 6:00 and Alarm 2 at 7:00.

Figure 6.1: The alarm clock screen showing two distinct alarm settings, "Preset Alarm 1 time" at 6:00 and "Preset Alarm 2 time" at 7:00.
- Press the AL button once to view Alarm 1. Press it again to view Alarm 2.
- While viewing the desired alarm (e.g., Alarm 1), press and hold the AL button until the hour digits flash.
- Use the + or - buttons to adjust the alarm hour.
- Press the AL button again to move to the minute digits.
- Use the + or - buttons to adjust the alarm minutes.
- Press the AL button once more to confirm and activate the alarm. An alarm icon will appear on the display.
- To deactivate an alarm, repeat the steps and set the alarm time to "OFF" or cycle through until the alarm icon disappears.
6.4 Adjusting Vibration Strength
The alarm clock offers three levels of vibration strength: slight, secondary, and powerful.

Figure 6.2: Illustration depicting the three adjustable vibration levels: (1) slight shock, (2) secondary shock, and (3) powerful shock. The image suggests placing the device under a pillow for silent waking.
To adjust the vibration strength:
- In normal time display mode, press and hold the + or - button to cycle through the vibration strength levels.
- The display will indicate the current vibration level (e.g., V1, V2, V3).
- Release the button when the desired strength is displayed.
6.5 Snooze Function
When an alarm vibrates:
- Short press the SNZ button to activate the snooze function. The alarm will pause and sound again after 10 minutes.
- Long press the SNZ button to stop the current alarm or snooze cycle completely.
6.6 Backlight and Decorative Doll Light
- In battery power mode, short press the SNZ button to turn on the backlight for 10 seconds.
- The decorative doll light (the cat design on the front button) will also illuminate for 10 seconds with a short press of the SNZ button.
6.7 Child Lock Function
To prevent accidental changes to settings, the alarm clock features a child lock.

Figure 6.3: The alarm clock screen showing "LOC" to indicate that the child lock function is active. Instructions for activating and deactivating the lock are provided.
- In time display mode, long press the SNZ button for 3 seconds to activate the child lock. The screen will display "LOC".
- To deactivate the child lock, long press the SNZ button for 3 seconds again. The screen will flash once to confirm release.
7. Maintenance
- Clean the device with a soft, dry cloth. Do not use abrasive cleaners or solvents.
- If the device will not be used for an extended period, remove the batteries to prevent leakage.
- Ensure the battery compartment is always securely closed to prevent dust and moisture ingress.
8. Troubleshooting
| Problem | Possible Cause | Solution |
|---|---|---|
| Clock does not turn on. | No batteries or incorrect battery installation. | Ensure 3 AA batteries are installed correctly with proper polarity. Replace with new batteries if needed. |
| Display is dim or flickering. | Low battery power. | Replace all 3 AA batteries with new ones. |
| Alarm does not sound/vibrate. | Alarm not set or deactivated. | Verify alarm settings (Section 6.3) and ensure the alarm icon is visible on the display. |
| Buttons are unresponsive. | Child lock is active. | Deactivate child lock by long pressing the SNZ button for 3 seconds (Section 6.7). |
| Time is incorrect. | Time not set or reset after battery change. | Set the correct time following instructions in Section 6.1. |
9. Specifications
| Feature | Detail |
|---|---|
| Model | TS-BC670 |
| Brand | YIWENG |
| Display Type | Digital LED |
| Power Source | 3 x AA Batteries (not included) |
| Alarm Type | Vibration Alarm (3 adjustable levels) |
| Alarm Groups | Two independent alarms |
| Snooze Duration | 10 minutes |
| Display Format | 12/24 Hour Switchable |
| Backlight | 10-second activation via SNZ button |
| Child Lock | Yes |
| Material | ABS (Acrylonitrile Butadiene Styrene) |
| Dimensions | 10.5 x 9.3 x 3.4 cm (4.13 x 3.66 x 1.34 inches) |
| Weight | 105g (3.7oz) |
10. Warranty and Support
This product comes with a standard manufacturer's warranty. For specific warranty terms and conditions, please refer to the documentation provided at the time of purchase or contact your retailer.
For technical support, troubleshooting assistance, or inquiries regarding your YIWENG TS-BC670 alarm clock, please contact YIWENG customer service through the retailer's platform or the official brand website.
Please have your model number (TS-BC670) and purchase information ready when contacting support.


