
1. Introduction
This manual provides detailed instructions for the installation, operation, and maintenance of your ASUS Prime B850M-K Gaming Motherboard. Please read this manual thoroughly before proceeding with installation to ensure proper setup and to maximize the performance and longevity of your system.

Image 1.1: The ASUS Prime B850M-K Motherboard alongside its retail packaging.
2. Key Features
The ASUS Prime B850M-K motherboard is engineered with advanced technologies to support high-performance computing. Key features include:
- Ready for advanced AI PCs: Designed for the future of AI computing, with the power and connectivity needed for demanding AI applications.
- AMD AM5 Socket: Compatible with AMD Socket AM5 for AMD Ryzen 9000, 8000, and 7000 Series Desktop Processors.
- Upgraded Power Solution: Features an 8+2+1 phase power supply design, 6-layer PCB, alloy chokes, and durable capacitors for stable power delivery.
- Ultra-fast connectivity: Includes a PCIe 5.0 x16 slot, PCIe 5.0 M.2 slot, Realtek 2.5Gb Ethernet, USB 10Gbps Type-A on the back, and USB 5Gbps Type-C support on the front.
- Comprehensive cooling: Equipped with VRM and M.2 heatsinks, a PCH heatsink, hybrid fan headers, and Fan Xpert 2+ for efficient thermal management.
3. Product Overview
Familiarize yourself with the layout and components of the ASUS Prime B850M-K motherboard.
3.1 Motherboard Layout
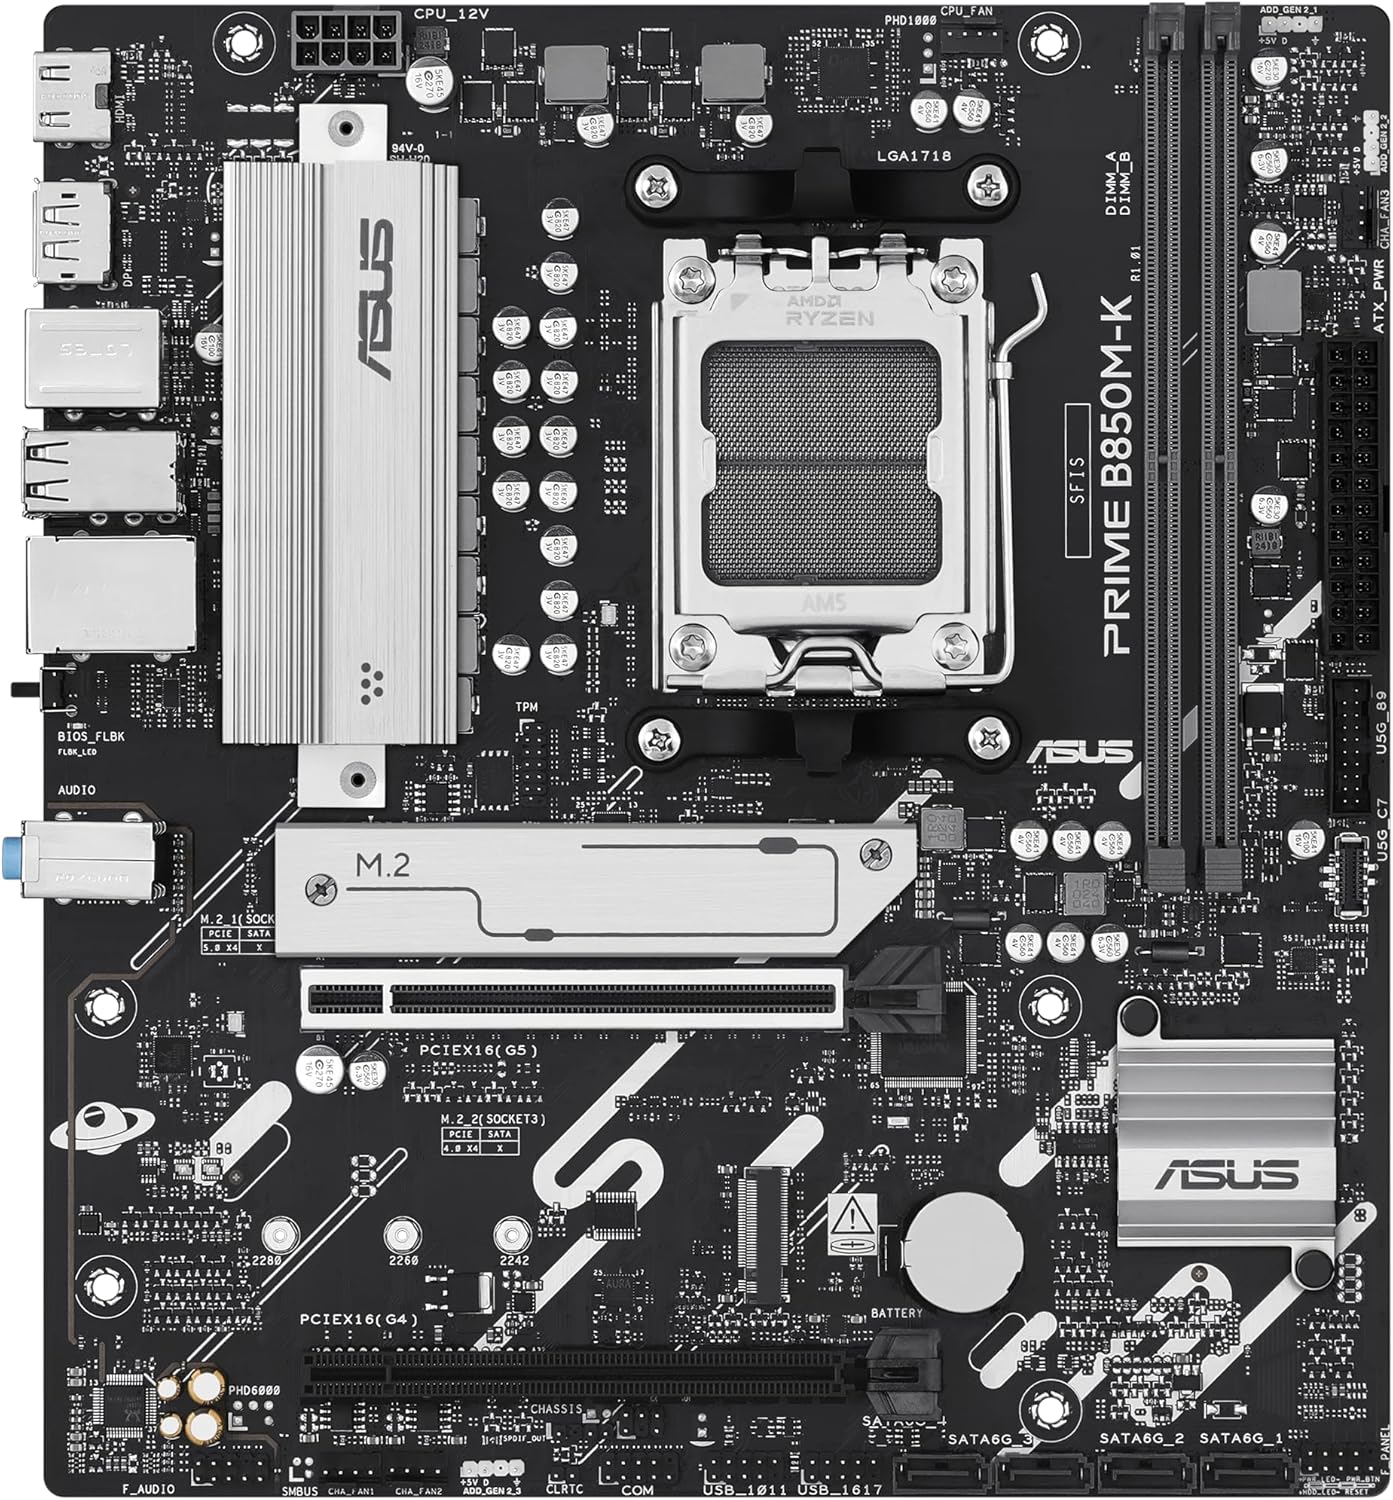
Image 3.1: A top-down view of the motherboard, highlighting the CPU socket, DIMM slots, PCIe slots, and M.2 slots.
This image provides a comprehensive view of the motherboard's key areas, including the AMD AM5 CPU socket, DDR5 DIMM slots, PCIe 5.0 x16 slot, and M.2 slots for storage devices. Understanding these locations is crucial for component installation.
3.2 Rear I/O Panel

Image 3.2: The rear input/output panel of the motherboard, showing various ports for external devices.
The rear I/O panel offers a range of connectivity options for your peripherals. It includes USB ports, Ethernet, audio jacks, and video outputs. Refer to the diagram below for specific port identification.

Image 3.3: A labeled diagram of the rear I/O panel, indicating the function of each port.
4. Setup and Installation
This section guides you through the process of installing your motherboard and its components.
4.1 Package Contents
Verify that all items are present in your motherboard package:
- ASUS Prime B850M-K Motherboard
- Rear I/O Panel Shield
- SATA Data Cables (2x)
- M.2 Screw Package
- M.2 Rubber Stand-off
- Quick Start Guide

Image 4.1: The complete contents of the ASUS Prime B850M-K motherboard package.
4.2 Pre-Installation Checklist
- Ensure your power supply unit (PSU) is compatible and provides sufficient wattage.
- Gather necessary tools: Phillips-head screwdriver, anti-static wrist strap.
- Prepare your computer case for motherboard installation.
4.3 Motherboard Installation
- Install the I/O shield into the rear opening of your computer case.
- Carefully align the motherboard with the standoffs in your case.
- Secure the motherboard with screws, ensuring it is firmly seated.
4.4 Component Installation
- CPU: Open the CPU socket lever, align the CPU with the triangle marker, gently place it into the socket, and close the lever.
- CPU Cooler: Install the CPU cooler according to its manufacturer's instructions.
- RAM (DDR5): Open the DIMM slot clips, align the memory modules, and press down firmly until the clips lock into place.
- M.2 Storage: Insert the M.2 drive into the M.2 slot, secure it with the provided screw or rubber stand-off.
- Graphics Card (GPU): Insert the graphics card into the PCIe 5.0 x16 slot and secure it with the case latch and screw.
- SATA Devices: Connect SATA data cables from the motherboard to your storage drives (HDDs/SSDs) and power cables from the PSU.
4.5 Connecting Power and Peripherals
- Connect the 24-pin ATX power connector and the 8-pin CPU power connector from your PSU to the motherboard.
- Connect front panel headers (power button, reset button, USB, audio) to their respective pins on the motherboard. Refer to the motherboard manual for exact pin layouts.
- Connect external peripherals (monitor, keyboard, mouse) to the rear I/O panel.
5. Operating Instructions
After successful installation, follow these steps for initial operation.
5.1 First Boot
- Ensure all connections are secure and the power supply is switched on.
- Press the power button on your computer case.
- The system should power on and display the ASUS logo or BIOS/UEFI screen.
5.2 BIOS/UEFI Configuration
To enter the BIOS/UEFI setup utility, press the Delete or F2 key during the Power-On Self-Test (POST). Here you can configure system settings, boot order, and enable features like XMP/EXPO for memory.
5.3 Driver Installation
After installing your operating system, install the latest drivers for your motherboard chipset, audio, LAN, and other integrated components. These can typically be found on the ASUS support website for your specific motherboard model.
6. Maintenance
Regular maintenance helps ensure the stability and longevity of your motherboard.
6.1 Cleaning
- Periodically clean dust from the motherboard and components using compressed air.
- Ensure the system is powered off and unplugged before cleaning.
6.2 BIOS Updates
Check the ASUS support website for BIOS/UEFI updates. Updates can improve system stability, add support for new hardware, or fix bugs. Follow the instructions provided by ASUS carefully when performing a BIOS update.
7. Troubleshooting
This section addresses common issues you might encounter.
- No Power: Check all power connections (24-pin ATX, 8-pin CPU, GPU power). Ensure PSU is switched on.
- No Display: Verify monitor connection, ensure graphics card is properly seated and powered. Try reseating RAM modules.
- System Instability/Crashes: Check CPU and GPU temperatures. Ensure RAM is correctly installed and compatible. Update drivers and BIOS.
- Boot Device Not Found: Check SATA/M.2 connections. Verify boot order in BIOS/UEFI.
- BIOS Flashback Issues: Ensure the USB drive is formatted correctly (FAT32) and the BIOS file is renamed as specified by ASUS.
8. Technical Specifications
Detailed specifications for the ASUS Prime B850M-K Motherboard.
| Feature | Specification |
|---|---|
| Brand | ASUS |
| Model Name | 90MB1LV0-M0EAY0 |
| CPU Socket | Socket AM5 |
| Compatible Processors | AMD Ryzen 9000, AMD Ryzen 8000, AMD Ryzen 7000 Series |
| RAM Memory Technology | DDR5 |
| Memory Speed | Up to 8000 MHz (OC) |
| Chipset Type | AMD B850 |
| PCIe Slots | 1x PCIe 5.0 x16, additional PCIe slots |
| M.2 Slots | 2x M.2 slots (PCIe 5.0 support) |
| Ethernet | Realtek 2.5Gb Ethernet |
| USB Connectivity | USB 10Gbps Type-A (rear), USB 5Gbps Type-C (front header) |
| Platform | Windows 10, Windows 11 |
| Item Weight | 1.52 pounds |
9. Warranty and Support
ASUS products are manufactured to the highest quality standards. For specific warranty terms and conditions, please refer to the warranty card included with your product or visit the official ASUS website.
9.1 Contact Support
For technical assistance, driver downloads, or further information, please visit the official ASUS support website:


