Introduction
Thank you for choosing the HEANTLE A2-BSF-HNT Fingerprint Keypad Deadbolt Door Lock. This advanced security device offers multiple entry methods including fingerprint, keypad code, and traditional key access, combined with an auto-lock feature for enhanced convenience and safety. This manual provides essential information for proper installation, setup, operation, and maintenance of your new door lock. Please read these instructions carefully before installation and keep them for future reference.
Product Overview
The HEANTLE A2-BSF-HNT is designed for robust security and ease of use. Key features include:
- Heavy-Duty Security: Constructed from high-grade alloy for long-lasting durability; features a backlit keypad for easy access in the dark; ensures secure keyless entry for your home.
- Keyless Entry Convenience: Simple installation with a Phillips screwdriver; supports up to 100 codes and 50 fingerprints; includes one-time passcodes; ideal for family, guests, and smart home integration.
- Auto-Lock Feature: Set the auto-lock function to engage after 5 to 60 seconds or use one-touch locking with the pound key; eliminates the worry of forgetting to lock the door.
- Privacy & Versatility: No app required; configure settings directly on the keypad for secure personal information; includes "L" and "R" buttons for easy installation on both left and right-handed doors.
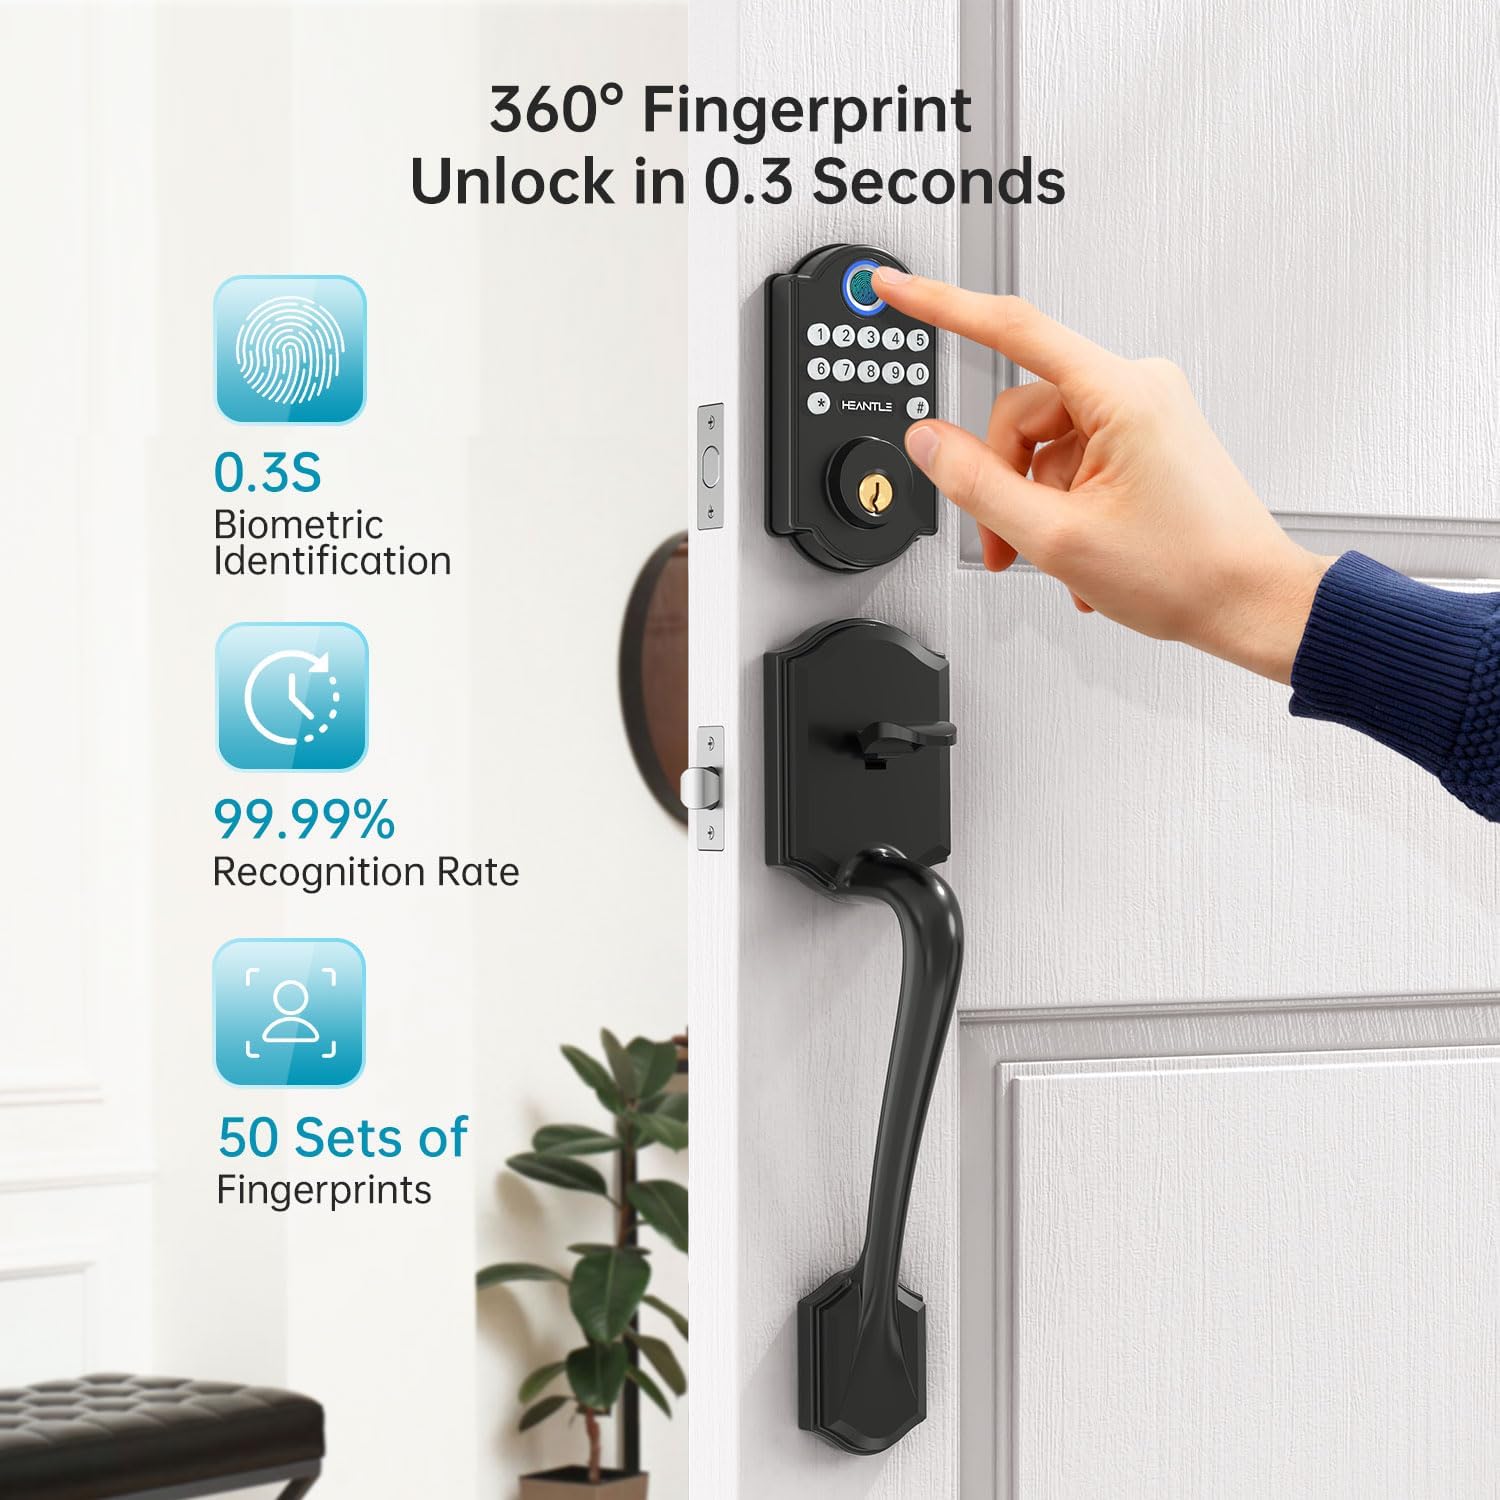
Figure 1: Fingerprint Unlock Feature. The lock allows for quick fingerprint recognition, supporting up to 50 unique fingerprints.
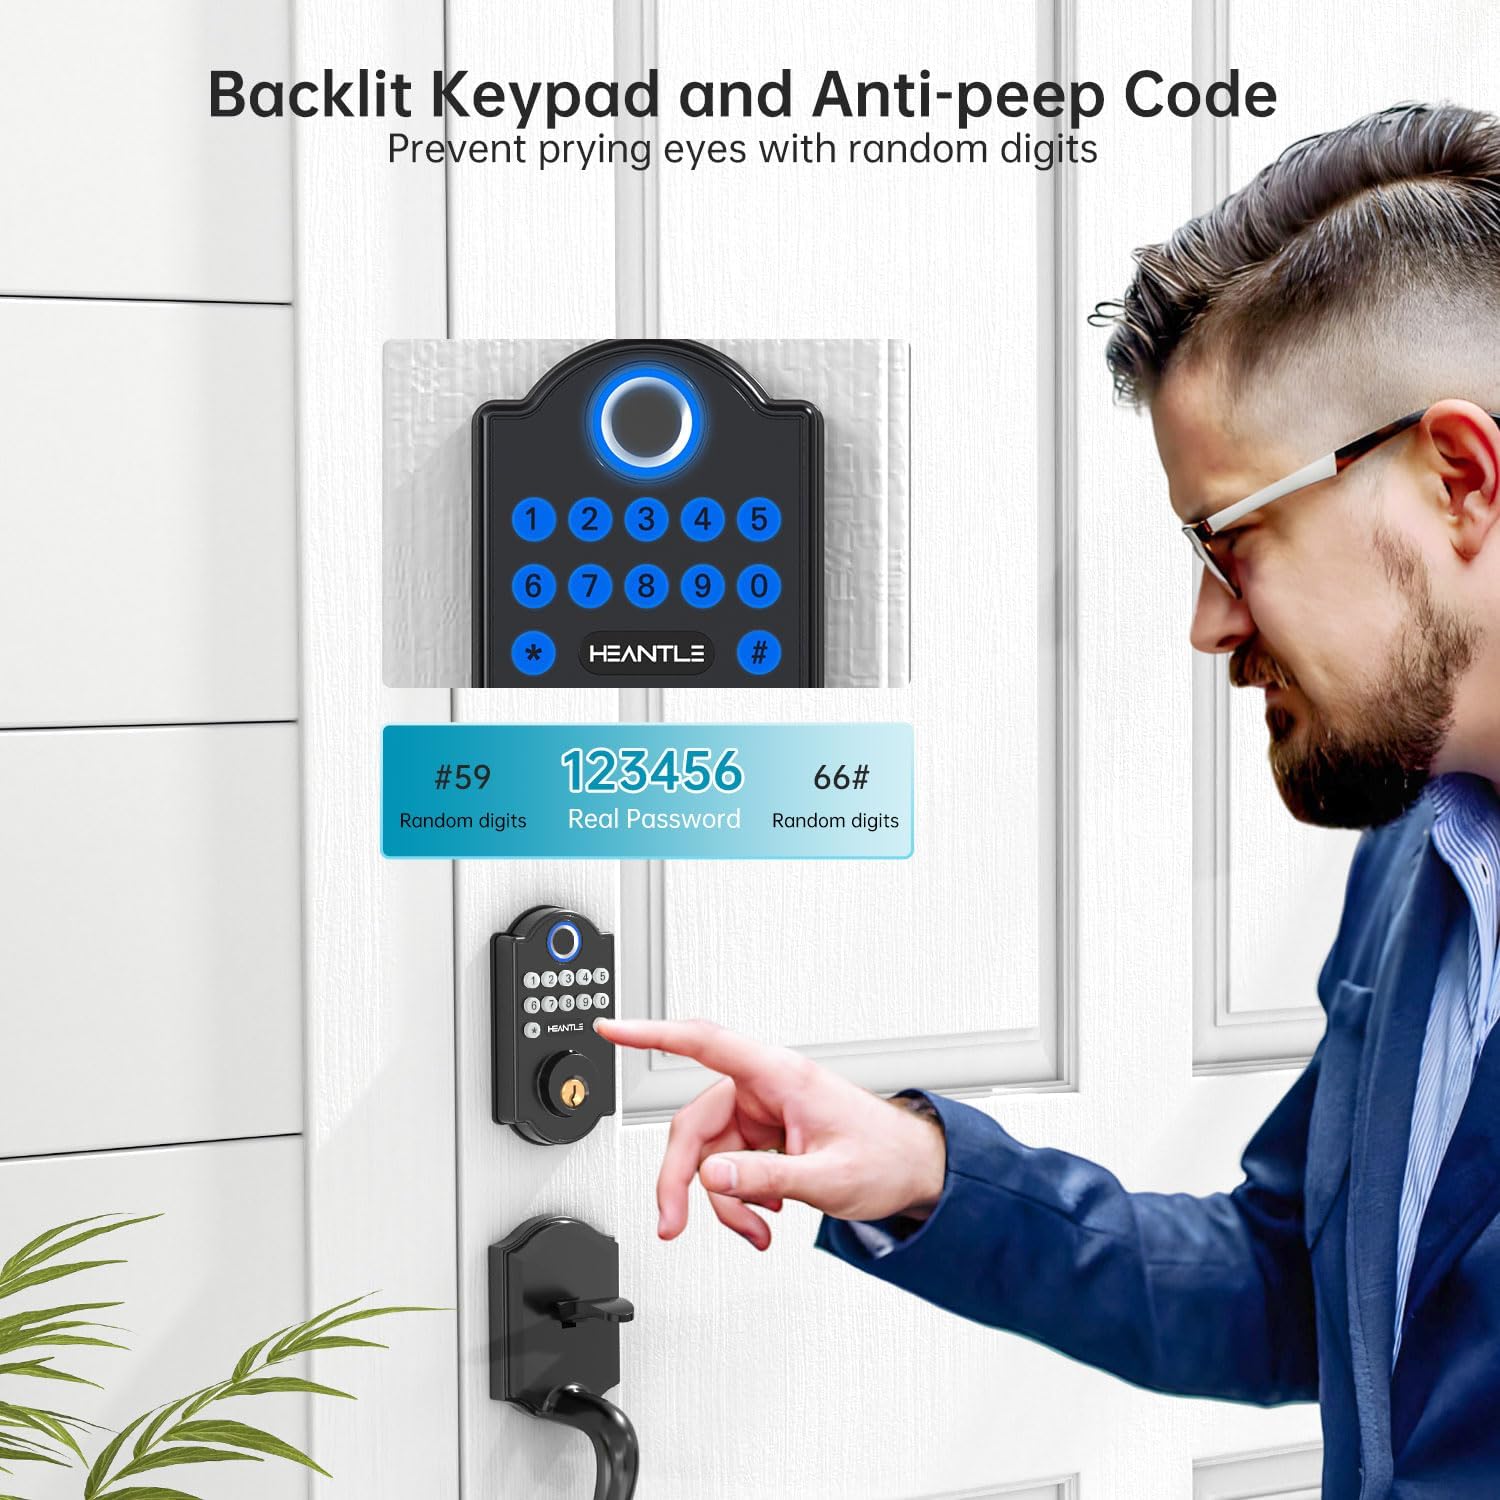
Figure 2: Backlit Keypad and Anti-Peep Code. The keypad illuminates for visibility in low light and supports anti-peep codes to prevent unauthorized viewing of your password.

Figure 3: Auto-Lock Feature. The lock can be configured to automatically secure itself after a set period, from 1 to 60 seconds.
Installation Guide
Installation of the HEANTLE A2-BSF-HNT lock is designed to be straightforward, typically requiring only a Phillips screwdriver. Ensure your door meets the specified dimensions before beginning.
1. Prepare Your Door
- Verify door thickness: 1.49-1.88 inches (38-48mm).
- Check backset: 2.36-2.76 inches (60-70mm).
- Ensure cross-bore diameter: 2-1/8 inches (54mm).
- The lock is reversible for both left and right-handed doors.

Figure 4: Door Compatibility and Dimensions. Confirm your door's measurements match the requirements for proper installation.
2. Install the Deadbolt Latch
- Insert the deadbolt latch into the door edge. Ensure the "UP" marking on the latch faces upwards.
- Secure the latch with the provided screws.
3. Install the Exterior Assembly
- Feed the cable from the exterior keypad assembly through the cross-bore hole and under the deadbolt latch.
- Align the exterior assembly with the deadbolt and door, ensuring the spindle passes through the latch mechanism.
4. Install the Interior Mounting Plate
- Pass the cable through the mounting plate.
- Secure the mounting plate to the door using the long screws, ensuring it is flush against the door surface.
5. Install the Interior Assembly
- Connect the cable from the exterior assembly to the port on the interior assembly.
- Align the interior assembly with the mounting plate and secure it with screws.
- Ensure the knob on the interior assembly is vertical during installation.
Figure 5: Smart Lock Installation. The process is designed for quick and easy setup.
Initial Setup and Programming
After physical installation, you need to program your lock. All settings are configured directly on the keypad.
1. Install Batteries
- Remove the battery cover on the interior assembly.
- Insert 4 AA batteries, ensuring correct polarity.
- Replace the battery cover.

Figure 6: Battery Installation and Features. The lock uses 4 AA batteries and provides alerts for low power, with a temporary charging option.
2. Change Master Code
The default master code is typically 123456. It is crucial to change this immediately for security.
- Press the "SET" button (usually located on the interior assembly).
- Enter the default master code (e.g., 123456) followed by "#".
- Press "1" (for changing master code) followed by "#".
- Enter your new master code (6-10 digits) followed by "#".
- Re-enter your new master code followed by "#" to confirm.
3. Add User Codes (Passcodes)
You can add up to 100 unique user codes.
- Press the "SET" button.
- Enter your Master Code followed by "#".
- Press "2" (for adding user code) followed by "#".
- Enter a User ID (01-99) followed by "#".
- Enter the new User Code (6-10 digits) followed by "#".
- Re-enter the new User Code followed by "#" to confirm.
4. Add Fingerprints
The lock supports up to 50 fingerprints.
- Press the "SET" button.
- Enter your Master Code followed by "#".
- Press "3" (for adding fingerprint) followed by "#".
- Place your finger on the fingerprint sensor. Lift and repeat 4 times until successful.
Operating Instructions
Unlocking the Door
- Using Fingerprint: Place your registered finger on the sensor. The lock will unlock if the fingerprint is recognized.
- Using Passcode: Enter your 6-10 digit user code followed by "#". The lock will unlock.
- Using Mechanical Key: Insert the provided mechanical key into the keyhole and turn to unlock.
Locking the Door
- One-Touch Locking: Press the "#" key on the keypad. The deadbolt will extend, locking the door.
- Auto-Lock: If enabled, the lock will automatically engage the deadbolt after a preset time (5-60 seconds) once the door is closed.
- Manual Locking: From the interior, turn the thumb-turn knob to lock the door.
Maintenance
Battery Replacement
- The lock will emit a low battery alert when power is running low. Replace all 4 AA batteries promptly.
- To replace, remove the battery cover on the interior assembly, remove old batteries, insert new ones with correct polarity, and replace the cover.
- If batteries completely drain, you can use the temporary charging port (Micro-USB) on the exterior assembly with a power bank to temporarily power the lock and gain entry.
Cleaning
- Clean the keypad and fingerprint sensor with a soft, dry cloth. Avoid abrasive cleaners or solvents.
Troubleshooting
| Problem | Possible Solution |
|---|---|
| Lock does not respond. | Check battery level. Replace batteries if low. Use the temporary charging port if completely drained. |
| Fingerprint not recognized. | Ensure your finger is clean and dry. Try re-registering your fingerprint. Ensure proper placement on the sensor. |
| Keypad code not working. | Ensure you are entering the correct code followed by "#". Check if the code has been deleted or changed. |
| Auto-lock not engaging. | Verify the auto-lock feature is enabled and the delay time is set correctly in the programming settings. Ensure the door is fully closed. |
| Lock is loose on the door. | Tighten the mounting screws on the interior assembly. |
Specifications
- Model: A2-BSF-HNT
- Material: Metal (High-grade alloy)
- Finish: Painted or Powder Coated (Black)
- Lock Type: Keypad Deadbolt
- Special Features: Auto-Lock, Back-Lit Keypad, Fingerprint Recognition
- Power Source: 4 x AA Batteries (not included)
- Fingerprint Capacity: Up to 50 sets
- Passcode Capacity: Up to 100 codes
- Auto-Lock Delay: 5 to 60 seconds (adjustable)
- Door Thickness Compatibility: 1.49 - 1.88 inches (38 - 48 mm)
- Backset Compatibility: 2.36 - 2.76 inches (60 - 70 mm)
- Cross-Bore Diameter: 2-1/8 inches (54 mm)
- Item Weight: 780 g
- Dimensions (L x W x H): 16.51 x 6.35 x 4.32 cm
Warranty and Support
The HEANTLE A2-BSF-HNT Fingerprint Keypad Deadbolt Door Lock comes with a one-year coverage for defects and technical support. For any issues, replacements for defects or scratches, or technical assistance, please contact our customer service. We aim to provide prompt assistance with responses within one business day.
Contact Information: Please refer to your product packaging or the official HEANTLE website for the most up-to-date contact details.


