
1. Introduction
The Sygonix SY-5044422 Digital Timer Switch is designed for easy programming and operation, helping to manage power consumption for various appliances. This device features 20 ON/OFF programs, 3 random settings, and a countdown function, with switching intervals as short as 1 minute. Programs can be set for specific days, combinations of days, or daily. Its IP44 splash-proof rating allows for outdoor use, and an integrated battery retains settings during power outages. The timer supports a maximum switching capacity of 1800 W and includes enhanced touch protection.
2. Safety Instructions
- Read all instructions carefully before use.
- This device is rated IP44, making it splash-proof for outdoor use. However, do not immerse it in water or expose it to direct jets of water.
- Ensure the total load of connected appliances does not exceed 1800 W.
- Do not open the device housing. Repairs should only be performed by qualified personnel.
- Keep out of reach of children. The device features enhanced touch protection.
- Always unplug the timer from the power outlet before cleaning.
3. Package Contents
- Sygonix SY-5044422 Digital Timer Switch
- Instruction Manual
- Warranty Information
4. Product Overview
Familiarize yourself with the components and controls of your digital timer switch.
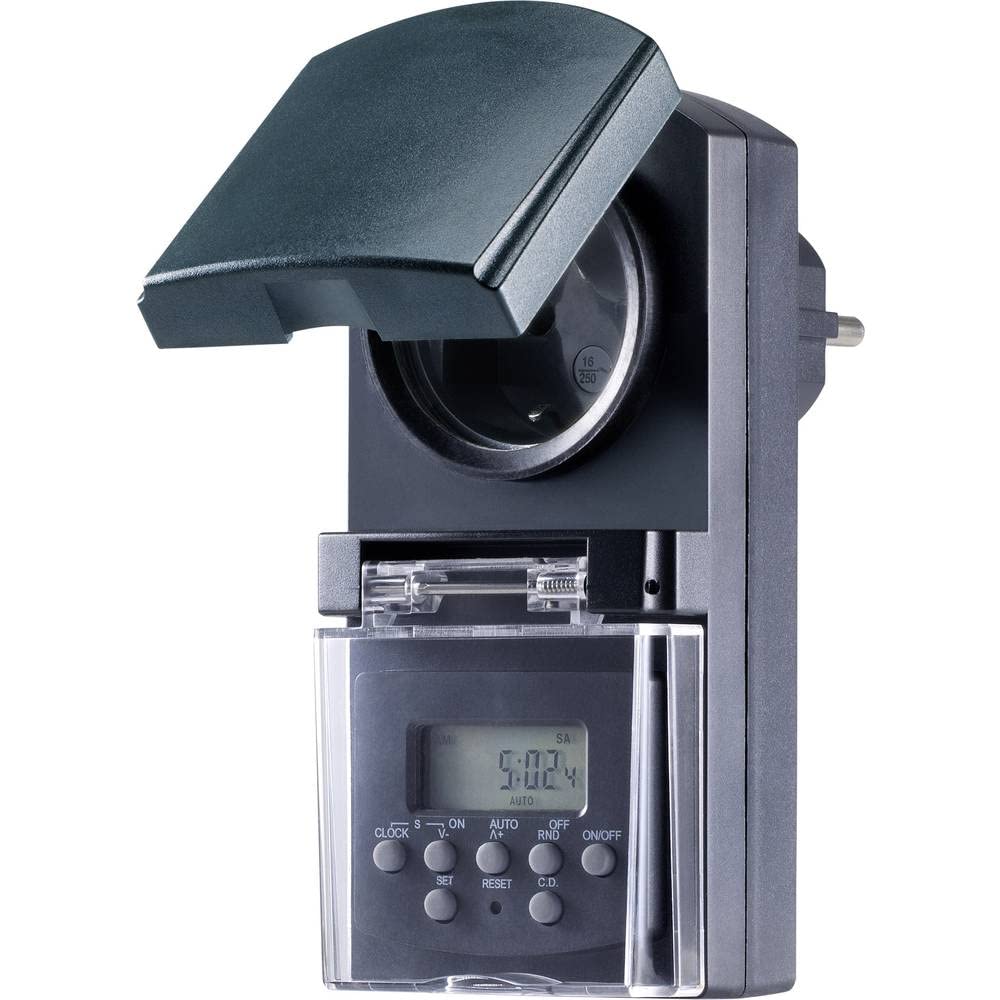
Figure 1: Front view of the Sygonix SY-5044422 Digital Timer Switch. This image displays the LCD screen, which shows the current time and day, along with various control buttons including CLOCK, ON/OFF, SET, RESET, AUTO/A+, OFF/RND, and C.D. (Countdown).

Figure 2: Front view of the timer with the protective cover opened, showing the integrated power socket. The display and control buttons are visible below the socket.
Control Buttons:
- CLOCK: Used to set the current time and day.
- ON/OFF: Manually switches the timer output ON or OFF.
- SET: Enters programming mode and confirms settings.
- RESET: Clears all settings and resets the timer to factory defaults.
- AUTO/A+: Cycles through automatic mode, program settings, and adjusts values.
- OFF/RND: Activates or deactivates the Random function.
- C.D. (Countdown): Activates or deactivates the Countdown function.
5. Setup
5.1 Initial Charging
Before first use, plug the timer into a power outlet for approximately 30 minutes to charge the internal battery. This ensures the display is active and settings are retained during power outages or when unplugged.
5.2 Setting Current Time and Day
- Press and hold the CLOCK button.
- While holding CLOCK, press AUTO/A+ repeatedly to set the current day (MO, TU, WE, TH, FR, SA, SU).
- While holding CLOCK, press SET repeatedly to set the current hour.
- While holding CLOCK, press OFF/RND repeatedly to set the current minute.
- Release the CLOCK button to save the settings.
5.3 Summer Time Adjustment
The timer supports a summer time function. To activate or deactivate:
- Press and hold the CLOCK button and the ON/OFF button simultaneously for 3 seconds. The display will show "SUMMER" or "WINTER" to indicate the mode.
6. Operating Instructions
6.1 Programming ON/OFF Times (Weekly Program)
The timer allows for up to 20 ON/OFF programs. Each program can be set for specific days or combinations of days.
- Press the SET button once to enter program mode. The display will show "1 ON".
- Press AUTO/A+ to select the desired day(s) for the program (e.g., MO, TU, WE, TH, FR, SA, SU, MO-FR, SA-SU, MO-SA, etc.).
- Press SET to confirm the day selection.
- Press AUTO/A+ to set the desired ON hour.
- Press OFF/RND to set the desired ON minute.
- Press SET again. The display will now show "1 OFF".
- Repeat steps 2-5 to set the OFF time for the same program.
- Continue pressing SET to cycle through all 20 ON/OFF programs. To exit program mode at any time, press the CLOCK button.
Note: After programming, ensure the timer is in AUTO mode for the programs to execute. Press ON/OFF repeatedly until "AUTO" is displayed.
6.2 Countdown Function
The countdown function allows you to switch the connected appliance ON or OFF after a set duration.
- Press the C.D. button once. The display will show "CD ON" or "CD OFF".
- Press AUTO/A+ to set the desired countdown hour.
- Press OFF/RND to set the desired countdown minute.
- Press C.D. again to start the countdown. The display will show the remaining time.
- To cancel the countdown, press C.D. once more.
6.3 Random Function (Presence Simulation)
The random function simulates presence by randomly switching the connected appliance ON and OFF within a set time window, deterring potential intruders.
- Ensure the timer is in AUTO mode.
- Press the OFF/RND button. The display will show "RND" to indicate the random function is active.
- The timer will now randomly switch the output ON and OFF for short periods within the programmed ON/OFF times.
- To deactivate the random function, press OFF/RND again. "RND" will disappear from the display.
6.4 Manual ON/OFF Override
You can manually override the programmed settings at any time.
- Press the ON/OFF button repeatedly to cycle through "ON", "OFF", and "AUTO" modes.
- "ON" means the output is continuously ON.
- "OFF" means the output is continuously OFF.
- "AUTO" means the timer will follow the programmed settings.
7. Maintenance
- Before cleaning, always unplug the timer from the power outlet.
- Wipe the device with a soft, dry cloth. Do not use abrasive cleaners or solvents.
- Ensure no liquids enter the device.
8. Troubleshooting
| Problem | Possible Cause | Solution |
|---|---|---|
| Display is blank or dim. | Internal battery is discharged. | Plug the timer into a live power outlet for at least 30 minutes to charge the battery. |
| Programs are not executing. | Timer is not in AUTO mode. | Press the ON/OFF button repeatedly until "AUTO" is displayed. |
| Incorrect time or day displayed. | Time/day was not set correctly or reset. | Refer to Section 5.2 "Setting Current Time and Day" to re-set. |
| All settings lost after power outage. | Internal battery not charged or faulty. | Ensure the timer is regularly plugged in to keep the internal battery charged. If the issue persists, contact support. |
9. Specifications
| Model Number: | SY-5044422 |
| Max. Switching Capacity: | 1800 W |
| Protection Class: | IP44 (Splash-proof) |
| Display Type: | Digital |
| Programs: | 20 ON/OFF programs |
| Minimum Switching Interval: | 1 minute |
| Special Features: | Countdown function, Random function (presence simulation), Summer time, Integrated battery for settings retention, Enhanced touch protection. |
| Product Dimensions: | 14 x 10 x 6 cm |
| Manufacturer: | Sygonix |
| Country of Origin: | China |
10. Warranty and Support
This product comes with a minimum 2-year warranty from the date of purchase. In case of any issues or defects, please contact your retailer or Sygonix customer support for assistance. Keep your proof of purchase for warranty claims.


