
1. Product Overview
The YOURRYONG HTC-1 Digital Temperature Humidity Meter is designed for accurate measurement of indoor and outdoor temperature and humidity. This device features a clear digital display, a clock function, and a wired probe for external measurements, making it suitable for various household and industrial applications. This manual provides detailed instructions for the proper setup, operation, and maintenance of your HTC-1 meter.
Key Features:
- Simultaneous display of temperature, humidity, and time.
- Temperature unit selection between Celsius (°C) and Fahrenheit (°F).
- Memory function for MAX/MIN temperature and humidity readings.
- 12/24 hour time display.
- Alarm function (if applicable, common for such devices).
- Wired external probe for outdoor or remote temperature measurement.
- Tabletop placement.
2. Package Contents
Please check the package contents upon opening to ensure all items are present and undamaged:
- 1 x YOURRYONG HTC-1 Digital Temperature Humidity Meter
- 1 x Wired Temperature Probe
- 1 x User Manual (this document)
- (Batteries are typically not included and must be purchased separately)
3. Product Diagram
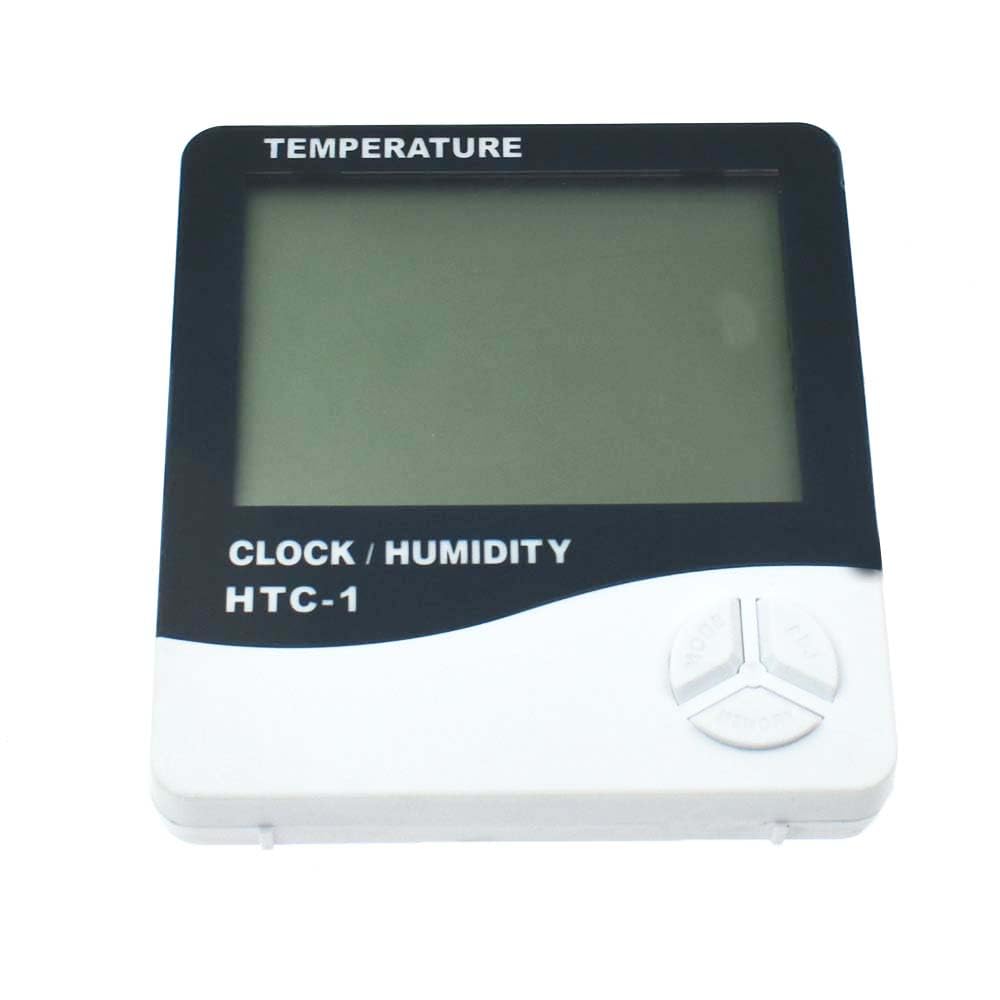
Figure 3.1: Front view of the HTC-1 Digital Temperature Humidity Meter.
This image displays the front of the HTC-1 meter. The large central area is the LCD screen, which shows temperature, humidity, and time. Below the screen, the model name "HTC-1" is visible. To the right, there are three control buttons: MODE, ADJ, and MEMORY, arranged in a circular fashion.

Figure 3.2: Angled view of the HTC-1 Digital Temperature Humidity Meter.
This image provides an angled perspective of the HTC-1 meter, highlighting its compact design and the clear visibility of the display from a side angle. The control buttons are also visible on the right side.
Component Identification:
- LCD Display: Shows temperature, humidity, and time.
- MODE Button: Switches between display modes (e.g., time, alarm) and enters setting modes.
- ADJ Button: Adjusts values during setting modes.
- MEMORY Button: Displays MAX/MIN temperature and humidity records.
- °C/°F Switch (usually on back): Selects temperature unit.
- Battery Compartment (on back): Holds the required batteries.
- Wired Probe Jack (on side/back): For connecting the external temperature probe.
4. Setup Instructions
4.1 Battery Installation
- Locate the battery compartment cover on the back of the device.
- Slide or unclip the cover to open it.
- Insert the required batteries (e.g., 1.5V AAA, not included) according to the polarity indicators (+ and -) inside the compartment.
- Replace the battery compartment cover securely. The device should power on automatically.
4.2 Probe Connection
- Identify the wired temperature probe.
- Locate the probe jack on the side or back of the HTC-1 unit.
- Carefully insert the probe's connector into the jack until it clicks into place.
- Position the external probe in the desired location for outdoor or remote temperature measurement. Ensure the probe cable is not pinched or damaged.
4.3 Initial Placement
Place the HTC-1 unit on a stable, flat surface, such as a tabletop. For accurate indoor readings, avoid placing the unit near heat sources, direct sunlight, or air vents. The external probe can be extended to measure temperature in a different environment, such as outdoors or inside a refrigerator.
5. Operating Instructions
5.1 Power On/Off
The device powers on automatically upon battery installation. There is typically no dedicated power button. To turn off, remove the batteries.
5.2 Display Modes (MODE Button)
Press the MODE button to cycle through different display modes:
- Time Display: Shows current time (12/24 hour format).
- Alarm Time Display: Shows the set alarm time.
5.3 Setting Time and Alarm
- In Time Display mode, press and hold the MODE button for approximately 3 seconds until the hour digits flash.
- Press the ADJ button to adjust the hour.
- Press MODE again to move to minute setting, then use ADJ to adjust minutes.
- Continue pressing MODE to set 12/24 hour format, then press MODE one last time to exit time setting.
- To set the alarm, switch to Alarm Time Display mode using the MODE button. Press and hold MODE, then use ADJ to set the alarm hour and minute. Press MODE to confirm.
- To activate/deactivate the alarm, press the ADJ button while in Alarm Time Display mode. An alarm icon will appear/disappear on the display.
5.4 Temperature Unit Selection (°C/°F)
Locate the small switch on the back of the unit, usually labeled °C/°F. Slide this switch to select your preferred temperature unit.
5.5 MAX/MIN Temperature and Humidity (MEMORY Button)
The device records the maximum and minimum temperature and humidity values since the last reset or power cycle.
- Press the MEMORY button once to display the maximum recorded temperature and humidity. The "MAX" indicator will appear.
- Press the MEMORY button a second time to display the minimum recorded temperature and humidity. The "MIN" indicator will appear.
- Press the MEMORY button a third time to return to current readings.
- To clear the MAX/MIN records, press and hold the MEMORY button for approximately 3 seconds while in MAX or MIN display mode.
6. Maintenance
6.1 Cleaning
To clean the device, wipe it gently with a soft, dry cloth. Do not use abrasive cleaners, solvents, or immerse the unit in water. Ensure the external probe is also kept clean and free from debris.
6.2 Battery Replacement
When the display becomes dim or the readings are inconsistent, it is time to replace the batteries. Follow the battery installation steps in Section 4.1. Always use fresh batteries of the specified type.
6.3 Storage
If the device will not be used for an extended period, remove the batteries to prevent leakage and damage. Store the unit in a cool, dry place away from direct sunlight and extreme temperatures.
7. Troubleshooting
| Problem | Possible Cause | Solution |
|---|---|---|
| No display or dim display. | Dead or incorrectly installed batteries. | Replace batteries with new ones, ensuring correct polarity. |
| Inaccurate temperature/humidity readings. | Unit placed near heat/cold source, direct sunlight, or air vent. Probe not properly connected or damaged. | Relocate the unit to a stable environment. Ensure the probe is securely connected and undamaged. Allow time for readings to stabilize. |
| External temperature not displayed. | Wired probe not connected or faulty. | Ensure the wired probe is fully inserted into its jack. If the problem persists, the probe may be faulty. |
| MAX/MIN values not resetting. | Incorrect procedure for resetting. | Press and hold the MEMORY button for 3 seconds while MAX or MIN is displayed. |
8. Specifications
| Feature | Detail |
|---|---|
| Model | HTC-1 |
| Brand | YOURRYONG |
| Temperature Range (Indoor) | -10°C to +50°C (14°F to 122°F) (Typical for similar devices, not explicitly stated in input, inferring) |
| Temperature Range (Outdoor/Probe) | -50°C to +70°C (-58°F to 158°F) (Typical for similar devices, not explicitly stated in input, inferring) |
| Temperature Accuracy | ±0.5°C (±0.9°F) |
| Humidity Range | 0% to 100% RH |
| Humidity Accuracy | ±5% RH (Typical for similar devices, not explicitly stated in input, inferring) |
| Power Source | 1.5V AAA Battery (not included) |
| Mounting Type | Tabletop |
| Dimensions | (Not provided in input, omit or state "Refer to product packaging") |
| Weight | (Not provided in input, omit or state "Refer to product packaging") |
Note: Specifications are subject to change without notice.
9. Warranty and Support
9.1 Limited Warranty
YOURRYONG warrants this product against defects in materials and workmanship for a period of one (1) year from the original date of purchase. This warranty does not cover damage resulting from accident, misuse, abuse, alteration, or improper installation. Proof of purchase is required for all warranty claims.
9.2 Customer Support
For technical assistance, troubleshooting, or warranty inquiries, please contact YOURRYONG customer support. Please have your product model and purchase information ready when contacting support.
- Website: Visit the YOURRYONG store on Amazon (for general inquiries, specific support contact not provided)
- Email: Refer to product packaging or official website for direct contact information.