1. Introduction
This manual provides essential information for the setup, operation, maintenance, and troubleshooting of your Yealink MCOREKIT-C5-MS Native Microsoft Teams Rooms System Base Kit. This system is designed to provide a seamless and efficient meeting experience in Microsoft Teams environments.
The Yealink MCOREKIT-C5-MS includes the following core components:
- Mini-PC: Equipped with an Intel Core i5 quad-core CPU, preloaded with Windows 10 IoT Enterprise OS, Microsoft Teams Rooms App, and Yealink Camera Control Plug-in.
- MTouch Plus: An 11.6-inch touch console for intuitive meeting control.
- RoomSensor: For enhanced room intelligence and automation.
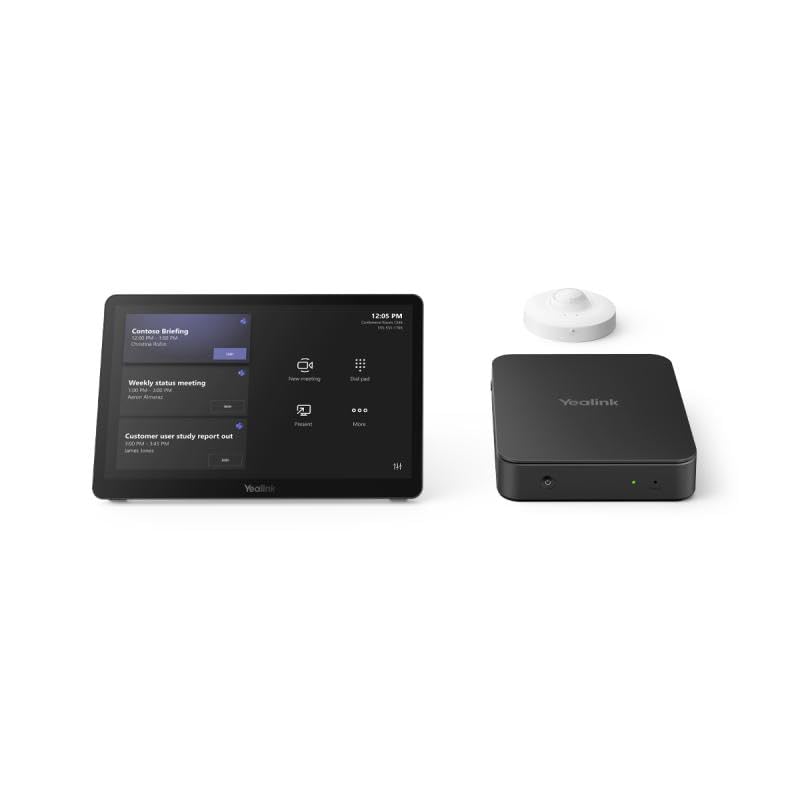
Figure 1: Overview of the Yealink MCOREKIT-C5-MS system components, including the Mini-PC, MTouch Plus touch console, and RoomSensor.
2. Setup
Follow these steps to set up your Yealink MCOREKIT-C5-MS system:
- Unpack Components: Carefully remove all components from their packaging. Verify that all items listed in the product description are present.
- Position Components: Place the Mini-PC in a secure, well-ventilated location. Position the MTouch Plus touch console on a table or desk for easy access. Install the RoomSensor according to its specific instructions, typically in a location that provides optimal coverage of the meeting space.
- Connect MTouch Plus: Connect the MTouch Plus to the Mini-PC using the provided cable. Ensure a secure connection.
- Connect RoomSensor: Connect the RoomSensor to the Mini-PC or network as per the specific RoomSensor installation guide.
- Connect Display(s): Connect your meeting room display(s) (e.g., TV, projector) to the Mini-PC using appropriate HDMI or DisplayPort cables.
- Connect Peripherals: Connect any additional peripherals such as a USB camera, microphone, or speakerphone to the Mini-PC.
- Network Connection: Connect the Mini-PC to your local area network (LAN) using an Ethernet cable for internet access and Microsoft Teams connectivity.
- Power On: Connect the power adapter to the Mini-PC and plug it into a power outlet. The system will automatically power on and boot into the Windows 10 IoT Enterprise OS and Microsoft Teams Rooms App.
- Initial Configuration: Follow the on-screen prompts on the MTouch Plus to complete the initial setup of the Microsoft Teams Rooms App, including signing in with your Microsoft Teams account.
3. Operating the System
The Yealink MCOREKIT-C5-MS is designed for intuitive operation through the MTouch Plus touch console.
- Starting a Meeting: From the MTouch Plus, you can join scheduled meetings directly from the calendar or start an instant meeting.
- In-Meeting Controls: During a meeting, the MTouch Plus provides controls for managing audio, video, sharing content, viewing participants, and ending the call.
- Content Sharing: Connect a laptop or other device to the Mini-PC's HDMI input (if available and configured) to share content directly to the meeting display and participants. Wireless content sharing may also be available depending on your Teams Rooms configuration.
- System Updates: Ensure the system is connected to the internet to receive automatic updates for Windows 10 IoT Enterprise and the Microsoft Teams Rooms App.
4. Maintenance
Regular maintenance helps ensure the longevity and optimal performance of your system.
- Cleaning: Use a soft, dry, anti-static cloth to clean the surfaces of the Mini-PC, MTouch Plus, and RoomSensor. For the MTouch Plus screen, use a screen-specific cleaning solution if necessary, applied to the cloth, not directly to the screen. Avoid abrasive cleaners or solvents.
- Ventilation: Ensure the Mini-PC's ventilation openings are clear and not obstructed to prevent overheating.
- Software Updates: Allow the system to perform automatic software updates for the operating system and Teams Rooms application. These updates often include performance improvements and security patches.
- Cable Management: Periodically check all cable connections to ensure they are secure and free from damage.
5. Troubleshooting
If you encounter issues with your Yealink MCOREKIT-C5-MS, refer to the following common troubleshooting steps:
| Problem | Possible Cause | Solution |
|---|---|---|
| System does not power on | Power cable disconnected; Power outlet issue | Check power cable connection to Mini-PC and outlet. Try a different outlet. |
| No display on screen | Display cable disconnected; Display turned off or incorrect input selected | Ensure HDMI/DisplayPort cables are securely connected. Verify display is on and set to the correct input source. |
| MTouch Plus unresponsive | Connection issue; Software glitch | Check the cable connecting MTouch Plus to Mini-PC. Restart the Mini-PC. |
| No network connection | Ethernet cable disconnected; Network configuration issue | Verify Ethernet cable is connected. Check network settings on the Mini-PC (if accessible) or consult your IT administrator. |
| Audio/Video issues in meeting | Peripheral not connected; Incorrect device selected in Teams Rooms app | Ensure camera, microphone, and speakers are properly connected. In the Teams Rooms app settings, verify the correct audio and video devices are selected. |
If problems persist, contact Yealink technical support or your IT administrator for further assistance.
6. Specifications
Key technical specifications for the Yealink MCOREKIT-C5-MS:
- Model Name: MCOREKIT-C5-MS
- Operating System: Windows 10 IoT Enterprise
- Processor: Intel Core i5 (quad-core)
- Hard Drive: SSD
- Graphics Coprocessor: Integrated
- MTouch Plus Screen Size: 11.6 Inches
- MTouch Plus Screen Resolution: 1366 x 768
- Computer Memory Type: DDR4 SDRAM, DDR5 RAM
- Item Weight: 11 pounds (approximate)
- Package Dimensions: 15 x 13 x 11 inches (approximate)
- Included Components: Mini-PC, MTouch Plus, RoomSensor (Monitor, Mouse also listed as included components in some specifications, referring to the overall system functionality)
7. Warranty and Support
The Yealink MCOREKIT-C5-MS Native Microsoft Teams Rooms System Base Kit includes a 2-year hardware warranty from the date of purchase. This warranty covers defects in materials and workmanship under normal use.
For technical support, warranty claims, or additional product information, please visit the official Yealink support website or contact your authorized Yealink reseller. Keep your proof of purchase for warranty validation.
Yealink Support Website: www.yealink.com/support


