
ASTGMI C3
ASTGMI Kids Camera C3 User Manual
Model: C3 | Brand: ASTGMI
Introduction
This user manual provides comprehensive instructions for operating and maintaining your ASTGMI Kids Camera C3. Designed for children aged 3-10, this digital camera offers a fun and engaging way for kids to explore photography and videography. Please read this manual carefully before using the camera to ensure proper function and longevity.

Figure 1: ASTGMI Kids Camera C3 (Blue) with included accessories.
Safety Information
Warning: Not for children under 3 years of age.
Always supervise young children during camera use. Keep small parts, such as the SD card, out of reach of infants to prevent choking hazards. Do not expose the camera to extreme temperatures or moisture. Use only the provided charging cable and accessories.
What's in the Box
- ASTGMI Kids Camera C3 (Blue)
- 32GB SD Card
- Silicone Protective Cover
- USB Charging Cable
- Lanyard

Figure 2: Package contents including camera, SD card, USB cable, and lanyard.
Product Overview
Familiarize yourself with the camera's components and controls.
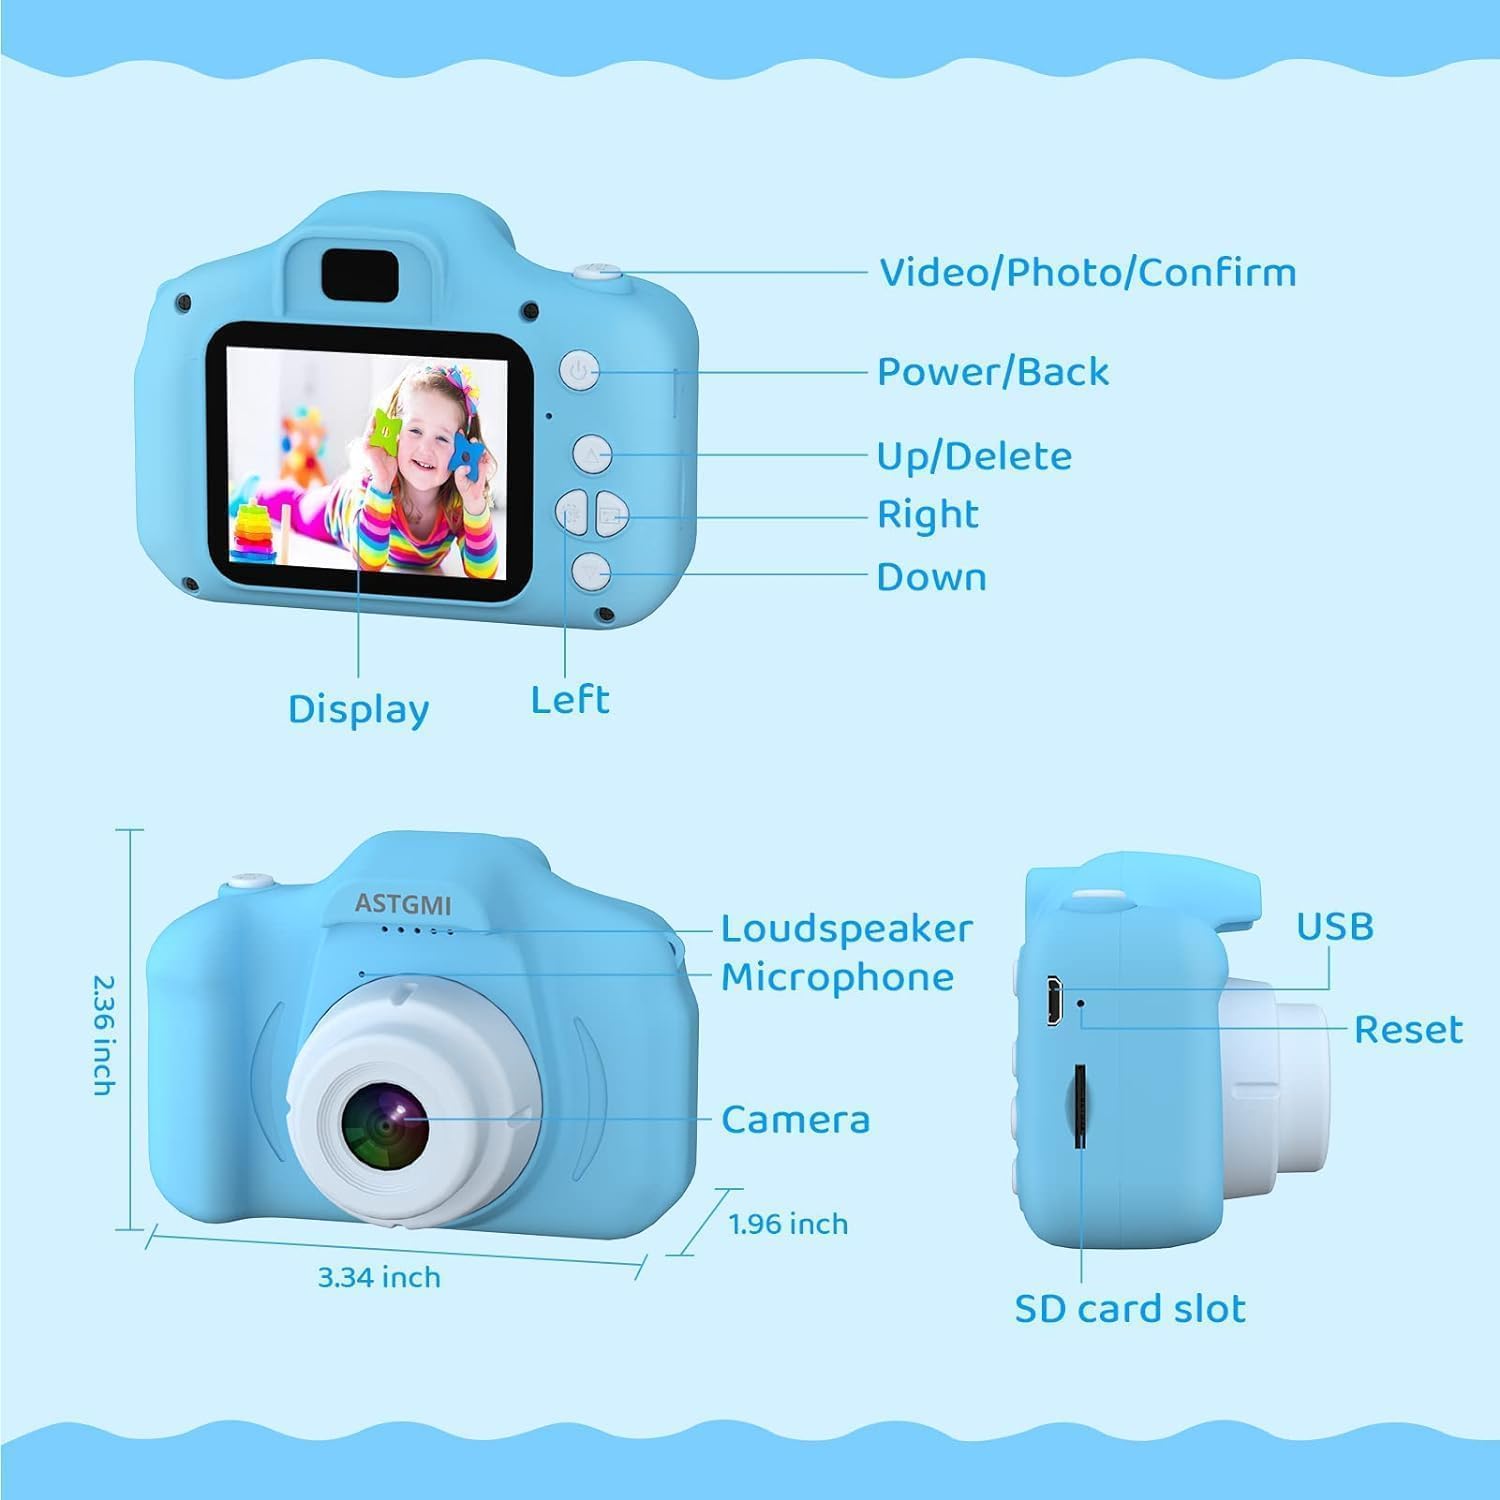
Figure 3: Front and back view of the camera with labeled parts.
Button Functions:
- Video/Photo/Confirm Button: Press to switch between video and photo modes, or to confirm selections in the menu.
- Power/Back Button: Press and hold to power on/off. Short press to go back to the previous menu.
- Up/Delete Button: Navigate up in menus. Long press to delete files.
- Right Button: Navigate right in menus.
- Down Button: Navigate down in menus.
Other components include the Display, Camera Lens, Loudspeaker, Microphone, USB Port, and Reset button.
Setup
1. Inserting the SD Card
Locate the SD card slot on the side of the camera. Gently insert the 32GB SD card with the metal contacts facing down until it clicks into place. To remove, push the card in slightly until it springs out.
2. Charging the Camera
Connect the provided USB charging cable to the camera's USB port and the other end to a USB power adapter (not included) or a computer USB port. The charging indicator light will illuminate. A full charge takes approximately 2-3 hours and provides 2-3 hours of continuous use. The camera features an automatic shut-off function to preserve battery life when not in operation.
3. Powering On/Off
Press and hold the Power/Back button for a few seconds to turn the camera on or off.
Operating Instructions
1. Taking Photos
From the main screen, press the Video/Photo/Confirm button to switch to photo mode. Aim the camera and press the Video/Photo/Confirm button again to capture a 12-megapixel photo. The camera features auto focus for clear images.

Figure 4: Capturing and reviewing moments with the camera.
Photo Features:
- Frames: Choose from 18 different frames to add fun borders to your photos.
- Filters: Apply 6 different filters to change the look of your pictures.
- Burst Shooting: Capture a series of photos quickly.
- Time-lapse: Set a timer for photos to be taken automatically at intervals (e.g., 2S, 5S, 10S).
- Digital Zoom: Use the navigation buttons to zoom in up to 4X.

Figure 5: A selection of the 18 available photo frames.

Figure 6: A selection of the 6 available photo filters.
2. Recording Videos
Press the Video/Photo/Confirm button to switch to video recording mode. Press it again to start recording 1080p HD video. Press once more to stop recording.

Figure 7: The camera supports 1080p HD video recording.
3. Playback
Navigate to the playback icon in the main menu using the navigation buttons and confirm with the Video/Photo/Confirm button. Use the navigation buttons to browse through your photos and videos. Press the Power/Back button to exit playback.
4. Puzzle Games
The camera includes 5 built-in puzzle games for entertainment. Access them from the main menu by selecting the game icon.

Figure 8: The camera includes 5 engaging puzzle games.
5. Menu Settings
From the main menu, select the 'Set Up' icon to access various camera settings, including:
- SD Format: Format the SD card (this will erase all data).
- Time Setting: Adjust date and time.
- Reset System: Restore factory settings.
- Photo Size: Adjust photo resolution.
- Language: Change the display language.
- Time Lapse: Configure time-lapse intervals.
- Burst Shooting: Enable/disable burst mode.
- Volume: Adjust sound volume.
- Version: View firmware version information.
The camera also offers 16 scene selections to optimize photo settings for different environments.
Maintenance
Cleaning the Camera
Use a soft, dry cloth to clean the camera body and screen. For the lens, use a specialized lens cleaning cloth. Do not use liquid cleaners or abrasive materials.
Storage
When not in use, store the camera in a cool, dry place, away from direct sunlight and extreme temperatures. It is recommended to remove the SD card if storing for extended periods.
Battery Care
To prolong battery life, avoid fully discharging the battery frequently. Charge the camera regularly, even if not in active use, to maintain battery health. The camera's automatic shut-off feature helps conserve power.
Troubleshooting
| Problem | Possible Cause | Solution |
|---|---|---|
| Camera does not turn on. | Low battery; System crash. | Charge the camera. Use a thin object (like a paperclip) to press the reset button located near the USB port. |
| Cannot take photos/videos. | SD card full or not inserted correctly. | Check SD card insertion. Delete unnecessary files or format the SD card (backup important data first). |
| Poor image quality. | Insufficient lighting; Dirty lens. | Ensure adequate lighting. Clean the camera lens with a soft cloth. |
| Camera freezes. | Software issue. | Press the reset button. |
Specifications
| Feature | Detail |
|---|---|
| Model Name | C3 |
| Brand | ASTGMI |
| Maximum Image Resolution | 12 MP |
| Video Resolution | 1080p |
| Screen Size | 35 Centimeters (approx. 1.38 inches) |
| Display Type | LCD |
| Battery Capacity | 600 mAh |
| Battery Average Life | 2.5 Hours |
| External Memory Size | 32 GB (SD Card included) |
| Image Stabilization | Digital |
| Connectivity Technology | USB |
| Age Range Description | Kid |
Warranty and Support
The ASTGMI Kids Camera C3 comes with a 2-year warranty from the date of purchase, covering manufacturing defects. Please retain your proof of purchase for warranty claims.
For technical support, troubleshooting assistance, or warranty inquiries, please contact ASTGMI customer service through the retailer where the product was purchased or visit the official ASTGMI website for contact information.
Ask a question about this manual
Ask about setup, troubleshooting, compatibility, parts, safety, or missing instructions. Manuals+ will review the question and use this page’s manual context to help answer it.