
1. Introduction
Thank you for choosing the ODK L-Shaped Gaming Desk. This manual provides detailed instructions for the assembly, operation, maintenance, and troubleshooting of your new desk. Please read this manual carefully before beginning assembly and retain it for future reference to ensure safe and optimal use of your product.
This desk is designed to provide a versatile and functional workspace, featuring integrated LED lighting, convenient power outlets, USB ports, and ample storage solutions. Its reversible design allows for flexible configuration to suit various room layouts.
2. Product Features
- Integrated LED Lighting: Features built-in LED lighting with 7 colors and 13 lighting modes to enhance your environment. The lighting system includes a memory function to recall the last used mode upon activation.
- Convenient Charging Station: Equipped with 2 standard AC outlets (110-240V/6A) and 2 USB ports (5V/2A) for easy charging of electronic devices such as laptops, phones, and gaming accessories.
- Reversible L-Shape Design: The desk can be configured as either a left-sided or right-sided L-shape to adapt to your specific space requirements and preferences.
- Spacious Desktop & Monitor Stand: Offers a large desktop surface for multiple monitors and equipment. A full-length monitor stand elevates displays to an ergonomic viewing height and provides additional storage space underneath.
- Ample Storage Solutions: Includes a distinctive grid-design 2-tier under-desk bookshelf, a dedicated computer tower stand, and additional 2-tier storage shelves. The adjustable 2-tier storage provides flexibility for items of various sizes.
- High Stability Construction: Constructed from premium MDF board and a sturdy metal frame, ensuring durability and stability for long-term use.

Figure 1: Overview of the ODK L-Shaped Gaming Desk with LED lighting activated.

Figure 2: Illustration of the customizable storage space, including two-tier shelves and a dedicated computer tower stand.
3. Setup Instructions
Before assembly, ensure all components are present and undamaged. Refer to the included hardware list and diagrams. It is recommended to assemble the desk on a soft, clean surface to prevent scratches.
3.1 Unpacking and Component Check
- Carefully unpack all parts from the packaging.
- Verify all components against the parts list provided in your packaging. If any parts are missing or damaged, contact customer support immediately.
3.2 Assembly Steps
Follow the step-by-step diagrams provided in your physical assembly guide. The key feature of this desk is its reversible design, allowing you to choose the orientation of the L-shape (left or right) during assembly.
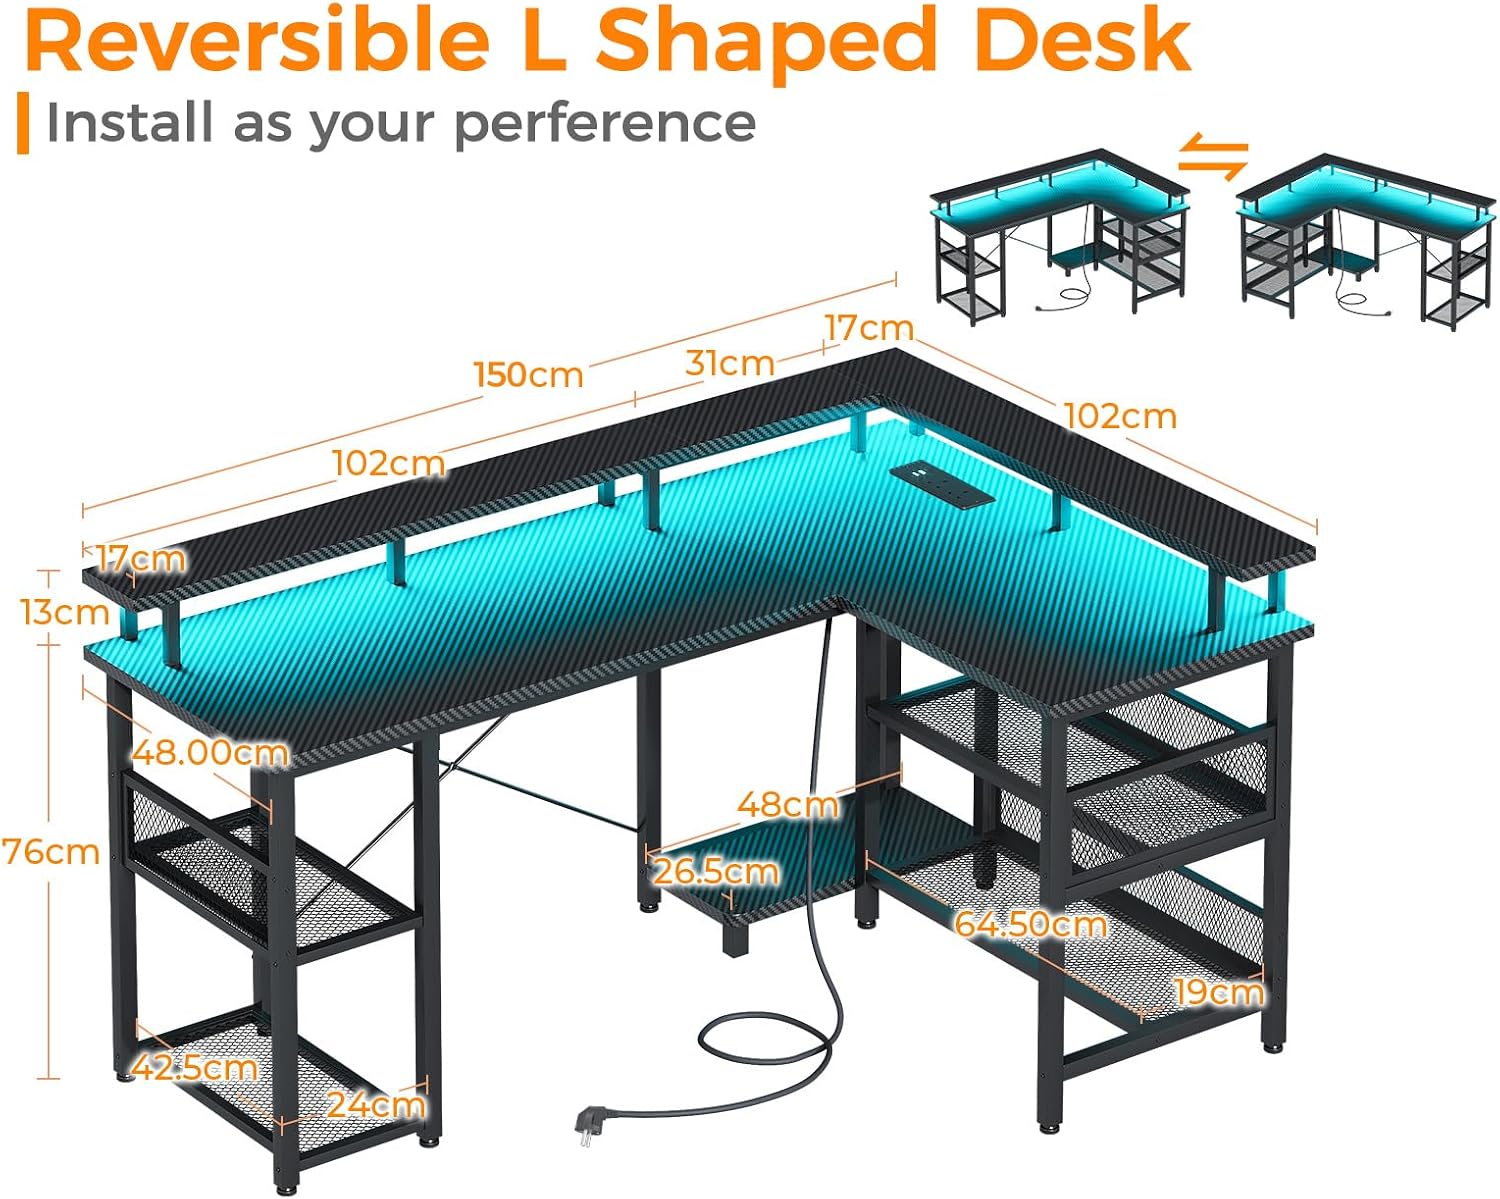
Figure 3: Illustration of the reversible L-shaped design and key dimensions (150cm x 102cm).
- Frame Assembly: Begin by assembling the metal frame components. Ensure all screws are tightened securely but do not overtighten until the entire frame is assembled.
- Desktop Placement: Position the desktop panels onto the assembled frame. Pay attention to the orientation if you are choosing a specific L-shape configuration.
- Storage Shelves: Attach the 2-tier storage shelves and the computer tower stand according to your desired left or right L-shape setup. The adjustable shelves can be positioned at different heights.
- Monitor Stand: Secure the monitor stand to the main desktop.
- Power Outlet Unit: Integrate the power outlet and USB port unit into its designated recessed area on the desktop.
- Final Tightening: Once all components are in place and aligned, fully tighten all screws.
Note: For optimal stability, ensure the desk is placed on a level surface.
4. Operating Instructions
4.1 LED Lighting System
The desk features integrated LED lighting. Connect the LED power cable to a standard wall outlet. A control button or remote (if included) allows you to manage the lighting.
- Power On/Off: Press the power button to turn the LED lights on or off.
- Color Selection: Cycle through 7 available colors by pressing the color selection button.
- Mode Selection: Choose from 13 different lighting modes (e.g., static, flashing, fading) using the mode button.
- Memory Function: The system will automatically recall the last selected color and mode when powered on again.
4.2 Power Outlet and USB Ports
The built-in power strip provides convenient access to power for your devices.
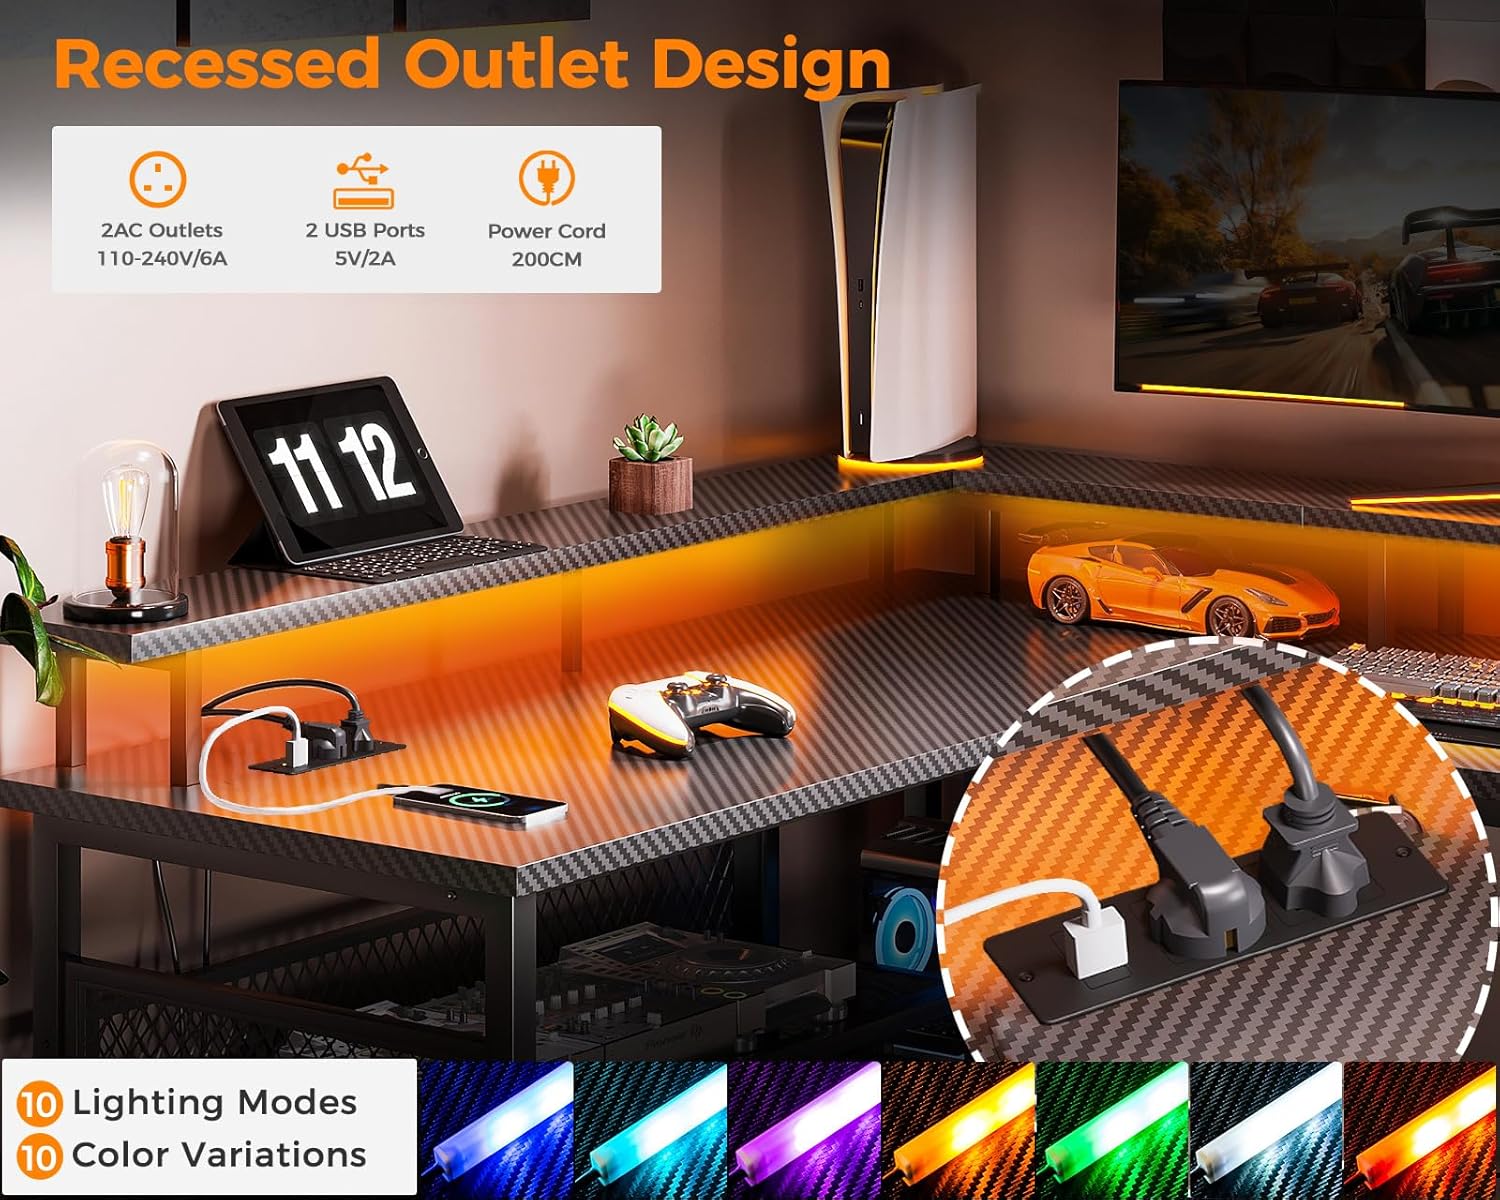
Figure 4: Detail of the recessed power outlet unit with AC and USB charging ports.
- AC Outlets: Plug in standard electronic devices into the 2 AC outlets (110-240V/6A).
- USB Ports: Connect USB-powered devices (e.g., smartphones, tablets) to the 2 USB ports (5V/2A) for charging.
- Power Cord: Ensure the desk's main power cord (200cm length) is securely plugged into a functional wall outlet.
Caution: Do not overload the power outlets. Ensure total power consumption does not exceed the rated capacity.
5. Maintenance
Regular maintenance will help preserve the appearance and functionality of your ODK Gaming Desk.
- Cleaning: Wipe surfaces with a soft, damp cloth. Avoid abrasive cleaners or harsh chemicals that may damage the finish. For the carbon fiber texture, a slightly damp cloth is sufficient.
- Spills: Immediately wipe up any spills to prevent damage to the desktop material and electrical components.
- Tightening: Periodically check and retighten all screws and fasteners to ensure the desk remains stable.
- Electrical Components: Ensure the power outlet unit and LED strips are kept dry. Do not attempt to repair electrical components yourself.
6. Troubleshooting
If you encounter issues with your ODK Gaming Desk, refer to the following common problems and solutions:
| Problem | Possible Cause | Solution |
|---|---|---|
| LED lights not turning on. | Power cable not connected; LED controller malfunction; power outage. | Ensure the power cable is securely plugged into a working outlet. Check the LED controller for damage. Test the outlet with another device. |
| Power outlets/USB ports not working. | Desk power cord unplugged; circuit breaker tripped; device overload. | Verify the desk's main power cord is plugged in. Check your home's circuit breaker. Unplug some devices to reduce load. |
| Desk feels wobbly or unstable. | Loose screws; uneven floor; incorrect assembly. | Check and tighten all assembly screws. Ensure the desk is on a level surface; use adjustable feet (if present) to stabilize. Review assembly steps. |
| Difficulty changing LED colors/modes. | Controller issue; interference. | Ensure the controller is functioning correctly. Try unplugging and replugging the LED power. |
If the problem persists after attempting these solutions, please contact ODK customer support for further assistance.
7. Specifications
| Feature | Detail |
|---|---|
| Brand | ODK |
| Model | L-Shaped Gaming Desk |
| Item Shape | L-Shape (Reversible) |
| Dimensions (D x W x H) | 150D x 102W x 88.7H centimeters |
| Color | Carbon Fiber Black |
| Material | Premium MDF Board, Iron Frame |
| Special Features | Built-In USB Outlet, Monitor Stand, Reversible Design, LED Lights |
| AC Outlets | 2 (110-240V/6A) |
| USB Ports | 2 (5V/2A) |
| Power Cord Length | 200 cm |
| LED Lighting | 7 Colors, 13 Modes, Memory Function |
| Recommended Use | Gaming, Home Office, Study Room |
8. Warranty and Support
ODK stands behind the quality of its products. For specific warranty details, please refer to the warranty card included with your purchase or visit the official ODK website.
If you require technical assistance, have questions about assembly, or need to report missing/damaged parts, please contact ODK customer support. Have your product model number and purchase date ready when contacting support.
Customer Support Contact: Please refer to the contact information provided in your product packaging or on the official ODK website.


