
Pro'sKit MT-1236
Pro’sKit MT-1236 True RMS Digital Multimeter User Manual
Model: MT-1236 | Brand: Pro'sKit
1. Product Overview
The Pro’sKit MT-1236 is a compact yet multifunctional True RMS Digital Multimeter designed for precise electrical measurements. It features a clear LCD display and robust overload protection, ensuring user safety and accurate readings across various applications.

Figure 1: Pro’sKit MT-1236 Digital Multimeter in its retail packaging.
This multimeter is equipped with a 3 5/6 5999 counts LCD display, providing detailed measurement results. Its True RMS capability ensures accurate readings for both sinusoidal and non-sinusoidal waveforms, making it a reliable tool for professionals and DIY enthusiasts alike.
2. Key Features and Components
The MT-1236 is built with user convenience and durability in mind. Below are its primary features and a breakdown of its components:
- True RMS Measurement: Provides accurate readings for complex waveforms.
- Full Functionality: Capable of measuring ACV, ACA, DCV, DCA, Resistance, Frequency, Cycle Duty, Diode Test, and more.
- Auto Range: Simplifies operation by automatically selecting the correct measurement range.
- Overload Protection: Enhances safety during operation.
- LED Light & NCV Detection: Integrated LED light for working in low-light conditions and Non-Contact Voltage (NCV) detection for added safety.
- Durable Case: High edge design for better protection against drops and impacts.
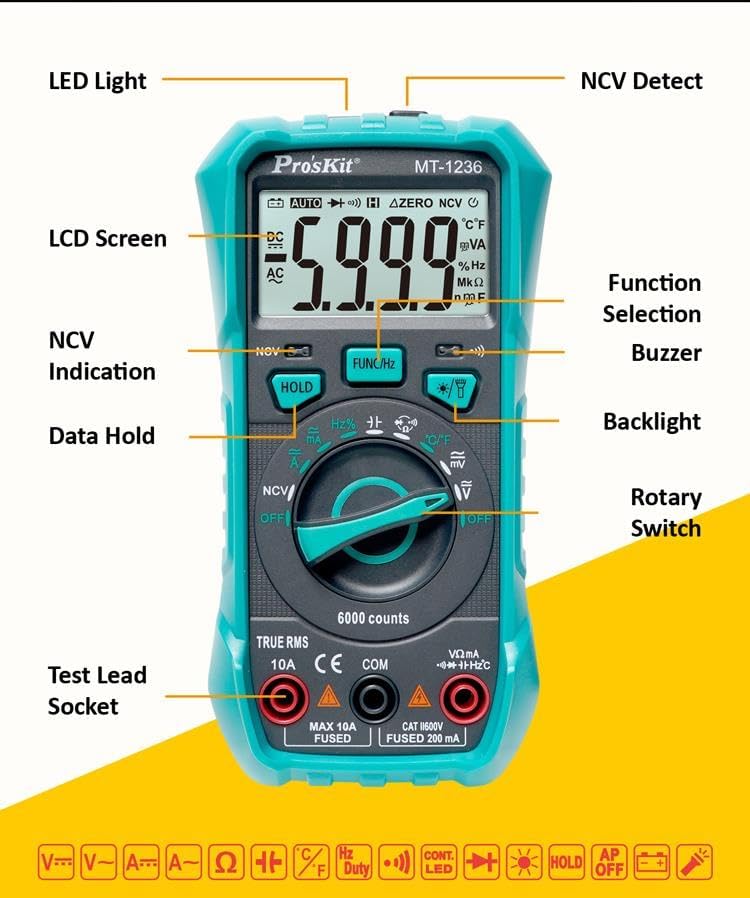
Figure 2: Detailed view of the MT-1236 Multimeter with its main components labeled, including LCD Screen, Function Selection, Rotary Switch, Test Lead Sockets, and various buttons.
3. Operating Instructions
This section provides guidance on how to perform various measurements using your MT-1236 Digital Multimeter.
3.1 General Operation
- Power On/Off: Rotate the rotary switch from 'OFF' to any measurement function to power on. Rotate back to 'OFF' to power off.
- Function Selection: Use the rotary switch to select the desired measurement function (e.g., V~ for AC Voltage, V- for DC Voltage, Ω for Resistance).
- Data Hold: Press the 'HOLD' button to freeze the current reading on the display. Press again to release.
- Backlight/LED Light: Press the light button to activate the LCD backlight. Long press the light button to turn on/off the integrated LED light for illuminating the test area.
3.2 Voltage and Current Measurement
The MT-1236 supports both AC and DC voltage and current measurements.

Figure 3: Visual examples of various measurement types including DCV, ACV, Resistance, and Diode tests.
- DCV Measurement: Connect the red test lead to the 'VΩmA' jack and the black test lead to the 'COM' jack. Select 'V-' on the rotary switch. Connect the leads across the DC voltage source.
- ACV Measurement: Connect the red test lead to the 'VΩmA' jack and the black test lead to the 'COM' jack. Select 'V~' on the rotary switch. Connect the leads across the AC voltage source.
- DCA/ACA Measurement: For current measurements, ensure the correct jack (10A or 200mA) is used and the multimeter is connected in series with the circuit.
3.3 Resistance, Continuity, and Diode Test
- Resistance Measurement: Select 'Ω' on the rotary switch. Connect the test leads across the component to measure its resistance.
- Continuity Test: Select the continuity function (often shared with diode or resistance). A buzzer will sound if continuity is detected.
- Diode Test: Select the diode function. Connect the leads across the diode to test its forward voltage drop.
3.4 Non-Contact Voltage (NCV) Detection
The NCV feature allows for quick and safe detection of AC voltage without direct contact.
- Select the NCV function on the rotary switch.
- Move the top part of the multimeter close to the suspected voltage source.
- The device will provide visual and audio alarms if AC voltage is detected.
3.5 Official Product Video
For a visual guide on the features and operation of the Pro’sKit MT-1236 True RMS Digital Multimeter, please watch the official product video below:
Video 1: Official overview of the Pro’sKit MT-1236 True RMS Digital Multimeter, demonstrating its features and various measurement capabilities.
4. Safety Information
Always prioritize safety when using electrical testing equipment. The MT-1236 is designed with several safety features, but proper handling is crucial.
- Overload Protection: The multimeter is equipped with overload protection on various ranges to prevent damage to the device and ensure user safety.
- Inspect Before Use: Always inspect the multimeter and test leads for any damage before use. Do not use if any damage is visible.
- Proper Range Selection: While the auto-ranging feature simplifies use, always be aware of the maximum input limits for each function.
- Do Not Exceed Ratings: Never attempt to measure voltages or currents that exceed the specified maximum ratings of the device.
- Use in Dry Conditions: Avoid using the multimeter in wet or damp environments.

Figure 4: The durable case of the MT-1236, designed with high edges for enhanced protection.
5. Specifications
| Attribute | Detail |
|---|---|
| Model Number | QD-Pro-MT-1236-C |
| Product Dimensions | 9.84 x 7.87 x 3.94 inches |
| Item Weight | 7.41 ounces (210 Grams) |
| Power Source | Battery Powered (1 Lithium Polymer battery included) |
| Display Counts | 3 5/6 (5999 Counts) |
| Measurement Type | True RMS |
| Color | Multicolored |
| Manufacturer | Pro'sKit Taiwan |
6. What's in the Box
The Pro’sKit MT-1236 package includes:
- 1 x MT-1236-C Digital Multimeter
- Test Leads (Red and Black)
- 1 x Lithium Polymer Battery
- User Manual (this document)
7. Maintenance and Care
- Cleaning: Wipe the device with a dry, clean cloth. Do not use abrasive cleaners or solvents.
- Battery Replacement: Replace the battery when the low battery indicator appears on the display to ensure accurate readings.
- Storage: Store the multimeter in a cool, dry place away from direct sunlight and extreme temperatures.
- Fuse Replacement: If the multimeter fails to function correctly on current ranges, the fuse may need replacement. Refer to the specifications for the correct fuse type and rating.
8. Troubleshooting
If you encounter issues with your MT-1236, consider the following common troubleshooting steps:
- No Display/Faint Display: Check battery level and replace if necessary.
- Incorrect Readings: Ensure test leads are properly connected and the correct function range is selected. Verify battery charge.
- No Continuity Beep: Check test leads for damage or open circuits. Ensure the continuity function is selected.
- Overload Indication (OL): The measured value exceeds the selected range. Switch to a higher range or verify the circuit.
For persistent issues, please contact Pro'sKit customer support.
9. Warranty and Support
Pro'sKit products are manufactured to high-quality standards. For warranty information and technical support, please refer to the warranty card included with your product or visit the official Pro'sKit website. Keep your purchase receipt as proof of purchase.
For additional resources and product information, visit the Pro'sKit Store on Amazon.
Ask a question about this manual
Ask about setup, troubleshooting, compatibility, parts, safety, or missing instructions. Manuals+ will review the question and use this page’s manual context to help answer it.