
1. Introduction
The RUGGARD EDC-80LC Electronic Dry Cabinet is engineered to safeguard your valuable equipment, such as cameras, lenses, photographic and optical devices, and mobile electronics, from the detrimental effects of excessive moisture, dirt, and dust. Utilizing a fast-acting TE Cooling Wafer, this cabinet precisely regulates the interior's relative humidity within a range of 35% to 60%, effectively preventing corrosion and mold growth. Its silent, dripless operation and secure combination lock make it an ideal storage solution.

Image 1.1: The RUGGARD EDC-80LC Electronic Dry Cabinet, showing its exterior and key dimensions (21.3"W x 20.3"H x 14.3"D).
2. Safety Information
- Leveling: Ensure the cabinet is placed on a stable, level surface to prevent tipping and ensure proper operation. Adjust the leveling feet as needed.
- Movement: Do not move the cabinet while it is in operation or contains items, as this may damage the unit or its contents.
- Power Supply: Use only the included multi-voltage power supply. Do not attempt to use other power adapters.
- Ventilation: Ensure adequate air circulation around the cabinet to allow for efficient heat dissipation from the dehumidifying unit.
- Internal Temperature: The cabinet regulates humidity, not temperature. Avoid placing it in areas with extreme temperature fluctuations.
3. Setup
- Unpacking: Carefully remove the dry cabinet from its packaging. Inspect for any signs of damage during transit.
- Handle Installation: The door handle is typically installed on the inside for shipping protection. Remove the handle from the inside of the door and securely attach it to the outside using the provided screws.
- Leveling: Place the cabinet in its desired location. Adjust the four feet, especially the two leveling feet, to ensure the cabinet is stable and level on uneven surfaces.
- Shelf Installation: The cabinet includes an adjustable metal shelf and two padded shelf liners. Insert the shelf brackets into the desired slots on the interior sides of the cabinet. Place the metal shelf on the brackets, then lay the padded liners on the shelf and the cabinet base.
- Power Connection: Connect the multi-voltage power supply to the cabinet and then plug it into a suitable power outlet.
- Initial Dehumidification: After plugging in, keep the cabinet door open for 3 to 5 hours to allow the internal air to circulate and stabilize before adjusting the humidity settings.

Image 3.1: Bottom view of the dry cabinet, highlighting the adjustable leveling feet for stability.

Image 3.2: The dry cabinet interior with the door open and shelf removed, demonstrating shelf adjustability.
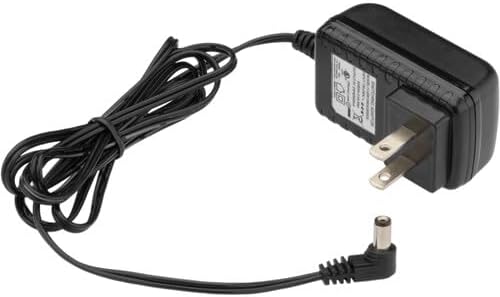
Image 3.3: The included multi-voltage power supply for the dry cabinet.
Setup Video Guide
Video 3.1: This video demonstrates the initial setup steps, including handle installation and shelf adjustment for the dry cabinet.
4. Operating Instructions
4.1 Control Panel Overview
The top of the cabinet features an LCD display and control buttons for monitoring and adjusting settings.
- LCD Display: Shows the current internal temperature (in Fahrenheit or Celsius) and relative humidity (%RH).
- Up/Down Arrows (▲/▼): Used to adjust the target humidity level.
- SET Button: Confirms the desired humidity setting.
- Light Button (💡): Toggles the interior LED lights on and off.
- F/C Set Button: Switches the temperature display between Fahrenheit (°F) and Celsius (°C).
4.2 Adjusting Humidity
- Press the SET button once. The humidity percentage on the display will begin to flash.
- Use the Up (▲) or Down (▼) arrow buttons to set your desired relative humidity level (between 35% and 60%).
- Press the SET button again to confirm your selection. The display will stop flashing, and the cabinet will begin to adjust to the new humidity level. This process typically takes 1 to 3 hours.
4.3 Using the Interior LED Lights
Press the Light (💡) button on the control panel to illuminate the interior of the cabinet, making it easier to view and access your stored items. Press it again to turn the lights off.
4.4 Combination Lock
The cabinet door is equipped with a three-digit combination lock for added security. To set your combination:
- With the lock in the unlocked position, locate the small reset button on the side or bottom of the lock mechanism.
- Use a pen or a pointed object to press and hold the reset button.
- While holding the reset button, set your desired three-digit combination by rotating the dials.
- Release the reset button. Your new combination is now set. Test the combination before closing the door.
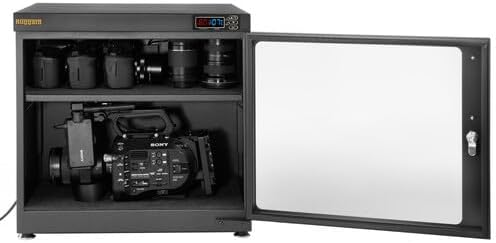
Image 4.1: The dry cabinet interior, showcasing stored camera equipment and the interior LED lighting.
5. Maintenance
- Cleaning: Wipe the exterior of the cabinet with a soft, damp cloth. For the glass door, use a glass cleaner. Avoid abrasive cleaners that could scratch surfaces.
- Interior Cleaning: Periodically remove items and wipe down the interior surfaces and shelves with a dry or slightly damp cloth. Ensure the interior is completely dry before placing items back inside.
- Gasket Seal: Check the door's gasket seal regularly for any signs of wear or damage. A proper seal is crucial for maintaining consistent humidity levels.
- Power Cord: Inspect the power cord for any damage. If damaged, discontinue use and contact customer support.
6. Troubleshooting
- Humidity Not Changing:
- Ensure the door is fully closed and the gasket seal is intact.
- Verify the power supply is connected and the unit is powered on.
- Allow sufficient time (1-3 hours) for the humidity to adjust after setting.
- Avoid frequent opening of the door, which can disrupt internal humidity.
- Display Not Working:
- Check the power connection.
- Ensure the power outlet is functional.
- Unusual Noises: The cabinet operates silently. If you hear unusual noises, disconnect power and contact customer support.
7. Specifications
| Feature | Detail |
|---|---|
| Volume Capacity | 2.8 ft³ / 80 L |
| Humidity Control Range | 35% to 60% RH |
| Security | 3-Digit Combination Lock |
| Control Interface | LCD Display (Temperature & Humidity) |
| AC Input Power | 110 to 240 VAC, 50 / 60 Hz |
| Power Consumption | 8 W |
| Construction Material | Glass, Steel |
| Interior Dimensions (W x H x D) | 21.1 x 17.7 x 13" / 53.6 x 45 x 33 cm |
| Exterior Dimensions (W x H x D) | 21.3 x 20.3 x 14.3" / 54.1 x 51.6 x 36.3 cm |
| Weight | 29.5 lb / 13.4 kg |
| Special Features | Virtually Silent Operation, Dripless Design, Interior LED Lighting, Padded Base and Shelves, User-selectable °F/°C Display |
8. Warranty and Support
For warranty information, please refer to the documentation included with your purchase or visit the official RUGGARD website. If you encounter any issues or require technical assistance, please contact RUGGARD customer support. Keep your purchase receipt and model number (EDC-80LC) handy for faster service.


