
OLIGHT Arkfeld pro
OLIGHT Arkfeld Pro Rechargeable EDC Flat Flashlight User Manual
Model: Arkfeld pro
Brand: OLIGHT
1. Introduction
The OLIGHT Arkfeld Pro is a compact and powerful everyday carry (EDC) flashlight designed for versatility and reliability. It integrates three distinct light sources: a high-output white LED, a precise green laser beam, and a potent UV light. This manual provides essential information on its setup, operation, maintenance, and specifications to ensure optimal performance and user safety.

Figure 1: OLIGHT Arkfeld Pro Flashlight (Orange CW)

Figure 2: Triple Light Sources - UV, Green Beam, and White Light
Key Features:
- Three-in-One Functionality: Combines white light (up to 1300 lumens), UV (900mW at 365nm), and a green beam (≤5mW, Class 3R).
- Intuitive Operation: Easily switch between modes using the circular selector.
- Magnetic Charging: Convenient and secure charging via the included magnetic cable.
- Battery Level Indicator: Five-level indicator for real-time battery status monitoring.
- Durable Construction: Made from aluminum for robust performance.
2. Setup
2.1 Initial Charging
Before first use, fully charge your Arkfeld Pro flashlight. Connect the magnetic charging cable to the tail of the flashlight and plug the USB end into a compatible power source (e.g., USB wall adapter, computer USB port). The battery indicator lights will illuminate during charging.

Figure 3: Magnetic Charging Connection
2.2 Battery Level Indicator
The Arkfeld Pro features a five-level battery indicator to keep you informed of the remaining power. Observe the indicator lights next to the circular selector:
- Four green lights: >75% battery
- Three green lights: 75% to 50% battery
- Two green lights: 50% to 25% battery
- One green light: 25% to 10% battery
- One red light: <10% battery or in lockout mode

Figure 4: Battery Level Indicator
3. Operating Instructions
3.1 Lockout Function
The Arkfeld Pro includes a lockout function to prevent accidental activation. If the flashlight does not turn on, it may be in lockout mode. To unlock, press and hold the central button for more than 1 second until the light briefly flashes or the red indicator light turns off.

Figure 5: Lockout Function
3.2 Switching Light Modes
Rotate the circular selector to choose between the three main light modes: White Light, Green Beam, and UV Light.
3.3 White Light Operation
- Turn On/Off: With the selector set to White Light, press the central button once.
- Change Brightness: While the white light is on, press and hold the central button to cycle through Moon, Low, Medium, and High brightness levels. Release the button at your desired level.
- Turbo Mode: Quickly double-press the central button for maximum brightness (1300 lumens).
- Strobe Mode: Quickly triple-press the central button to activate strobe.
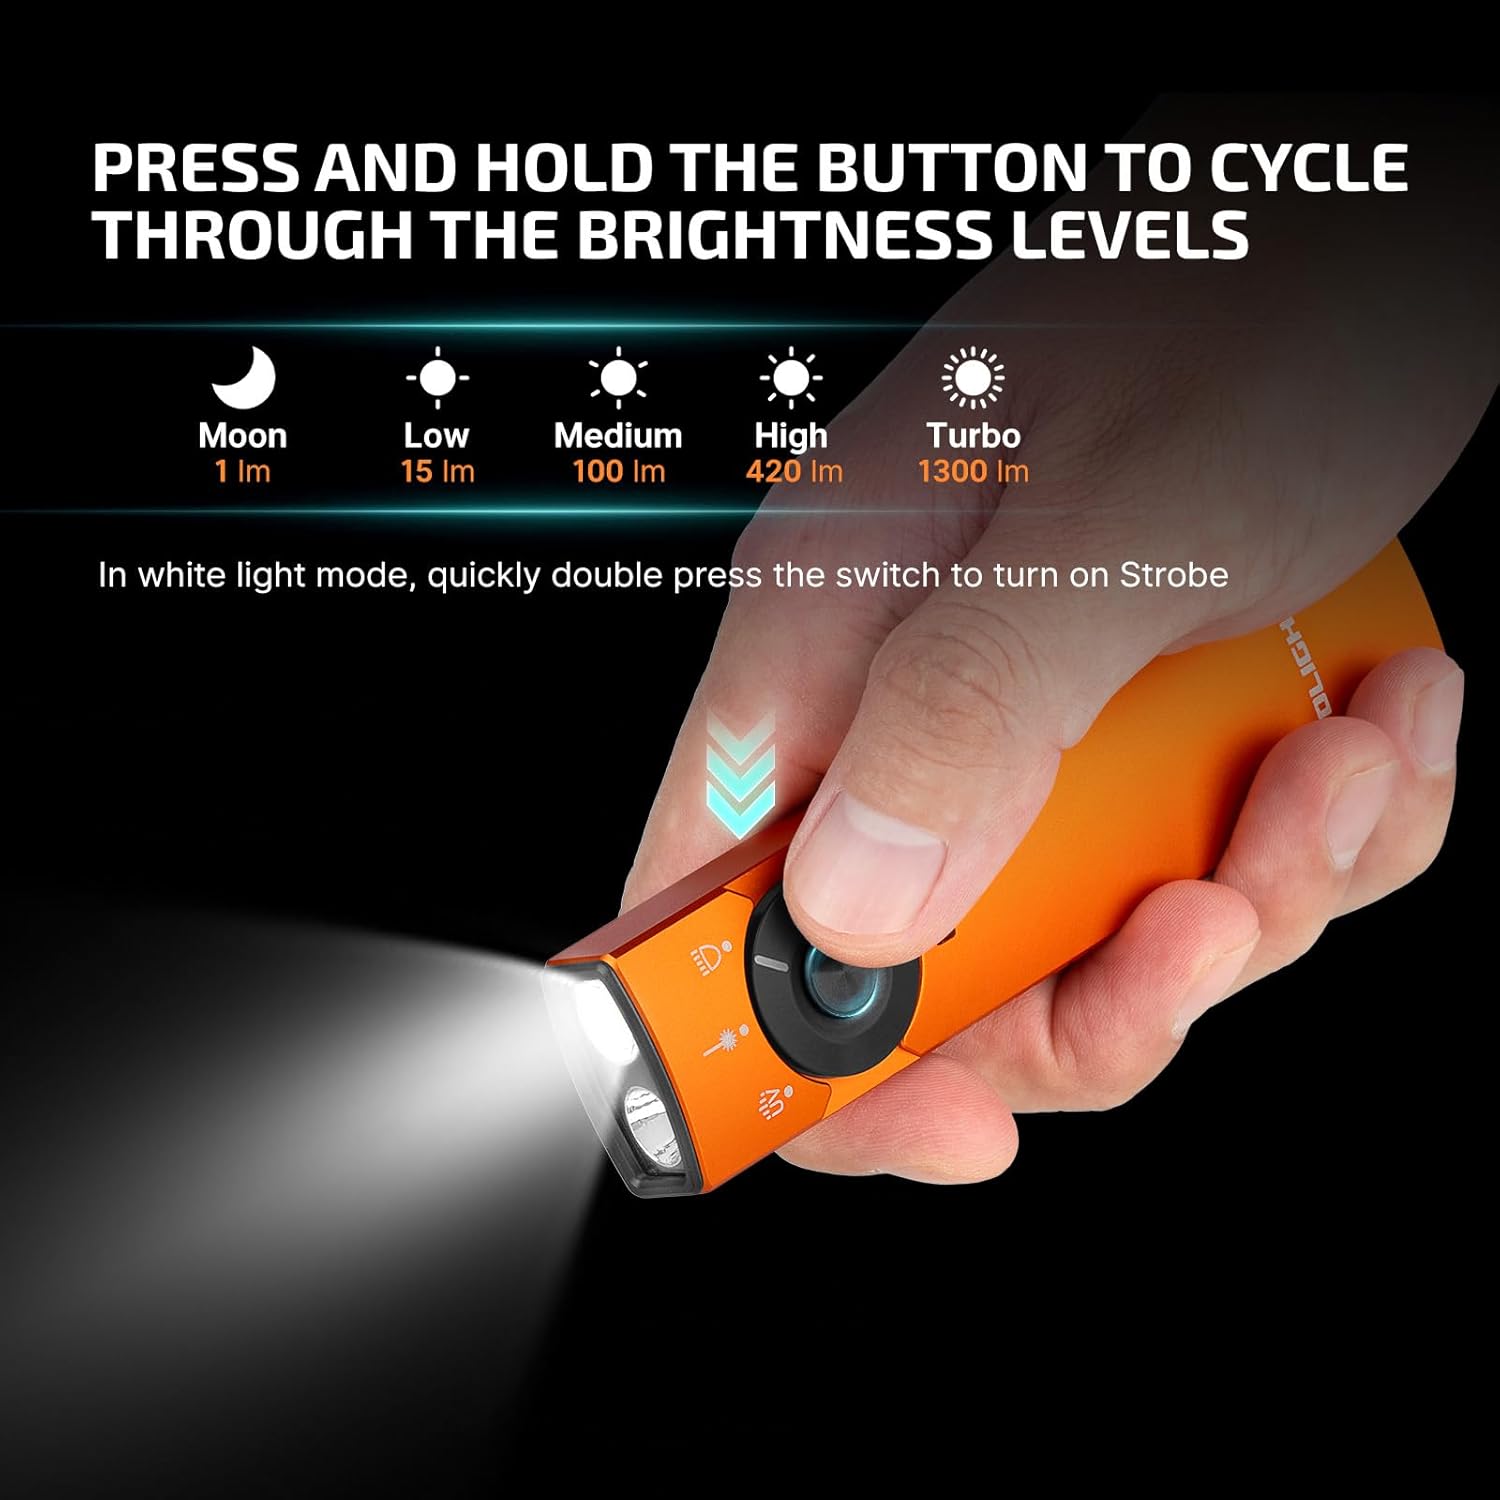
Figure 6: White Light Brightness Levels and Turbo Activation
3.4 Green Beam Operation
With the selector set to Green Beam, press the central button once to activate the green laser. This feature is useful for pointing, presentations, or even pet training.

Figure 7: Green Beam in Use
3.5 UV Light Operation
With the selector set to UV Light, press the central button once to activate the UV light. The Arkfeld Pro's 365nm UV light offers a purer and more professional experience, ideal for detecting hidden stains, authenticating documents, or inspecting for certain materials.

Figure 8: UV Light for Enhanced Clarity
4. Maintenance
To ensure the longevity and optimal performance of your OLIGHT Arkfeld Pro, follow these maintenance guidelines:
- Cleaning: Regularly wipe the flashlight body with a soft, damp cloth. For optical surfaces, use a lens cleaning cloth.
- UV Light for Cleaning Inspection: The powerful UV light can be used to reveal unexpected stains or residues on surfaces, aiding in thorough cleaning.

Figure 9: Reveal Unexpected Stains with UV Light
5. Troubleshooting
If your Arkfeld Pro is not functioning as expected, consider the following:
- Flashlight Not Turning On: Check if the flashlight is in lockout mode. Refer to Section 3.1 for instructions on how to unlock it.
- Low Brightness or Short Runtime: Ensure the battery is fully charged. Refer to Section 2.1 for charging instructions.
- Magnetic Charging Not Working: Ensure the magnetic cable is clean and properly aligned with the tailcap. Check the USB power source.
6. Specifications
| Feature | Value |
|---|---|
| Special Feature | Rechargeable |
| Color | Orange |
| Power Source | Battery Powered |
| Light Source Type | LED, Green Beam, UV |
| Material | Aluminum |
| White Brightness | 1300 Lumens |
| Included Components | Arkfeld PRO x 1, Charging Cable |
| Product Dimensions | 0.62"D x 1.06"W x 4.72"H |
| Voltage | 3.7 Volts |
| Light Path Distance | 102 Meters |
| Battery Cell Composition | Lithium Ion |
| Item Weight | 5.92 ounces |
| Number of Batteries | 1 Lithium Polymer batteries required. (included) |
| Water Resistance Level | Waterproof |
| Runtime | 11 minutes (Turbo) |
| Item model number | Arkfeld pro |
7. Warranty and Support
OLIGHT is committed to providing high-quality flashlights and ensuring customer satisfaction. The company prides itself on delivering hope and belief to people in need, aiming to make the world brighter with its actions.
For detailed warranty information, troubleshooting guides, and additional support, please refer to the official user manual PDF:
Related documentsArkfeld pro


Ask a question about this manual
Ask about setup, troubleshooting, compatibility, parts, safety, or missing instructions. Manuals+ will review the question and use this page’s manual context to help answer it.