
1. Introduction
This manual provides essential information for the safe and efficient operation of your inBEKEA 4000W Pure Sine Wave Inverter. This device converts 12V DC battery power into 110V AC household power, suitable for various applications including camping, outdoor activities, road trips, and remote job sites. Please read this manual thoroughly before installation and use.
2. Safety Instructions
Failure to follow these safety instructions may result in injury, damage to the inverter, or damage to connected devices.
- Use only the standard battery cables provided with the inverter. Using non-standard cables may prevent the inverter from delivering full power.
- Do not connect the inverter directly to grid power.
- Ensure correct polarity when connecting to the battery. Reverse connection of positive and negative terminals is strictly forbidden and will cause damage.
- Do not overload the inverter. Ensure the continuous power rating of the inverter meets the requirements of your appliances.
- This inverter is not recommended for inductive loads such as refrigerators, iceboxes, coffee machines, pumps, microwave ovens, or vacuum cleaners without careful consideration of their surge power requirements. Consult the manufacturer if unsure.
- Keep the inverter in a well-ventilated area to prevent overheating.
- Keep away from water, flammable materials, and direct sunlight.
3. Product Features
- Pure Sine Wave Output: Provides clean and stable power, compatible with most electrical appliances.
- Dual AC Outlets: Equipped with two 110V AC output sockets for connecting multiple devices.
- Comprehensive Protection: Features over-temperature shutdown, automatic overload protection, over-voltage protection, short-circuit protection, and under-voltage protection.
- Digital LCD Display: Clearly shows battery power level, battery input voltage, AC output voltage, output power, and warning indicators for overvoltage, undervoltage, overload, and short circuit.
- Durable Construction: Housed in a robust aluminum alloy shell for protection against drops and impacts.
- Efficient Cooling: Dual cooling fans activate automatically when the temperature reaches 45℃ or the load exceeds 480 Watts.
4. Package Contents
Upon opening the package, please verify that all items are present and undamaged:
- inBEKEA 4000W Pure Sine Wave Inverter (12V DC to 110V AC)
- User Manual
- One set of inverter battery cables (50 cm length)
- Spare fuses
5. Specifications
| Parameter | Value |
|---|---|
| Output Wave Form | Pure Sine Wave |
| Input Voltage | DC 12V |
| Output Voltage | AC 110V (60Hz) |
| Continuous Output Power | 4000W |
| Peak Output Power | 5000W |
| AC Sockets | 2 x US Type |
| Cooling System | Dual cooling fans (activates at ≥ 45°C or load > 480W) |
| Battery Cables Length | 50 cm |
Understanding Pure Sine Wave Technology
Pure sine wave output is crucial for sensitive electronics. Unlike modified sine wave inverters, pure sine wave output mimics the waveform of standard household electricity, ensuring compatibility and reducing interference with appliances like laptops, medical equipment, and audio systems. This results in quieter operation and extended lifespan for your devices.

This graphic illustrates the benefits of pure sine wave output, highlighting its compatibility with most electrical appliances and its ability to reduce interference compared to other waveforms.
6. Setup and Installation
Follow these steps to correctly connect your inverter to a 12V battery:
- Prepare Inverter Terminals: Locate the positive (+) and negative (-) terminals on the inverter. Twist off the terminal nuts.
- Connect Power Cords: Insert the ring terminals of the provided battery cables onto the inverter's terminals, ensuring the red cable connects to the positive (+) terminal and the black cable to the negative (-) terminal. Tighten the terminal nuts securely.
- Connect to Battery: Attach the battery clamps of the red cable to the positive (+) terminal of your 12V battery and the black cable clamp to the negative (-) terminal. Double-check that the polarity is correct before proceeding.
- Connect Appliances: Once the inverter is securely connected to the battery, you can plug your electrical appliances into the AC outlets on the inverter.

This image provides a visual guide for connecting the inverter to a 12V battery, showing the steps from preparing terminals to connecting appliances.
Inverter Front Panel Overview
Familiarize yourself with the inverter's front panel for easy operation and monitoring:
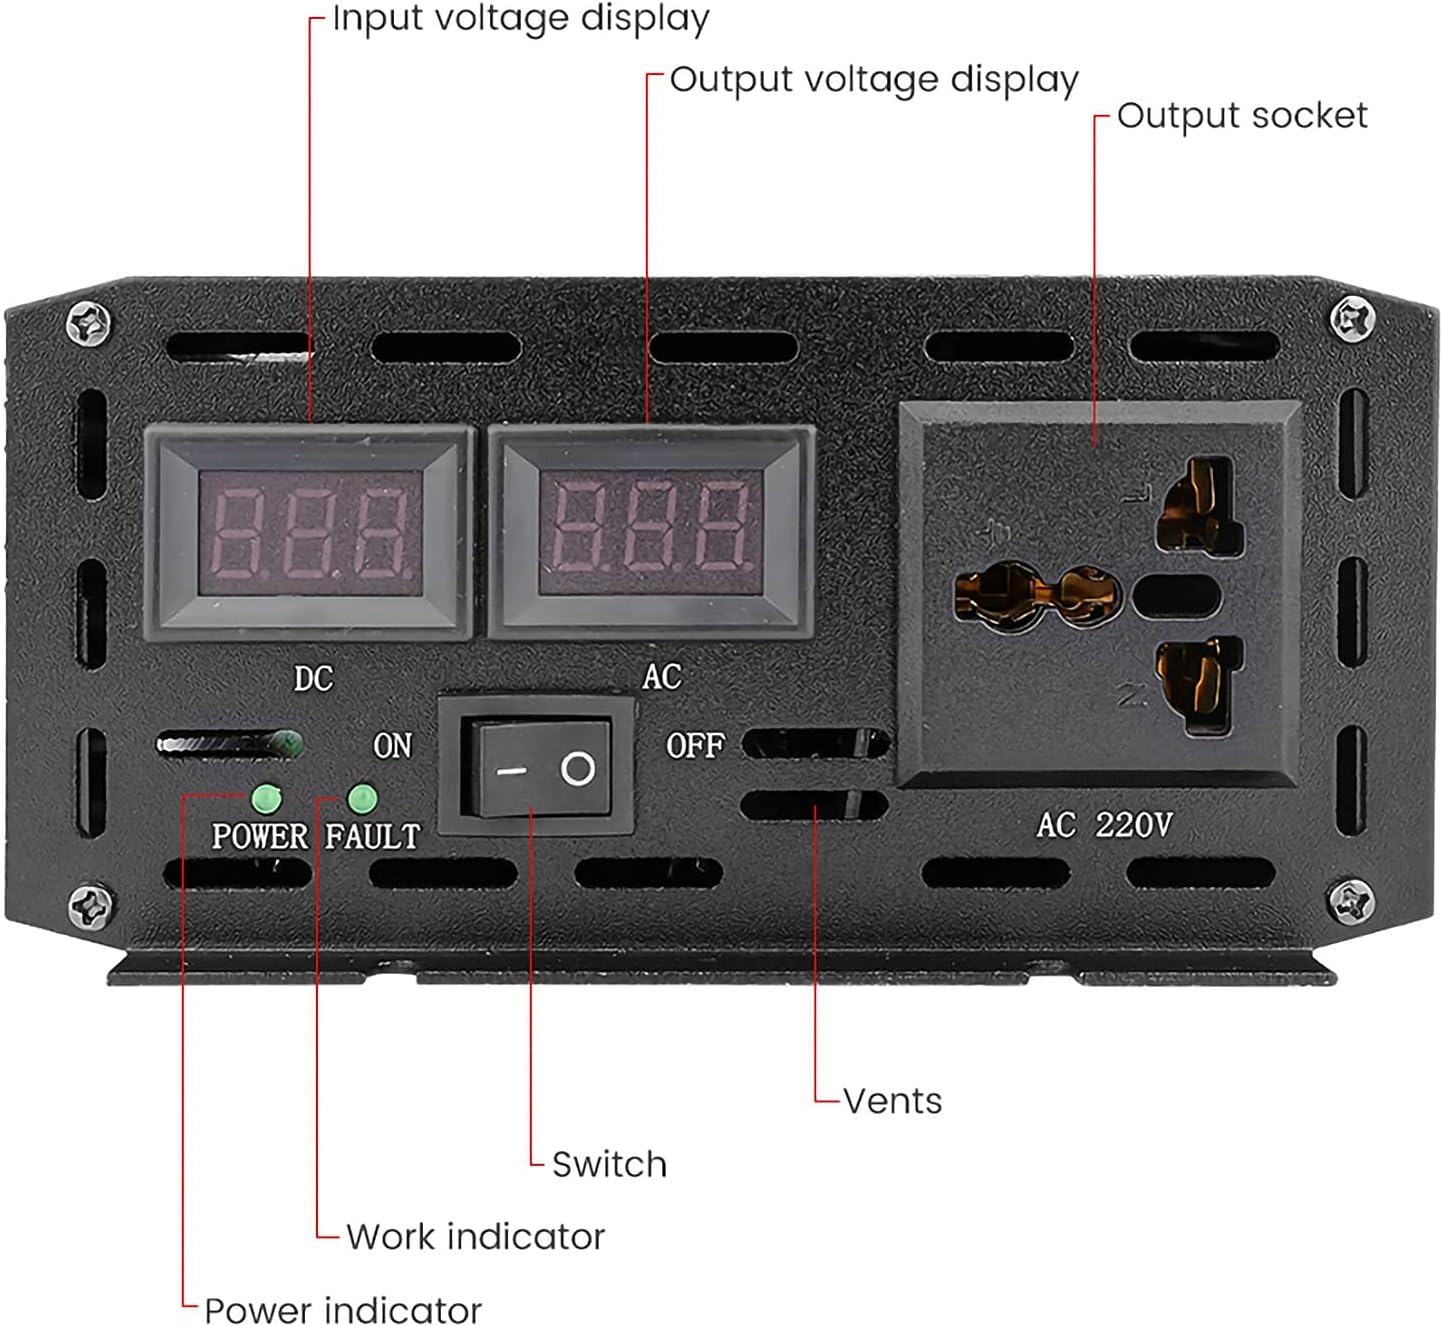
This close-up view of the inverter's front panel highlights key components including the input voltage display, output voltage display, AC output socket, power switch, work indicator, power indicator, and ventilation vents.
Connection Diagram Example

This diagram illustrates a typical connection setup, showing how the inverter integrates with a 12V battery and can be part of a larger system including solar panels and a solar controller.
7. Operating Instructions
After successful installation, operate your inverter as follows:
- Power On: Flip the power switch on the front panel to the 'ON' position. The power indicator light will illuminate, and the LCD display will show the battery input voltage and AC output voltage.
- Monitor Display: The digital LCD display provides real-time information:
- DC: Displays the current battery input voltage (e.g., 12.5V).
- AC: Displays the current AC output voltage (e.g., 110V).
- Battery Power Indicator: Shows the approximate remaining battery capacity.
- Warnings: Alerts for conditions like overvoltage, undervoltage, overload, or short circuit.
- Connect Appliances: Plug your 110V AC appliances into the inverter's outlets. Ensure the total wattage of connected appliances does not exceed the inverter's continuous output power (4000W).
- Power Off: When finished, disconnect all appliances and then flip the power switch to the 'OFF' position.

This image shows the inverter's intelligent dual voltage display, providing real-time monitoring of DC input and AC output voltages. Note that the AC output voltage displayed will correspond to your specific model (e.g., 110V for this model).
8. Maintenance
Regular maintenance ensures optimal performance and longevity of your inverter:
- Keep Vents Clear: Periodically check that the cooling vents on the inverter are free from dust, dirt, or obstructions. Use compressed air to clean if necessary.
- Check Connections: Regularly inspect all cable connections to ensure they are tight and free from corrosion. Loose connections can lead to power loss or overheating.
- Storage: When not in use for extended periods, store the inverter in a cool, dry, and well-ventilated place, away from direct sunlight and moisture.
- Battery Maintenance: Ensure your 12V battery is properly maintained and charged according to its manufacturer's guidelines. A healthy battery is crucial for inverter performance.
9. Troubleshooting
If you encounter issues with your inverter, refer to the following common problems and solutions:
| Problem | Possible Cause | Solution |
|---|---|---|
| Inverter does not power on | Loose battery connections, discharged battery, faulty fuse. | Check battery cable connections, ensure battery is charged, replace fuses if blown. |
| Low output power / Inverter shuts down | Overload, low battery voltage, poor ventilation leading to overheating. | Reduce connected load, recharge or replace battery, ensure clear ventilation around the inverter. |
| Alarm sounds (undervoltage) | Battery voltage is too low. | Immediately disconnect appliances and recharge the battery. |
| Alarm sounds (overload/short circuit) | Connected appliance draws too much power or there is a short circuit. | Disconnect the appliance. Check the appliance for faults. Ensure total load is within inverter's capacity. |
| Cooling fans constantly running | High ambient temperature, heavy load. | This is normal operation if temperature ≥ 45°C or load > 480W. Ensure adequate ventilation. |
10. Warranty and Support
For warranty information or technical support, please refer to the documentation provided at the time of purchase or contact inBEKEA customer service through the retailer where the product was acquired. Keep your purchase receipt as proof of purchase.